Lavron's '64 Build Thread

The Era of The Square Body Racing Comets
lavron
Site Admin
Posts: 4710
Joined: Sat Nov 01, 2003 9:17 am
Location: Missouri, Ozarks
Contact:

Re: Lavron's '64 Build Thread

Post by lavron »

Well the floor part from the parts car did not work too well for me, it had a couple of spots of rust through so I decided instead of repairing it I would just build my own, you can't really see the parts I made to go around the gas tank here because I started building the forward part of the floor.

Image

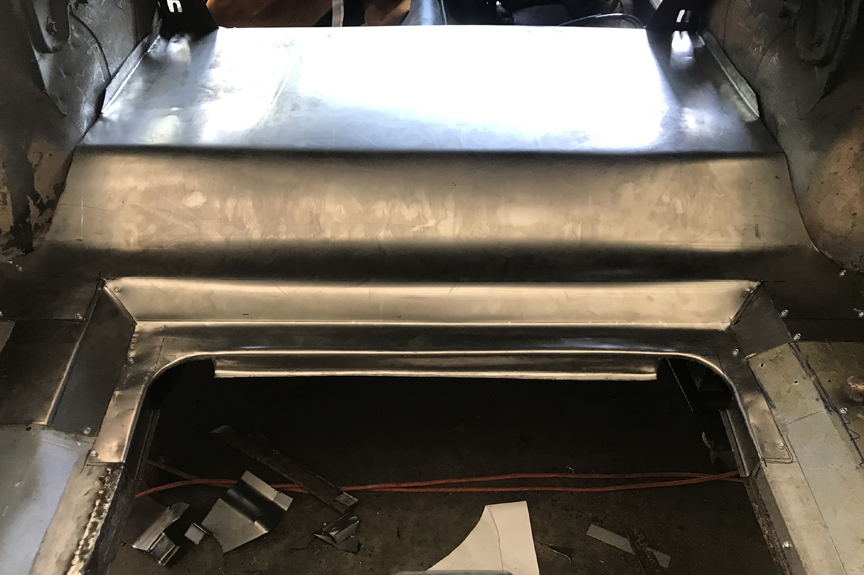
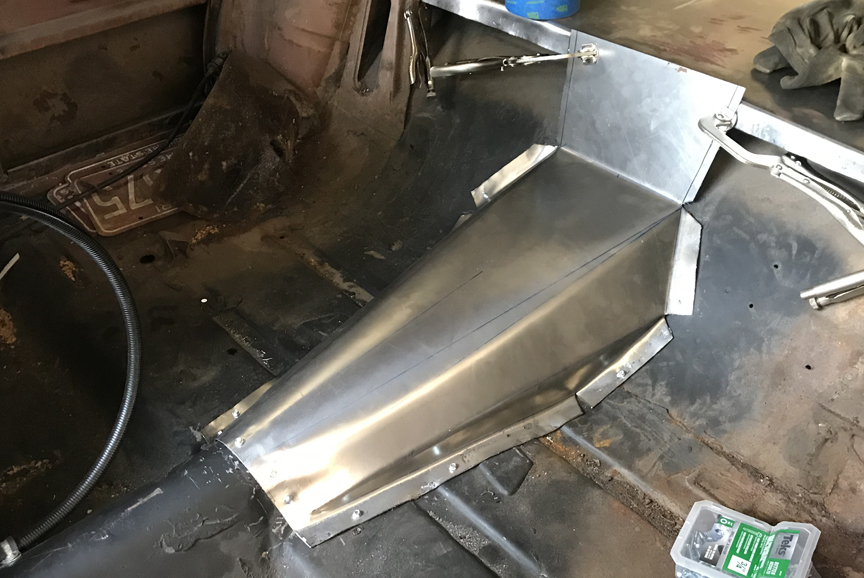
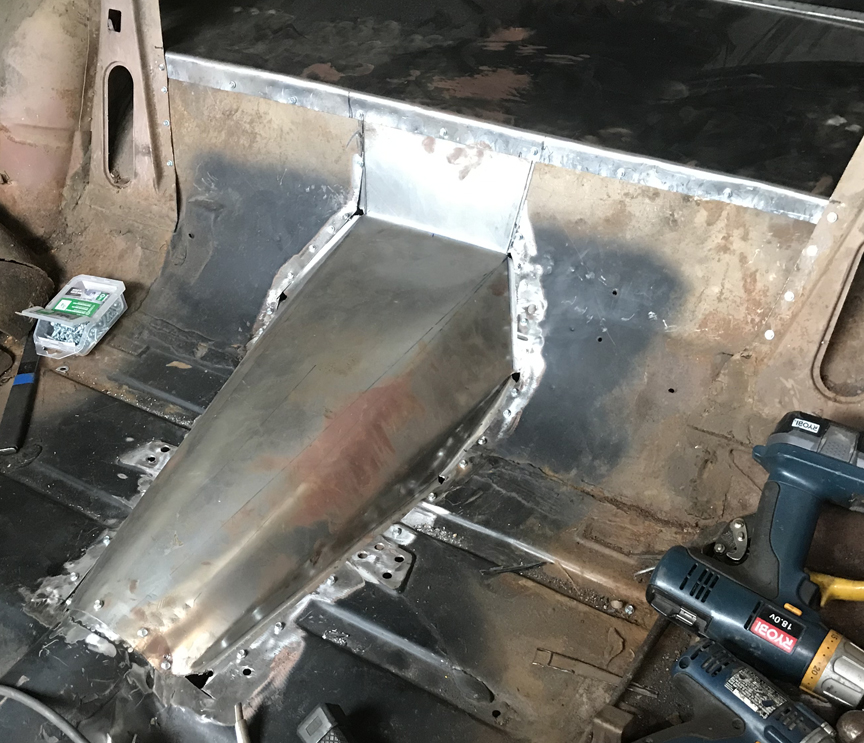
That was really a bite to get in there (it is wider than the trunk lid opening) and now I am ready to pull it back out so I can continue forming it, I tried to make so it was not a super snug fit but it turned out to be a super snug fit :roll:

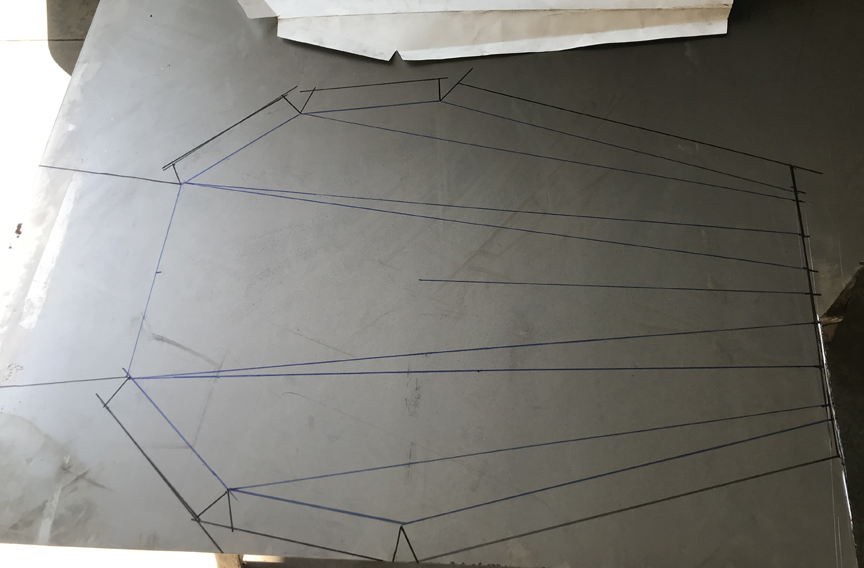
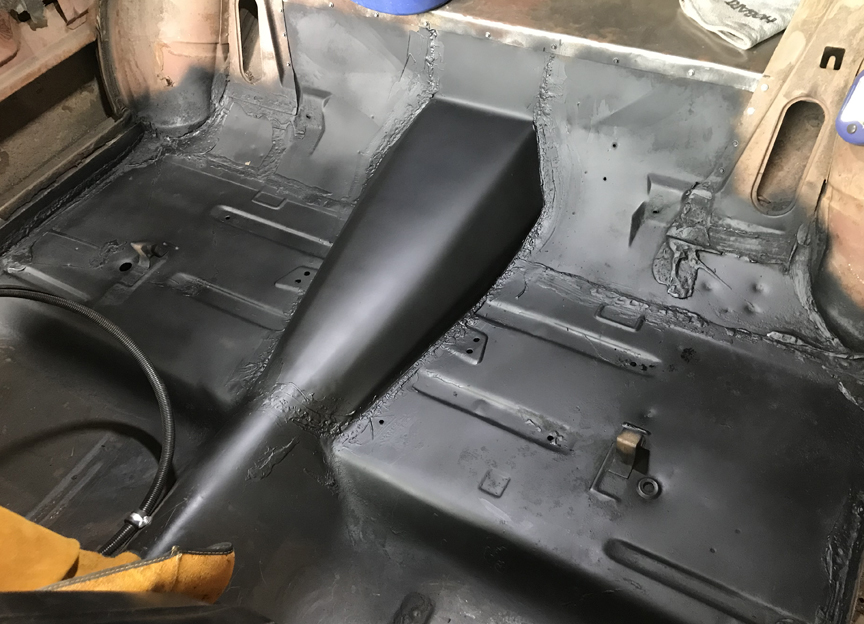
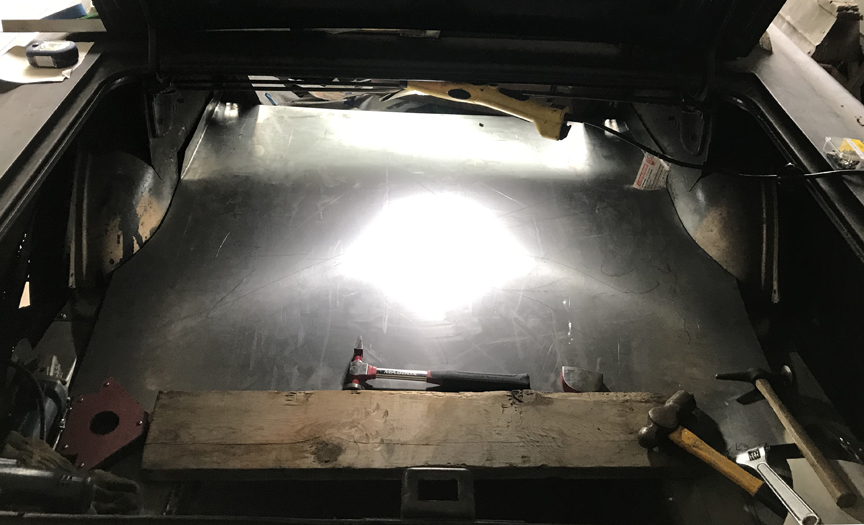
I need to get in the rear seat of the car and get everything leveled out and and then start curving it down toward the gas tank, I will say I made perfect cuts around the wheel wells but of course they are not long enough (I knew they wouldn't be) but thought it would be better to keep trimming and fitting. You probably can't see much in this picture but it will all make sense eventually :roll: I wish I had a bead roller so I could add a few ribs but hopefully it will be supported enough to keep from flexing much.

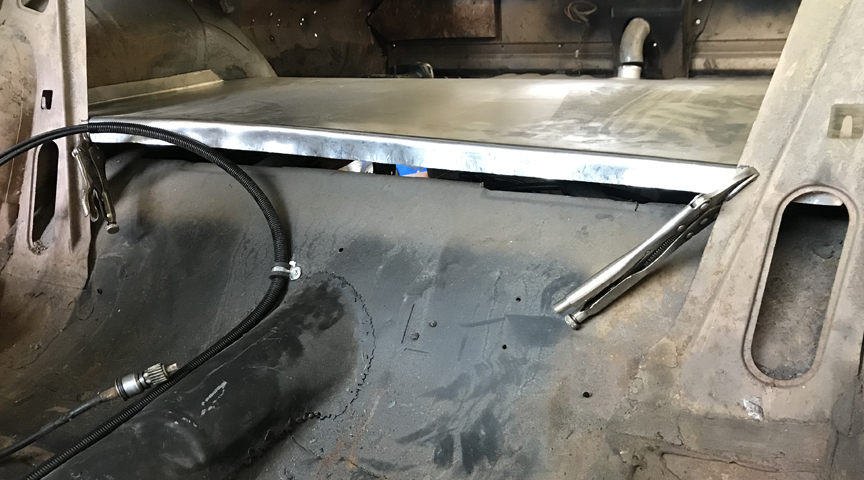
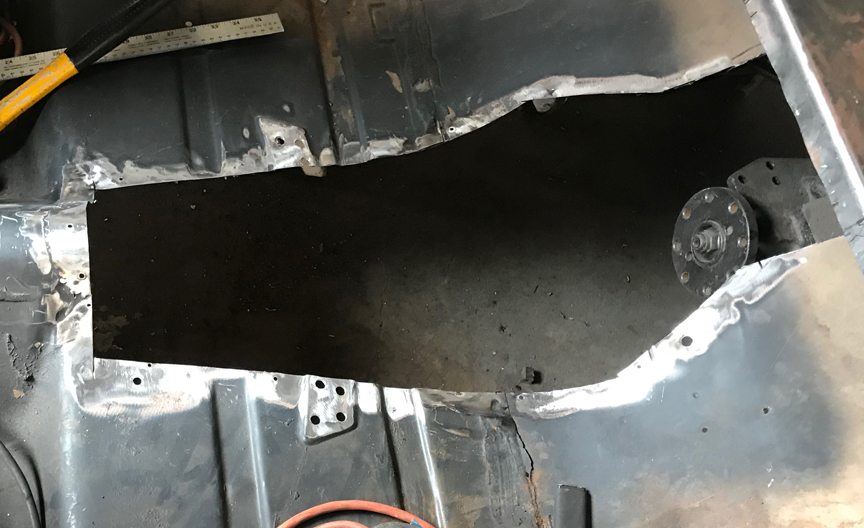
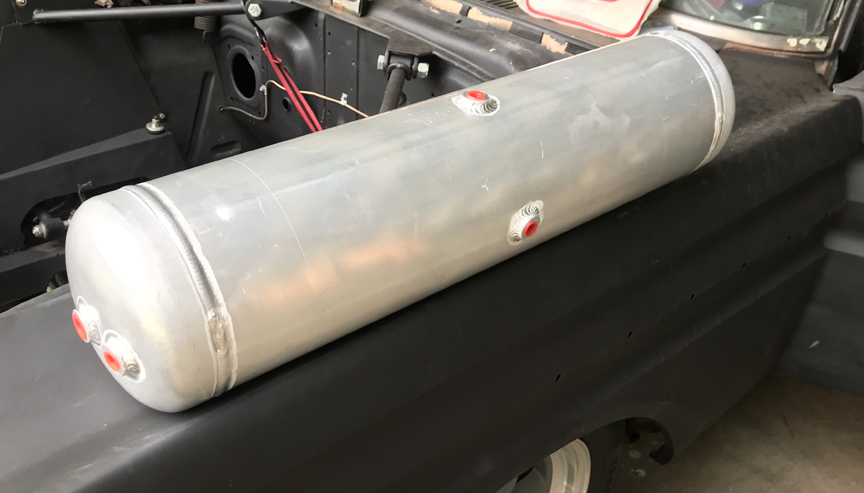
You can see on the left side I have a tab (too tall right now) going up the wheel well, where it ends the floor will start sloping down after coming back far enough to make the shocks removable under the car, I also need to cut and build wells for the air bag connections which should help some with stiffening it along with a a couple of plates to extend the frame up and seal off the top of the frame from elements and rodents. I should have plenty of room up front to mount the air tank and compressor.

Anyway moving along.

See Ya,
Mike
Mike's build thread
viewtopic.php?f=9&t=13058
Image

lavron
Site Admin
Posts: 4710
Joined: Sat Nov 01, 2003 9:17 am
Location: Missouri, Ozarks
Contact:

Re: Lavron's '64 Build Thread

Post by lavron »

Hot today, I got out early to work on my trunk floor/gas tank install build. this is not perfect by any means because I don't have the proper tools but if I waited for that I would never get anything done :roll: (a poor workman blames his tools)
Image
I hammer formed the rounded corners and still need to add the drop parts to those, Ford made those in separate parts as well and if I fail creating my own I will use the ones I have but want to try and make them.

This is by far the largest single part I have made but hasn't been too bad, I fixed a couple of spots on it and now it slides in much easier plus the rear corners are narrower and shorter now.
In the front I am going to roll/bend the original floor up and weld it too the new floor, I think it will be plenty strong.
Image

I know the front edge is wavy but I will get it hammer and dolled before I weld it in.

I fit the tank in and bolted it down, I had one minor error in that I made the hole a bit long, I was nervous to get it so tight the tank would be a bear to slide down in there, it still bolts down but the bolts are right on the edge of the bend.
Image

Like I said in a earlier post there are a few little filler parts I am going to make to go under the floor between the frame and floor, need one on each end and each side, I will have to try and crawl under the car and make patterns and probably tack weld them, then remove the floor and weld them in permanent before replacing the floor and welding it in, I need to build the wells for the air bag fitting access and I may or may not add some hammered ribs in the front part. One thing I am considering doing is adding two light weight 1" square tubes under the floor for support and to run my airlines through so they don't show in the trunk.

I still need to cut out the rest of the old floor on part of it so I will pulling everything back out to do that and then start welding it all together, but not today it is too hot and I dread even going out to pick up my tools and clean up.

Keeping on it.

See Ya,
Mike
Mike's build thread
viewtopic.php?f=9&t=13058
Image

User avatar
SASSY
Moderator
Posts: 5134
Joined: Sat Jan 07, 2006 12:32 am
Location: Wynndel, BC CANADA

Re: Lavron's '64 Build Thread

Post by SASSY »

Nice work! Ya tools, I feel the same way. Please quit putting your work down, that is someone else's job.
Fred
I'd rather do it myself if it's done right or not,,,isn't that what hotrodding is all about

Image

Lou's Comet
Posts: 1540
Joined: Sat Nov 26, 2011 8:56 pm
Location: Jeannette, Pa.

Re: Lavron's '64 Build Thread

Post by Lou's Comet »

lavron wrote:................and I may or may not add some hammered ribs in the front part...........
If you want some ribs/beads in the metal and don't have a bead roller you can take a router and rout a groove into a piece of wood. Place the wood under the metal, clamp it or if you don't have long enough clamp drill a few holes thru the metal into the wood to hold it with screws. Lay a piece of metal rod on top of the metal over the groove in the wood and hammer the rod to get your ribs. When done weld the screw holes shut and grind smooth. Takes a little longer than a bead roller but works, looks decent too. If the metal is thicker a little heat will help.

And I agree with Fred, very nice work. Really enjoy your build!!

Lou

lavron
Site Admin
Posts: 4710
Joined: Sat Nov 01, 2003 9:17 am
Location: Missouri, Ozarks
Contact:

Re: Lavron's '64 Build Thread

Post by lavron »

SASSY wrote:Nice work! Ya tools, I feel the same way. Please quit putting your work down, that is someone else's job.
Fred
Thanks Fred, I am happy with it so I guess that is all that matters, it looks so much better than a rusty floor (and stronger) and it is the trunk floor after all, it is going to get beat up from throwing stuff in the trunk, I also saved $500 by not buying a replacement floor pan that I would have had to cut to pieces since I changed the area over the rear diff (not sure there is even a Comet floor pan, I have only seen Falcon ones).

I am going to bed liner it when I am done so I think that will make it look fine, I might even do a little filler in a couple of spots but there is no way I am going to try and make it look like factory original (not that the trunk was all that nice in the first place)

It will cost me more to fill this car with gas than it does my truck :roll: hopefully I will be able to go a long ways between fill-ups, that is why I went with the larger tank, certainly there are pros and cons in that decision like it will weigh 132 pounds full as opposed to the original tank (14 gallons?) would weigh 84 pounds, of course I wouldn't have to fill it all the way up if I didn't need too.
Lou's Comet wrote:If you want some ribs/beads in the metal and don't have a bead roller you can take a router and rout a groove into a piece of wood. Place the wood under the metal, clamp it or if you don't have long enough clamp drill a few holes thru the metal into the wood to hold it with screws. Lay a piece of metal rod on top of the metal over the groove in the wood and hammer the rod to get your ribs. When done weld the screw holes shut and grind smooth. Takes a little longer than a bead roller but works, looks decent too. If the metal is thicker a little heat will help.

And I agree with Fred, very nice work. Really enjoy your build!!

Lou
Thanks Lou, I actually ordered some planishing hammers to fit the air chisel (haven't got them yet) and I was going to do something like you have suggested, I was looking at it today however and thought how nice and clean it looked and hate to run my air lines up out of the floor, so my idea is to recreate the opening to match the shock access hole in the stock floor (rubber plugs would fit) and run the air lines in channels under the floor that make stiffening ribs, that is why I said I may or may not add beads, I was going to wait and see how much stiffness the ribs added. Also if you look at this picture the floor sits directly on top of the big round crossmember (in the center of it) and the top of the shock mounts (on the outside edge) and will be welded to them.
Image

The other thing is that upper shelf is actually the home of the air tank and compressor.

See Ya,
Mike
Mike's build thread
viewtopic.php?f=9&t=13058
Image

lavron
Site Admin
Posts: 4710
Joined: Sat Nov 01, 2003 9:17 am
Location: Missouri, Ozarks
Contact:

Re: Lavron's '64 Build Thread

Post by lavron »

I didn't have much time today 2 1/2 to 3 hours so why not do something not even on the agenda (sort of) I was looking at the front part of the trunk floor install (between the trunk and the cabin) and decided I did not like this.
Image

One thing I am not going to have a back seat so that will show and it is not really big enough even though I enlarged it, so I got out a piece of poster board, made a pattern, transferred it to some metal and cut it out.
Image

Then I bent it up and made a new hump before it got to unbearably hot, and got it temp screwed down to the floor (I still need to cut out the old stuff)
Image

I like it and it should look better finished than the Frankenpatch. I think I will just cut off the old floor in the trunk down to where it starts to curve and put patches on each side.

More to come later.

See Ya,
Mike
Mike's build thread
viewtopic.php?f=9&t=13058
Image

lavron
Site Admin
Posts: 4710
Joined: Sat Nov 01, 2003 9:17 am
Location: Missouri, Ozarks
Contact:

Re: Lavron's '64 Build Thread

Post by lavron »

I cut a giant hole in my rear floor today :roll:
Image

I had to remove the e-brake mounts and a couple of line clips, also I had to leave just a little bit of Frankenpatch at the very front. The way I marked where the hole need to be is after screwing the patch on top of the floor (previous post) I took a drill and drilled a hole at each "V" notch then cut between each hole like connect the dots, I cut closer to the outside of the drilled holes so the patch would be able to move around a little.

I went ahead and folded the floor up to meet the trunk floor and got everything screwed in real well ready for welding.
Image

Too hot to weld today but supposed to be raining tomorrow and cooler, if it is I am going to try and get the hump welded in and then jump to the air bag cups and frame filler parts, of course I will show what I do :roll: :P

I used a lot of screws to hold this all together because there will be no way to clamp it in place, I am going to stitch weld along the seam and then remove the screws and weld up the holes. I did make a couple of errors trimming everything, you can see on the front left I trimmed too much of the patch and left a hole I will have to weld up (patch) and on the upper right side I trimmed too much floor out so my seam does not follow where I flanged the edge, no big deal again there is enough there to weld too.

It certainly did not take long to get rusty, like overnight. Everywhere my sweaty self touched it, the trunk floor is the same way :roll:

See Ya,
Mike
Mike's build thread
viewtopic.php?f=9&t=13058
Image

lavron
Site Admin
Posts: 4710
Joined: Sat Nov 01, 2003 9:17 am
Location: Missouri, Ozarks
Contact:

Re: Lavron's '64 Build Thread

Post by lavron »

Welded, sealed and primed.
Image

that part is mostly done, I still need to remove the rear seat clips from the floor.

Not sure why I refused to remove the front seats it was a bite crawling in the back past the seats and they limited my space as well, I guess I needed something to complain about :roll: Kneeling down welding is hard on my knees but I guess it beats overhead welding any day :P Guess I am glad that is finished so I can stand up and do the trunk mostly.

See Ya,
Mike
Mike's build thread
viewtopic.php?f=9&t=13058
Image

User avatar
Jims65cyclone
Posts: 2764
Joined: Sun Nov 23, 2014 10:29 pm
Location: Lexington, SC

Re: Lavron's '64 Build Thread

Post by Jims65cyclone »

Lookin' good, Mike. 8)

Jim
Image

lavron
Site Admin
Posts: 4710
Joined: Sat Nov 01, 2003 9:17 am
Location: Missouri, Ozarks
Contact:

Re: Lavron's '64 Build Thread

Post by lavron »

Jims65cyclone wrote:Lookin' good, Mike.
Thanks Jim.

Didn't get much time today but I pulled the floor and tank back out and made a pattern for the air bag connection well (don't really know what to call it) I am ready to transfer to metal and cut it out (maybe the first thing the new plasma cutter does) once those are bent up and installed along with a couple of other pieces I can get the floor welded in.

I also got this today;
Image

I think I mentioned I was looking at air tanks, this is a 5 gallon aluminum tank, there are also mounting hoops for it but I did not take them out of their boxes. I ordered my compressor also so it should be here soon, I think that is everything for the air ride system finally, as soon as the floor is in I can get it located and mocked in plus build the mount for the compressor.

I believe once the trunk floor is welded in it will be time to really seriously think about tipping the car up, the last structural things I need to do are the bottoms of the front torque boxes and semi structural is the outer rear wheel wells and the trunk drops (not sure how much they add to structural integrity). That will leave me with just the rear quarters to repair and the little bit of work on the cowl and all my rust will be gone :roll: :D

See Ya,
Mike
Mike's build thread
viewtopic.php?f=9&t=13058
Image

lavron
Site Admin
Posts: 4710
Joined: Sat Nov 01, 2003 9:17 am
Location: Missouri, Ozarks
Contact:

Re: Lavron's '64 Build Thread

Post by lavron »

I seem to not be taking pictures like I should, I got out today and cut out all the left side of the trunk floor except the piece I already patched in.

Image

I actually trimmed and welded in the replacement parts but I seem to have not taken any pictures of that (will do that later :roll: ) It looks good (relative). You can see the trunk drop is junk, however the trunk drop on the right side is fine (I did not expect that) so I will make a new one for the left side, I did not weld the floor to the drop. I will probably make the drop, weld it in and only screw it at the bottom until I can make the quarter panel patches, at least it will be in the correct place.

Also not pictured :roll: I got the floor supports all welded in for the front part of the floor, I only lack two pieces, once I make them and weld them in I can get the trunk floor welded in after I cut the rusty floor out on the right side and weld in my new parts there (remember the right side is basically one piece).

Anyway I am still keeping at it.

BTW - the machinist called me today and the short block is ready to pick up, I told him I would bring my head when I came to get it so it could get hardened seats and new (slightly larger) valves, I want him to check the head and make sure it is ok before buying that stuff.

See Ya,
Mike
Mike's build thread
viewtopic.php?f=9&t=13058
Image

lavron
Site Admin
Posts: 4710
Joined: Sat Nov 01, 2003 9:17 am
Location: Missouri, Ozarks
Contact:

Re: Lavron's '64 Build Thread

Post by lavron »

Just got home today with this;
Image
I did not know he was going to paint it, I told him blue was not what I had in mind :P but it was the correct color for a '78 block, will repaint it black (the correct '64 block color :roll: )

Dropped the head off he said he might be able to check it today for cracks or any other issues, going to put the '78+ valves in it (head is a '72, '78+ had larger intake valves) and hardened exhaust seats, Viton valve seals. Still deciding on valve springs, may do 302 springs or dual after market, I guess it depends on the cost difference.

Now I need to call on figuring out the cam profile and get my cam ordered and get this started going back together.

See Ya,
Mike
Mike's build thread
viewtopic.php?f=9&t=13058
Image

Cobraguy
Posts: 39
Joined: Wed Sep 12, 2018 10:35 am
Location: El Cajon CA

Re: Lavron's '64 Build Thread

Post by Cobraguy »

The hardest thing to find will be a timing set.

lavron
Site Admin
Posts: 4710
Joined: Sat Nov 01, 2003 9:17 am
Location: Missouri, Ozarks
Contact:

Re: Lavron's '64 Build Thread

Post by lavron »

Cobraguy wrote:The hardest thing to find will be a timing set.
Clay Smith Cams has them, they sell the early and late set.

See Ya,
Mike
Mike's build thread
viewtopic.php?f=9&t=13058
Image

Lou's Comet
Posts: 1540
Joined: Sat Nov 26, 2011 8:56 pm
Location: Jeannette, Pa.

Re: Lavron's '64 Build Thread

Post by Lou's Comet »

Your cam manufacturer will tell you what type/pressure valve springs to run with the cam. You might want to talk to them in case the head needs machine work for the springs, before you have the head work done?

Lou

Post Reply