Lavron's '64 Build Thread

The Era of The Square Body Racing Comets
lavron
Site Admin
Posts: 4710
Joined: Sat Nov 01, 2003 9:17 am
Location: Missouri, Ozarks
Contact:

Re: Lavron's '64 Build Thread

Post by lavron »

This is an update of a listing I did way back in July 22, 2016 before I actually started building my Comet, I have gone through and updated it and added some parts numbers in case (for some reason) anyone wants to do something crazy like I am doing. It is also a good place to keep some information for my feeble mind to be able reference in the future :roll:

There are a few things listed here like I have them already but I don't, I have just decided they are what I am going to buy (most of this I have and is installed even).
SUSPENSION
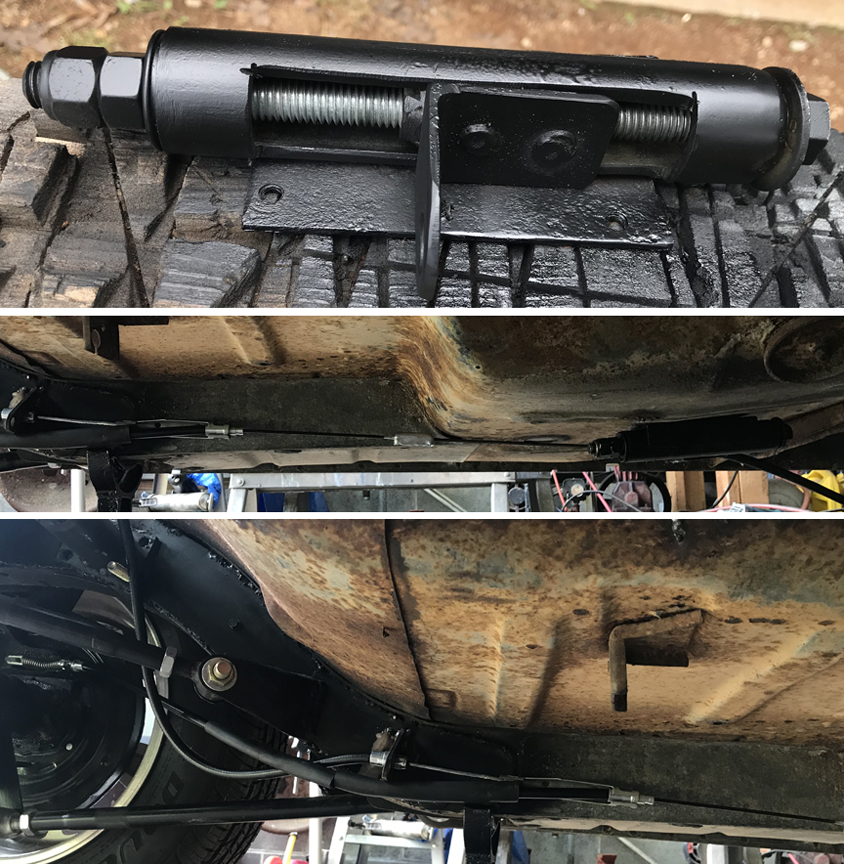
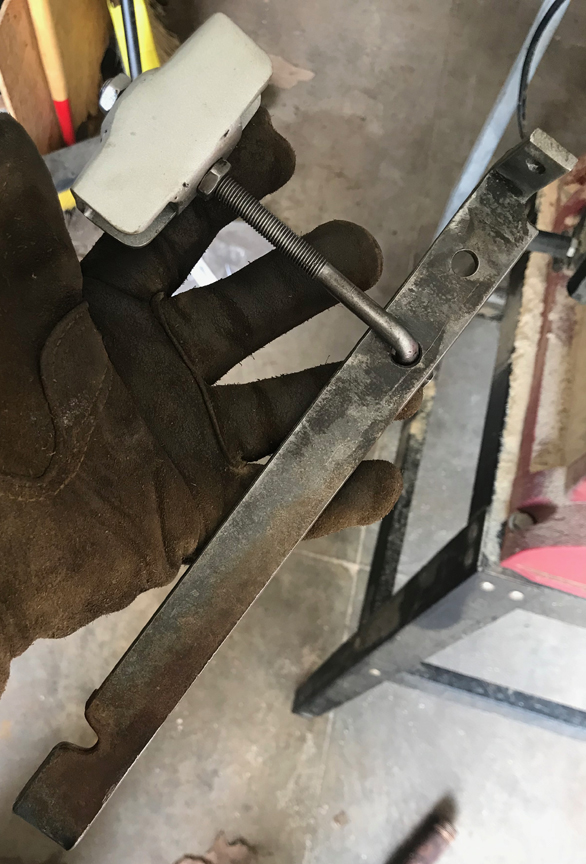
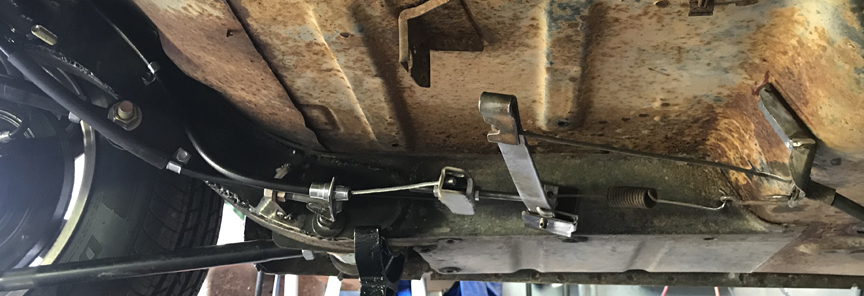
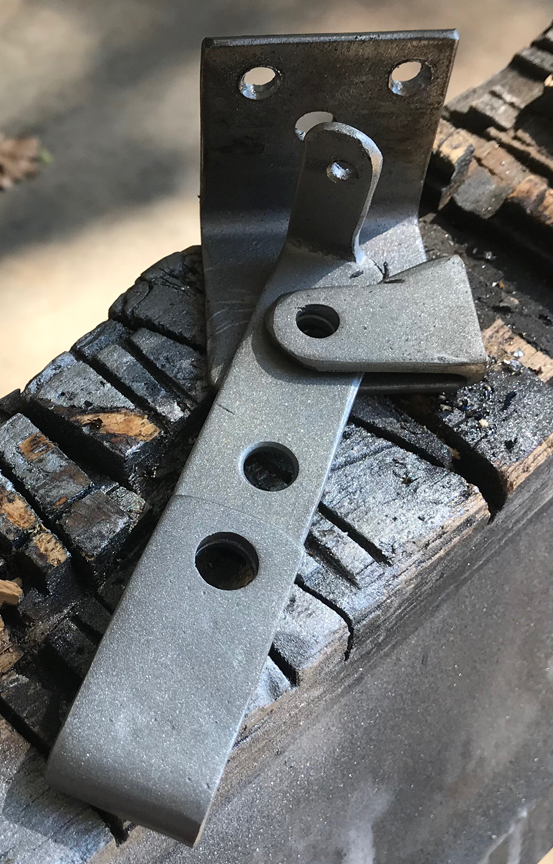
REAR - 4-link (Johnny Law/Hoffman Group universal kit purchased off eBay), 8.8 rear out of a '98 V8 Mercury Mountaineer with 3.73 trac-lock & disc brakes, narrowed at home to 56 3/4" by using a second passenger axle on the drivers side, Airbags (Slam Specialties SS-6 Bags), Rear Shocks from 1997 Mitsubishi Montero Sport (KYB KG4034), misc homemade brackets (upper shock mounts, etc)
FRONT - 1974 Mustang II manual R&P, MII 2" drop spindles.
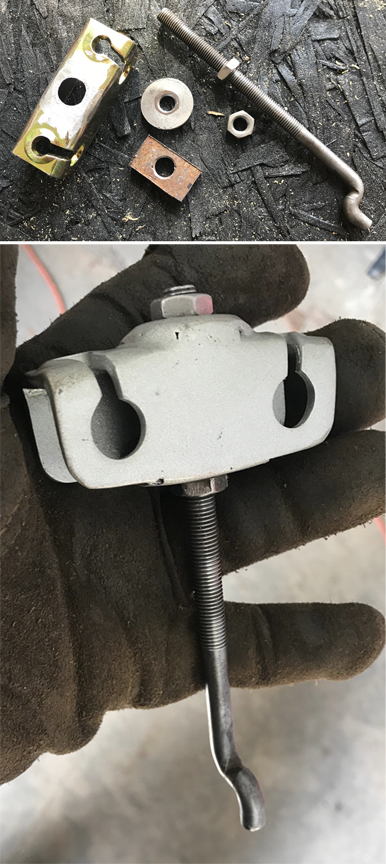
crossmember (Welder Series 56.5 wide, plus homemade parts), Tubular Lower & Upper Control Arms with lower bag plates (GearHead off eBay), Airbags (Slam Specialties SS-5), Disc Brakes (pieced together including; 11” rotors, brake brackets & metric calipers from Speedway Motors), Front Shocks 1982 Checker Marathon Cab (KYB KG5404 with bar pins removed) on a custom fabricated bracket, Modified Steering column sleeve out of a floor shift early ‘60s Mustang fabricated steering shaft by cutting original from steering box and adding bearing and parts from farm supply store, Sway bar Helix 56.5" kit (HEXSBK4).
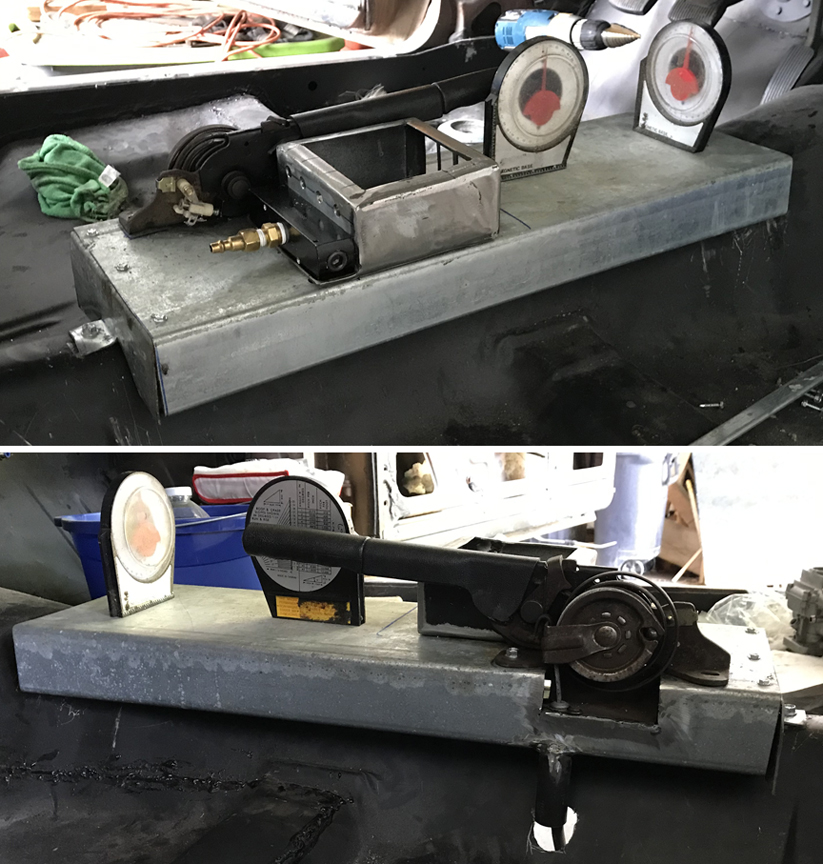
ONBOARD AIR SYSTEM - Many fittings that are push to connect (PTC) DOT certified from Bag Riders and Michigan Truck Brakes?, Manual paddle valves in a fabricated box - Tank and Compressor not purchased yet
TIRES & WHEELS - Tires Douglas Tires from Wal-Mart (P225/60R16 rear, P195/65R15 front), modifying rear wheel wells outer housing to clear, set the rear back 1-1.5“. Wheels are American Racing Torque Thrust 2 in 16x7” (4”BS) rear and 15x6” (3.5”BS) front.

BRAKES - 4 wheel disc listed above (’98 Ford Explorer & Speedway Metric), 1985 Lincoln Town Car Brake master cylinder (Cardone 131518), Wilwood portioning valve (260-8419), 3/16” Copper-Nickel brake line with self installed flare nuts

ENGINE - 250 cid inline 6 out of a '77 Maverick bored .020 over, Silv-O-Lite pistons for an Australian 250 (part 3332H+.020) rods from 1986-91 Ford Tempo/Topaz (2.5L HSC/OHV) ARP connecting Rod bolts (ARP-154-6002), Stock oil pump (Sealed Power 22441165), GMB OE replacement aluminum water pump (125-1380); Head ’72 200 cid “M” Flat Log with 1977-82 intake (1.76) and exhaust (1.38) valves and hardened seats, 302 valve springs, Adjustable rocker arms from an early 144-170 Ford 6, Self made cast aluminum 3x2 intake with 3 1983 Ford Escort Carbs (Motorcraft 740/5740 progressive 2 barrel),'67-'72 250 stock timing chain set, custom fabricated rear sump oil pan, still to be determined; cam, lifters, pushrods, gaskets, distributor and bearings.

EXHAUST - Dual out stainless header (from eBay), Dual in and out Muffler for 2-2.25” or 2-2.5" pipes (Magnaflow MPE-11385 or MPE-113790).

TRANSMISSION - 1996 3.8L Mustang T-5 Borg Warner, Tag Number 1352 238 gearing; 265 3.35 1.93 1.29 1.00 0.73, Input Shaft Length & Diameter 7.85-0.668. Clutch 2002 Mustang V6 (LUK 07114) , 96 Mustang V6 3.8L bell housing, 2002 Mustang 3.8L V6 168 Tooth, zero balance Flywheel (SACHS NFW1175), ARP pressure plate bolts (ARP-134-2203) & ARP Flywheel bolts (ARP-200-2802), Home Fabricated Hydraulic clutch setup (1986 Toyota Land Cruiser master [AISIN CMT032], 1992 Isuzu Rodeo slave [Centric 139.43005]) homemade brackets, AN-3 36" braided SS hose. Aluminum Driveshaft from a 2009-11 Crown Vic Police Car.
If I missed a part number I will go back in and edit it later to add it here.

See Ya,
Mike
Mike's build thread
viewtopic.php?f=9&t=13058
Image

lavron
Site Admin
Posts: 4710
Joined: Sat Nov 01, 2003 9:17 am
Location: Missouri, Ozarks
Contact:

Re: Lavron's '64 Build Thread

Post by lavron »

Started working on my console base today, I have decided to put the fuse boxes just behind this section, I know it would make more sense to have them further forward but this looks to be a convenient location.

Image

That is my air ride controller box that I cut down smaller so I could put the brake handle next to it. I used the original e-brake cable on the hand brake lever because I had it and it is fairly new (has little use) because I parked the car right after I installed it, I have an idea on how I am going to connect it to the rear lines but will decide for sure after I get under the car again and contemplate on it.

I am going to make a full length console running from the rear firewall (back of rear seat area) to up under the dash, will have my wiring and air lines running inside of it, I was even thinking about running my rear brake line in it but not my fuel line.

See Ya,
Mike
Mike's build thread
viewtopic.php?f=9&t=13058
Image

lavron
Site Admin
Posts: 4710
Joined: Sat Nov 01, 2003 9:17 am
Location: Missouri, Ozarks
Contact:

Re: Lavron's '64 Build Thread

Post by lavron »

Little more on the E-Brake install, not really a lot to show on the car, basically I cut a pipe to fit in the hole in the floor that the pipe coming down from the console base would slip inside for my cable to come up through. I welded it in.

Image

The main thing I did was figure out how to hook everything up the rear brakes, the Explorer bake cables should work fine, it is a bit of a mystery how they work where they come together and I had to search and search to finally find a picture. Here is the picture(s) I found, so these are not mine, they were off of a Ranger/Explorer forum.

Image

As you can see the passenger cable comes over and attaches to the mid-cable going forward and the "equalizer" bracket clips over the end of the jacket and then the left cable clips to the bracket and a frame bracket. What is odd to me is nothing holds the right cable, I can not figure out how that pulls the left cable, but I guess it works :roll: The issue I am going to have is figuring out how far back to mount the frame bracket to get them to pull even because there is no adjustment.

And the right cable I have is stuck so I am just going to order both of them new, seems to be a common issue from what I have read. The weird thing about the one I have is the frame bracket was attached to the right cable (the brackets were cut off by the JY and left hanging on the cables) but appears hooked up the same as above just in reverse, I guess it wouldn't make a difference, it is magic to me anyway :roll:

See Ya,
Mike
Mike's build thread
viewtopic.php?f=9&t=13058
Image

lavron
Site Admin
Posts: 4710
Joined: Sat Nov 01, 2003 9:17 am
Location: Missouri, Ozarks
Contact:

Re: Lavron's '64 Build Thread

Post by lavron »

Here is the only picture of my E-Brake cables I could find from when I brought the rear home.
Image

You can see the frame bracket on the passenger cable

See Ya,
Mike
Mike's build thread
viewtopic.php?f=9&t=13058
Image

lavron
Site Admin
Posts: 4710
Joined: Sat Nov 01, 2003 9:17 am
Location: Missouri, Ozarks
Contact:

Re: Lavron's '64 Build Thread

Post by lavron »

Finally got the wedding out of the way and all my house guests sent back home :P

My new brake cables came in and I got them installed, trying for the stock Explorer configuration in the back (even though I don't understand the concept) I have mostly just mocked it all in but mostly operational, I need to finish welding the frame bracket on because it is just tacked in place but actually seems well attached so full welds should make it solid, lucky it is mounted to my 1/8" frame plating in the rear that the 4-link brackets are attached too so I can burn it in good on both sides.

I spent most of my time today building a funky adjustable cable mount for the cable coming from the lever between the seats, because I did not know how much slack I was going to have to take up to get the rears to balance out, right now they seem about the same after adjusting the shoes out (I had to pull the right one apart because I put the adjuster in backwards and the star wheel was not aligned with the backing plate hole) kinda shooting in the dark with a lot of this.

I have not pulled everything really tight yet because I need to get the bracket fully welded but if it doesn't work I bought a regular brake cable balance bracket and I will just mount the left cable to the frame as well and pull on both cables instead of one cable jacket pulling the other cable. Right now I have 3 ways to adjust the cable, at each rear wheel using the star adjusters and then my front mount adjuster, the handle also has an auto tightening feature as well but I am not sure if I need to disable that.

I will try and take some pictures tomorrow after welding everything down.

I had to pull my rear wheels off (well one but I did both, mistakenly) and I am going to have to come up with a solution, even after airing the tires completely down I had to fight to get them out and there was no way they were going back in, I had to disconnect my air bags so I could drop the rear down to the limit of the shocks and still had to struggle to get the flat tires up in there, I can't be disconnecting the air bags every time I need to change tires, my first plan is to nearly remove the fender lip and then see if I can get them off and back on, don't really have a second plan :P

See Ya,
Mike
Mike's build thread
viewtopic.php?f=9&t=13058
Image

lavron
Site Admin
Posts: 4710
Joined: Sat Nov 01, 2003 9:17 am
Location: Missouri, Ozarks
Contact:

Re: Lavron's '64 Build Thread

Post by lavron »

Repaired this NOS DS1 distributor today, I bought it off eBay a while back expecting it to be a DS2 but it is not, it had an odd part "number" scrawled on the side.
Image

It appears to have once had a designation "number" added I can make out the first and last letters to be S an T with what appears to be two letter/numbers in the middle, maybe "hi" or "h1" :roll:

Eventhough I believe this a brand new distributor (it certainly appears to be) the breaker plate was completely seized up on the breaker plate base, it almost looked like someone tried to pry it off without first removing the snap ring, I had to tap it back down and remove the snap ring and then basically pry the breaker plate off, the center part was gummed up with something, maybe some kind of hardened grease, I cleaned it with some fine wet or dry 220 sandpaper and brake cleaner, got it operating smoothly and applied a little lithium grease to the mount and reassembled everything.
Image

I cleaned the case up and removed all the extraneous markings in the process, everything appears to operational and smooth rotating now when I suck on the vacuum advance port now. I am not sure what cap and rotor to use but I think it is just a the regular load-o-matic cap, I looked up a '74 Maverick 250 on RockAuto and they showed the OEM part number as F2111 and it looked like a regular cap.

I think I will build my own ignition box using a 4 pin HEI module once I run down the directions again :roll:

See Ya,
Mike
Mike's build thread
viewtopic.php?f=9&t=13058
Image

popscomet
Posts: 9689
Joined: Sat Jan 01, 2011 11:19 pm
Location: Jacksonville, Arkansas

Re: Lavron's '64 Build Thread

Post by popscomet »

I like the manual oiler spout,,recall my dad ever so often checking the oil and would always hold that little cover open and let a drop or 2 from the dip stick go into it,,of course later on I did the same...he was a good role model :D :wink:
Image
pop/glenda

lavron
Site Admin
Posts: 4710
Joined: Sat Nov 01, 2003 9:17 am
Location: Missouri, Ozarks
Contact:

Re: Lavron's '64 Build Thread

Post by lavron »

popscomet wrote:I like the manual oiler spout,,recall my dad ever so often checking the oil and would always hold that little cover open and let a drop or 2 from the dip stick go into it,,of course later on I did the same...he was a good role model :D :wink:
Sounds like good advice to me.

Sorta got my e-brake installed today, still not pulling the right brake :roll: I am going to try one more thing before I throw in the towel and hook them up with an equalizer bar.

Here is the adjuster I built, kinda overkill but it was stuff I had on hand, needs a locking bolt or something similar in it and of course I decided that after I welded it to the floor.
Image

Also the middle picture shows it welded to the floor, it will adjust enough to pull the brakes on, at least the left side.

In the lower picture you can maybe see the whacky way this e-brake system works, this looking at the left side, the left cable is the short one running from the drum up to the front pulling cable, it floats free basically it is only attached to the rear drum bracket, the inner cable connects to the brake lever and the jacket is clipped to the drum bracket, going forward everything else free, the front inner cable is attached to the front pulling cable and there is a clip on the jacket that is attached to the right inner cable and then the right jacket is clipped to the frame bracket, the right hub end is the same as the left. As near as I can tell the way it is supposed to work is when you set the brake in the cabin it pulls the left cable tight and stretches the left jacket as tight as it can go pulling the right cable :roll: all seems kinda of dumb to me, or maybe I am the dumb one.

My next test is too disconnect the right cable from the frame and stack some big nuts behind the frame bracket until I can get enough slack pulled out of the right cable so it will pull even with the left, if I don't have to put too many nuts behind there I can cut off the frame bracket and move it back once I know where it needs to be (I wish I had not welded it solid) failing that I will do the equalizer bar, only problem is I will have to cut the adjuster I made off the floor and move it back because the cables will all be too short to reach (it would be better this way because I could weld the adjuster to the frame instead of the floor).

Fun times.

See Ya,
Mike
Mike's build thread
viewtopic.php?f=9&t=13058
Image

lavron
Site Admin
Posts: 4710
Joined: Sat Nov 01, 2003 9:17 am
Location: Missouri, Ozarks
Contact:

Re: Lavron's '64 Build Thread

Post by lavron »

My e-brake saga continues, I went out today and started looking at the way the Explorer e-brake hooks and thought "screw it" I am not messing with this anymore, so I took another inventory of parts on hand and laid under the car a little while staring at it, so far this is my solution; I had bought some cheap add-on brake brackets from Amazon (mostly $2-$3 bits) one thing I mentioned was a regular equalizer bar I could understand the function of :roll: only problem was the center hole was too large to fit the original adjuster off the Comet so I welded some parts too it.
Image

Then disassembled the original for the brake arm.
Image

I didn't take a picture of it for some reason, but I built a new pivot mount to attach to the frame and rerouted the brake cables so the left one went into the original hole where the right cable had been and made a bracket to hold the right cable with some angle iron and a fine thread grade 8 bolt that fit into the extra hole on the original mount (didn't take a picture of it either :roll: ) the reason I made the adjustable mount for the right cable is because the pulled part of the right cable is shorter than the left and I did not want to cut the cable ends off (and it is adjustable) I secured both of the brake cables up on the frame with some stainless hold downs and self tapping screws.

I also made a new bracket for the front cable (I did take a picture of it) I probably got too much angle in the bend but I think it will work ok, the second hole is supposed to be for the return spring.
Image

I temp screwed the pivot bracket to the frame and the front bracket to the edge of the rear seat riser and attached all my cables, I was not man enough to get to the spring attached so I made a temporary wire extension.
Image

It actually works if I am laying under the car and push the lever forward, however I need to do some more modification, I think the arm is too long so I don't have enough pull with the handle, I believe the "between the seats" e-brake levers are meant to direct pull the rear cables, they don't have a lot of travel. I think I can make a temp lever to test this out or try and clamp the front cable with some vise grips at different locations down the current arm to see what is an optimal length.

I also have a little issue with the lever binding but think that is from the frame bracket twisting because it just has one screw holding it, it won't twist when I weld it permanent but did not want to do that until I was sure it was in the right place. I am pretty sure I will have to shorten the front cable as well but I have some clamp on cable ends so I can do that and I need to weld a gusset on the rear frame mount now that there two cables secured to it.

See Ya,
Mike
Mike's build thread
viewtopic.php?f=9&t=13058
Image

popscomet
Posts: 9689
Joined: Sat Jan 01, 2011 11:19 pm
Location: Jacksonville, Arkansas

Re: Lavron's '64 Build Thread

Post by popscomet »

wouldn't it have been much easier to just carry you a brick and scotch a whl ???? :lol: :lol: POP is a nerves wreck trying to keep up with you and your doings !! :lol: ................just kidding,,,keep it up your doing fine 8) :lol: :lol: :wink:
Image
pop/glenda

lavron
Site Admin
Posts: 4710
Joined: Sat Nov 01, 2003 9:17 am
Location: Missouri, Ozarks
Contact:

Re: Lavron's '64 Build Thread

Post by lavron »

popscomet wrote:wouldn't it have been much easier to just carry you a brick and scotch a whl ????
Maybe a rope and pulley system so I could drop them from the drivers seat :roll: :P :lol:

I think I may be getting close to wrapping up this e-brake system, even though it is a somewhat redundant/optional system after having too use then twice to stop the car after blowing wheel cylinders they are kinda of important in my mind. Probably why I am overdoing the brake system, I never want to step on the pedal while driving down the highway and have it go to the floor again (brake failure parked the car last time as well).

See Ya,
Mike
Mike's build thread
viewtopic.php?f=9&t=13058
Image

lavron
Site Admin
Posts: 4710
Joined: Sat Nov 01, 2003 9:17 am
Location: Missouri, Ozarks
Contact:

Re: Lavron's '64 Build Thread

Post by lavron »

Went ahead and just made a short e-brake arm this morning.
Image

I put it on and moved the front cable bracket out closer to in-line with it, still needs some tweaking but I think it will work, I haven't cut the front cable yet or welded anything permanent so it is a little hard to get everything adjusted.

I do think I can get the return spring on now :roll: but did not try too hard because it will have to come back off because I think the front bracket needs to be cut, straightened a little, and re-welded so it is vertical.

Pretty sure I will have this wrapped up the next time I work on it (next week hopefully).

See Ya,
Mike
Mike's build thread
viewtopic.php?f=9&t=13058
Image

User avatar
poboyjo65
Moderator
Posts: 7059
Joined: Thu Oct 20, 2011 9:40 pm
Location: Camden, Tenn.

Re: Lavron's '64 Build Thread

Post by poboyjo65 »

looks short. you losing a lot of leverage.but maybe you dont even need a lever? did the new style hand lever that you are using use to have a lever or was it just a straight pull to the triple tree/equilizer?
Image
Johno

lavron
Site Admin
Posts: 4710
Joined: Sat Nov 01, 2003 9:17 am
Location: Missouri, Ozarks
Contact:

Re: Lavron's '64 Build Thread

Post by lavron »

poboyjo65 wrote:did the new style hand lever that you are using use to have a lever or was it just a straight pull to the triple tree/equilizer?
Don't know I bought it off eBay, I think it is a '98 Cobra Mustang handle (sure no different that any Mustang) I think you don't need the leverage because the you get that with the handle and there is not a lot of pull. my thoughts are that style of handle is direct pull.

See Ya,
Mike
Mike's build thread
viewtopic.php?f=9&t=13058
Image

lavron
Site Admin
Posts: 4710
Joined: Sat Nov 01, 2003 9:17 am
Location: Missouri, Ozarks
Contact:

Re: Lavron's '64 Build Thread

Post by lavron »

I did get e-brake stuff all welded on today, I think it works, well it did until I popped one of the brackets off (the front one) I have been having an issue with my welds being very porous the last couple of days (pretty poor actually, I had just changed gas and had to check and make sure they didn't give me pure argon again) I think I figured it out this evening, there was a big chunk of slag down the nozzle, I got it out but went ahead and switched the tip and nozzle with new ones that I had already, I will test it out tomorrow and see if that is the issue.

Here is the frame bracket I did not take a picture of last time, it is welded to the side of the left rear torque box now (ran a bead down each side and in the holes, I think it will stay)
Image

Even if the welder is doing ok now I think I will re-design the front bracket so it will weld to the frame as well instead of the floor (or in addition to the floor) and then see if I can break it again :roll:

See Ya,
Mike
Mike's build thread
viewtopic.php?f=9&t=13058
Image

Post Reply