Lavron's '64 Build Thread
Re: Lavron's '64 Build Thread
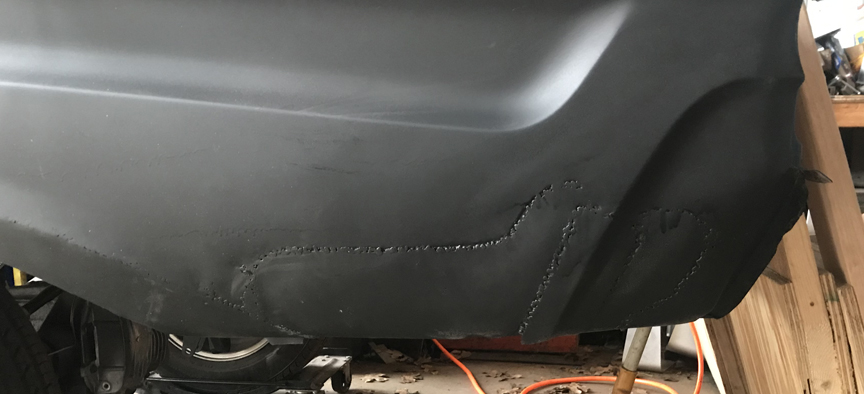
So this patch area your working is that a white spot high lighting it on your signature pic or the sunshine on the grass on the other side of the car??? 

I'd rather do it myself if it's done right or not,,,isn't that what hotrodding is all about

Re: Lavron's '64 Build Thread
Yep this is the same spot in the sig pic, that is the sun shining through the car window and out the quarter panel because there is no back seat. Soon it won't be able to do thatSASSY wrote:So this patch area your working is that a white spot high lighting it on your signature pic or the sunshine on the grass on the other side of the car???
There are 3 or 4 spots of rust left on the car, this quarter and trunk drop, the outer part of the inner wheel wells (what I haven't already cut out) the torque box on the drivers side (I already cut it all out of the passenger side, it just needs a new bottom welded on it) and some pin holes in the cowl (that are only getting patched) once this quarter is patched the rest should be fairly easy the problem with what I am doing now it is on the outside where everyone can see it
Can't wait to have the quarters done (1/2 way there) it has been something that has bugged me for 40 years.
I hope me showing how I am doing this will help someone in the future see that they can fix this stuff without going out and buying patch panels (if they even could) or pristine quarter panels there are ways to do things if you set your mind to it and if you are cheap like me, is it the ideal way to do this? No, but I think they will look pretty good when done and last a few years. I would suggest getting at least a little bit better parts than I started out with.
Sometimes I can't see the end of the tunnel, but then I think back that it was just in June 15, 2018 , in 17 months I have done quite a lot (look back to page 43 of this build to see what has happened since, you can ignore the first 42 pages because I changed my mind a lot

I have to think I really haven't done too bad considering I have fabricated almost everything on the car, not too much bolt-on stuff around my shed
See Ya,
Mike

Re: Lavron's '64 Build Thread
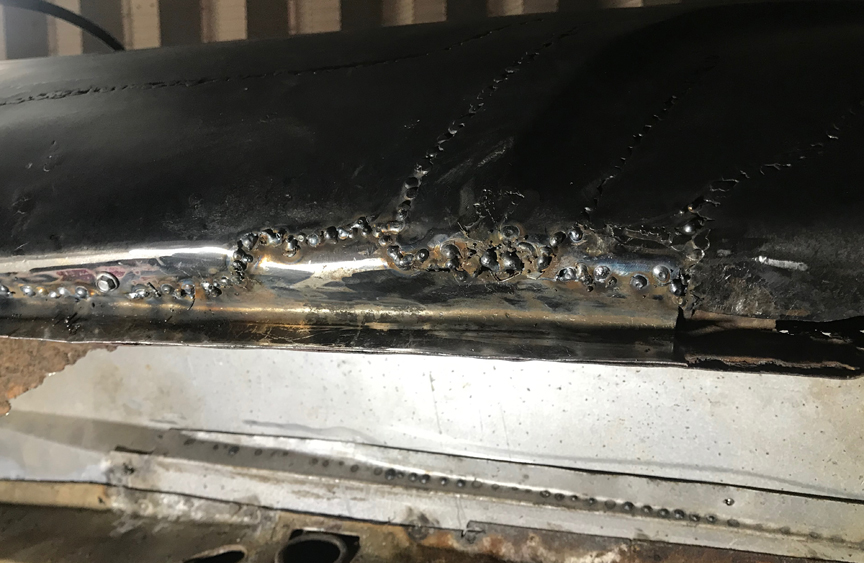
OK part way through getting these patches welded in, didn't take but this one picture because I figured it would be redundant, it looks basically like the other side as far as procedure goes except I have ground my initial welds down before round 2.
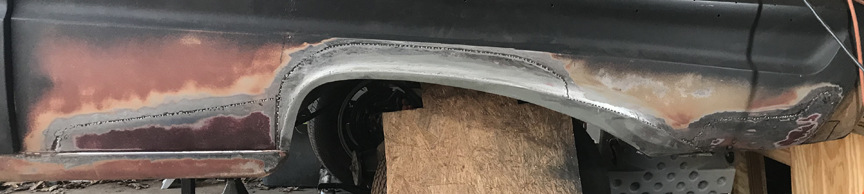
Right now the one is a little flex in the back because the trunk drop is rusted out so there isn't much supporting it back there.
A little more welding and grinding and this side will be done for now.
See Ya,
Mike
Right now the one is a little flex in the back because the trunk drop is rusted out so there isn't much supporting it back there.
A little more welding and grinding and this side will be done for now.
See Ya,
Mike

Re: Lavron's '64 Build Thread
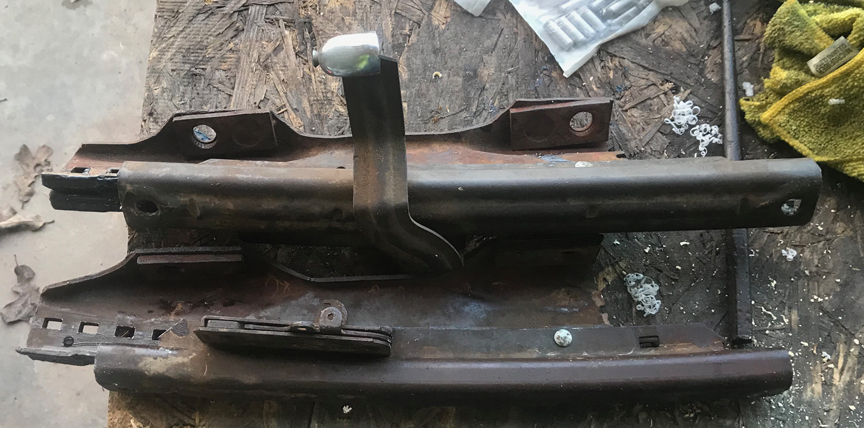
One thing I would have done in hind sight when I fixed my lowers & trunk drops ,,is mocked up my rear bumper,,,because it touches the quarter on one side & way more space on the other at the bottom corners. I could have adjusted & evened them up better before welding them If I had known to do it.lavron wrote:Right now the one is a little flex in the back because the trunk drop is rusted out so there isn't much supporting it back there.
See Ya,
Mike

Johno
Re: Lavron's '64 Build Thread
Good idea, I might stick the bumper in there and try making a temporary support brace to hold it in place, the passenger side I did not have to replace the trunk drop so it should be good, the drivers side I really don't have any trunk drop left on the bottom, just enough to get in the way of reaching behind with vise grips or a hammer and dollypoboyjo65 wrote:One thing I would have done in hind sight when I fixed my lowers & trunk drops ,,is mocked up my rear bumper
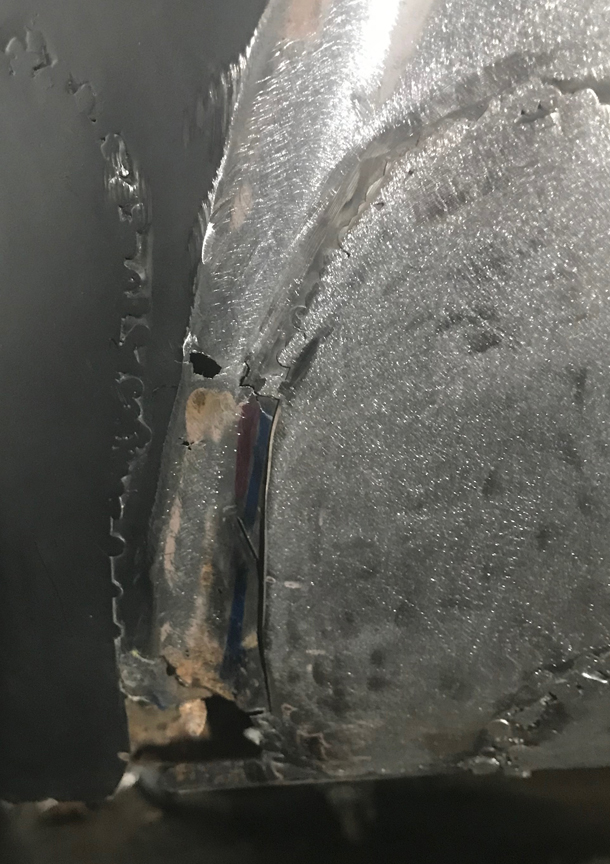
I did go back out and finished welding the patches on mostly, I have a couple of pin holes to try and weld up, mostly from my bad aim, two holes from temp screws I thought I had welded up only to grind them and see I totally missed the bottom half of the hole
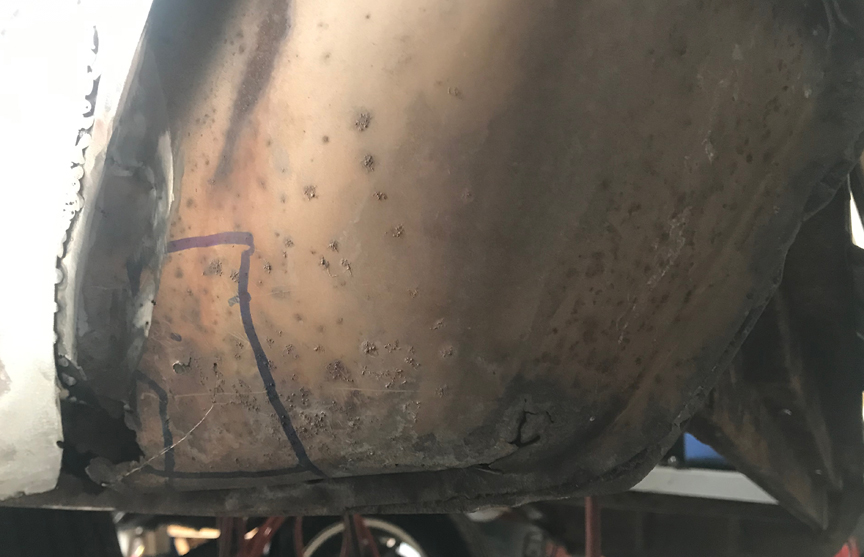
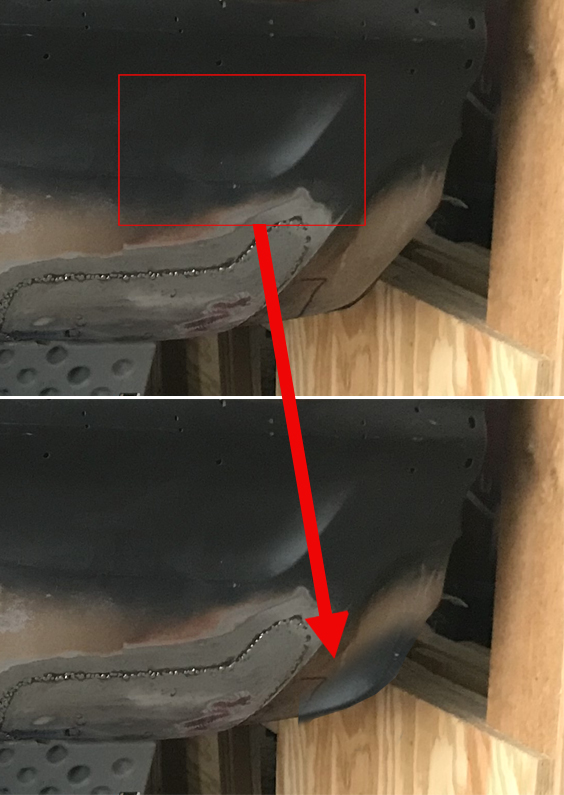
One issue I am going to have to address is I got a bobble on the bottom of the quarter behind the wheel (related to not being able to get a hammer in there) in the picture below I drew a couple of lines in PS the red one shows how it is now the blue one shows how I think it is supposed to be.

Not really an issue I think when I get the trunk drop all cut out I can hammer and dolly it down into place I really don't have much to attach to down there or to follow for a pattern just bits and pieces that are not too stable, I have always intended to finish the fix on the bottom edge after I get it flipped up and can see what I am doing.
See Ya,
Mike
Re: Lavron's '64 Build Thread
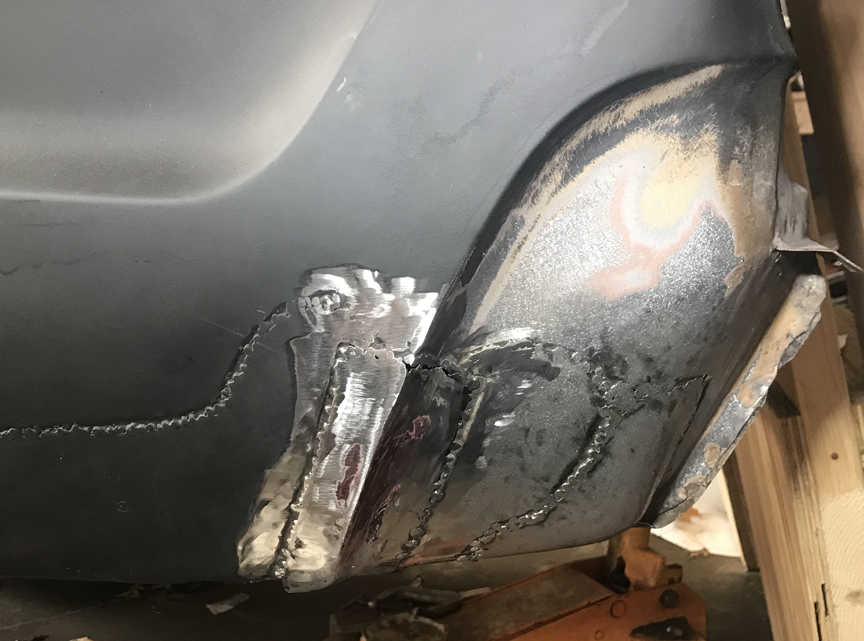
Almost finished (with the outside part) finished welding, grinding and sanding, I fixed the bobble in the lower rear mostly, as good as I am going to for now, it was actually pushed up and in, I finally clamped a piece of angle iron on it and tapped the spot out the best I could with limited swing and clearance for the hammer.
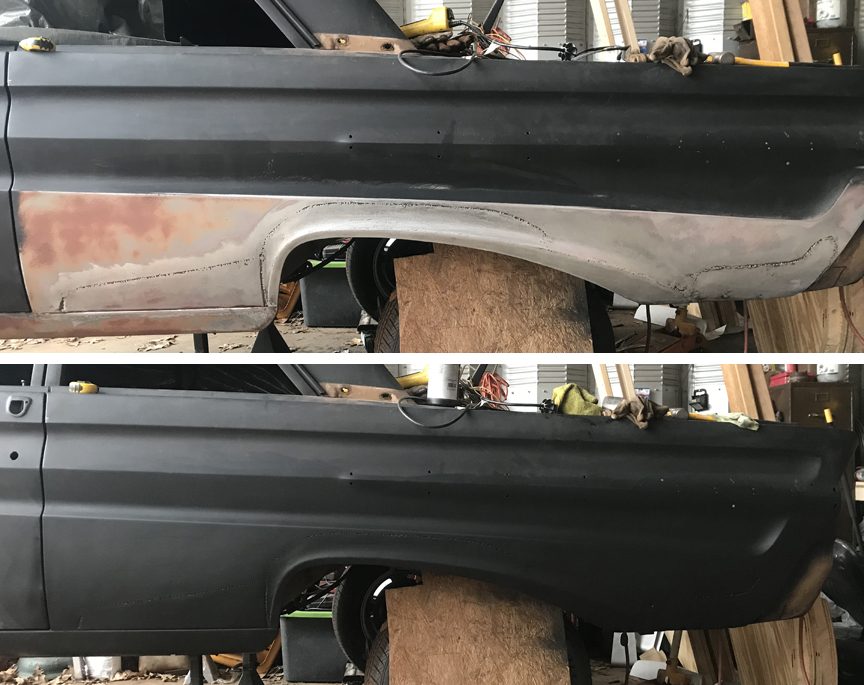
I went ahead on this side and acid washed the panel before shooting some rattle can on there, should be good until I can get to the body work, of course some will burn off when I weld the inner structures in. I was looking at the parts car and the trunk drop is fairly complete, not good enough to use but good enough to use as a pattern to make a new one, if it was a little better I would patch it and I may still but need to go out with the wire brush and clean it up and see how hard it would be to repair it before I just make a new one, how pretty does the trunk drop have to be?
The challenge ahead is the rear part that is under the bumper (thank goodness) this should be fun to make a patch panel for.
I think I know what to do and it might get a bit more filler than the rest of the body, that is a lot of curves. Obviously I need to cut it off up near the top of the picture and all the way round to the pinch seam not just where I marked it with a pen, those are rust holes where I ground the paint off, this would have been nice to have a good one to put in there but I will see what I can do with my limited equipment and skills.
See Ya,
Mike
Re: Lavron's '64 Build Thread
Starry Starry Night, just reminded me of a song about Vincent van Gogh (I guess a painting too) I am not ready to cut my ear off yet but just get rid of some more rust instead, it seems less extreme 
I am sure there is a constellation represented there
Time to patch some of this up, looks like I will have at least 4 patches in that small little spot by the time I am done, I made the main patch first and welded it in and then the corner patch.

If you were wondering how I made the corner patch, if you have the end of the body line (from the same side) if you flip it over it is a close match, I think it has a bit sharper turn than the lower quarter panel, but I think it will work ok for me, it is behind the bumper completely.
Next patch is the one running down the front edge, I think I have an idea of how to make it, but it has to curve two ways.
The last patch will run along the bottom, underneath, it is the pinch weld seam. I think I will try and make it in one piece from the back of the wheel well to the bumper (that is the plan anyway )
I looked at the trunk drop on the parts car and I am not going to patch it I think I will use some 18 gauge steel and just make a new one, I don't think I will worry about putting the two ribs in it.
See Ya,
Mike
I am sure there is a constellation represented there
Time to patch some of this up, looks like I will have at least 4 patches in that small little spot by the time I am done, I made the main patch first and welded it in and then the corner patch.
If you were wondering how I made the corner patch, if you have the end of the body line (from the same side) if you flip it over it is a close match, I think it has a bit sharper turn than the lower quarter panel, but I think it will work ok for me, it is behind the bumper completely.
Next patch is the one running down the front edge, I think I have an idea of how to make it, but it has to curve two ways.
The last patch will run along the bottom, underneath, it is the pinch weld seam. I think I will try and make it in one piece from the back of the wheel well to the bumper (that is the plan anyway
I looked at the trunk drop on the parts car and I am not going to patch it I think I will use some 18 gauge steel and just make a new one, I don't think I will worry about putting the two ribs in it.
See Ya,
Mike
Re: Lavron's '64 Build Thread
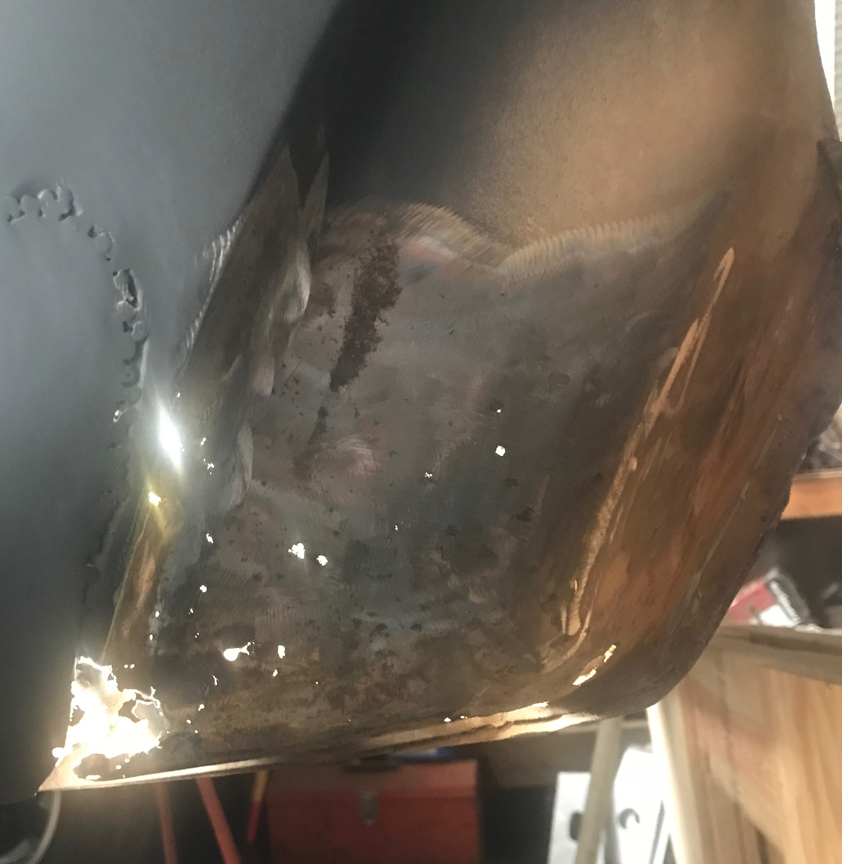
Getting there slowly, this piece was difficult to make and may have to roll it under a little more in the front, but will cross that bridge when I get to it.
This 3rd patch in this area is actually made from two pieces, the body line is from the same area on the other side turned upside down, I then had to bend a curve under at which point I had to split the patch so it could roll two different ways and I butt welded in a piece I picked up off the floor with the right shape (I think it was the top curve flipped over and rotated ) I had to butt weld the top seam on this as well to get the body line to align, the two up and down welds are flanged and lap welded. (and yes I cut off the welded seam of the first patch so I wouldn't have too much thickness, and there would be no way to flange it)
I wish this could have been one patch but the fates did not work out for me, thank the good Lord the other side is good. I think it will look good when I am done and have a thin coat of filler on it.
Just a little more welding and grinding and this patch will be done, then one more to go along the bottom, that one might just get tacked in until I can get in a better position to weld. I was welding on the bottom of one of those patches last week, was finished but decided to do a couple of tacks while lying on the floor at the bottom, in a hurry, just two tacks, I can do this bare handed well the glove cuff would have come in nice, first tack drops a hot ball right down my shirt sleeve where I think it rolled half way around my arm until it came to rest on the nice tender forearm flesh, funny it never even scorched the inside sleeve of my sweatshirt, at least I did not ruin my shirt  Safety first kids
This patch really stiffened the rear quarter because the back part is still attached at the pinch seam, it might not be pretty but I think it will do the job and after having to "make" a patch for that area the rest should be gravy.
This 3rd patch in this area is actually made from two pieces, the body line is from the same area on the other side turned upside down, I then had to bend a curve under at which point I had to split the patch so it could roll two different ways and I butt welded in a piece I picked up off the floor with the right shape (I think it was the top curve flipped over and rotated
I wish this could have been one patch but the fates did not work out for me, thank the good Lord the other side is good. I think it will look good when I am done and have a thin coat of filler on it.
Just a little more welding and grinding and this patch will be done, then one more to go along the bottom, that one might just get tacked in until I can get in a better position to weld. I was welding on the bottom of one of those patches last week, was finished but decided to do a couple of tacks while lying on the floor at the bottom, in a hurry, just two tacks, I can do this bare handed
This patch really stiffened the rear quarter because the back part is still attached at the pinch seam, it might not be pretty but I think it will do the job and after having to "make" a patch for that area the rest should be gravy.
Re: Lavron's '64 Build Thread
Man that's way better than the work I did on my 1/4s,, makes me think about grinding all the mud off my 1/4s and redoing the metal work!!
I'd rather do it myself if it's done right or not,,,isn't that what hotrodding is all about
Re: Lavron's '64 Build Thread
Thanks, don't really know what I am doing, I have never done anything even remotely like this before so I am probably making tons of noob mistakesSASSY wrote:Man that's way better than the work I did on my 1/4s,, makes me think about grinding all the mud off my 1/4s and redoing the metal work!!
In the light of making mistakes I decided to check my patched spot as compared to the other side (which is unmolested perfect) so I made a poster board pattern of the right side and taped on the left to see how I did, I guess ok, at least good enough for me
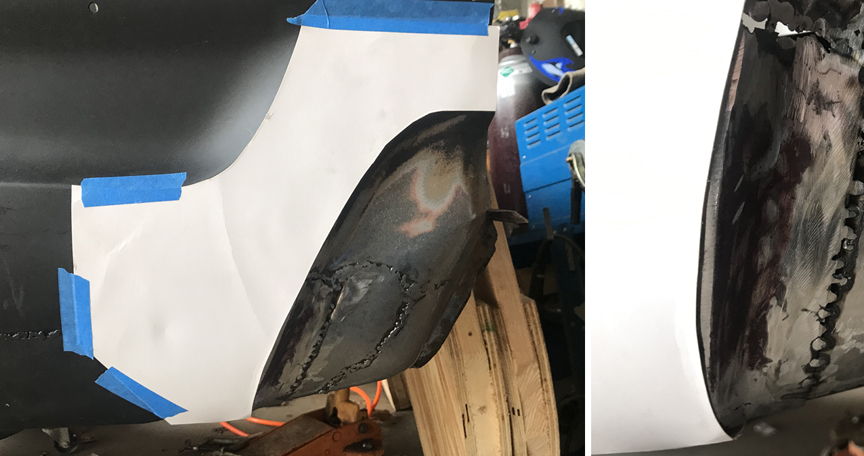
I missed by a little but I think it will be fine (ignore the gaping holes at the top of the right picture, I welded them up) that is about an 1/8" off, but remember that is a piece from the other side I had to bend that curve into it, I just didn't bend it quite enough.
I finished welding everything and ground it down shot a little rattle can on it, it was so cold out my wax and grease remover was mostly frozen (if it topped the freezing mark today I would be surprised) I did get enough to wipe it down, the paint actually sprayed and I hit it lightly because I figured it would want to run, I then used the heat gun and dried it.
It should be ready for body filler mostly, I know it looks like Frankenstein's monster but it is actually fairly flat and just low mostly in the spots it needs to be, mostly it is rust free, I think it will look good I have done body filler work before at least and know what I am doing half way in that department
I found my patch for the underneath part but instead of running one piece all the way I only need to run from the wheel opening to the bumper line because the little part in back I have been patching on still has a solid bottom attached to the pinch seam except in the very back I will have to make a little patch to repair a hole on bottom and back edge, probably won't be a precise fitting patch back there, just trim out the rust and make something Bondo can stick too.
Every day a little more rust free, truthfully I never thought I was going to make it to this point, I will say if I had had nice pretty patches to work with this would have been a fun job, as it was it was a pain
See Ya,
Mike

Re: Lavron's '64 Build Thread
The repair looks good. I ended up just using fiberglass and filler on mine.
Roger
Roger
65 comet 7.61@96mph 1/8
Made in Canada, Built for speed.
Tweaked65 on instagram
https://youtu.be/JCVwEitXSi4

Made in Canada, Built for speed.
Tweaked65 on instagram
https://youtu.be/JCVwEitXSi4
Re: Lavron's '64 Build Thread
Thanks I think it will look good in the end, hopefully no one will be able to see the repair. that is my goal anyway after getting rid of rust.tweaked wrote:The repair looks good. I ended up just using fiberglass and filler on mine.
Roger
Pretty cold today, freezing rain this morning so hovering around 32° (I know it doesn't compare to you northern guys

I guess a good day to do some rust patching
I was almost hesitant to post these pictures, not because I suck at welding
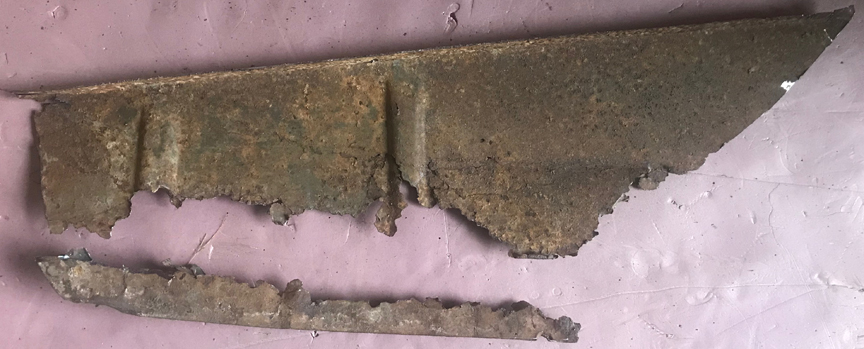
The little bit of rusty metal you can see in the lower left on that picture is the trunk drop bent back out of the way (or what is left of it)
So that leaves me with just a little rusty spot in the very back, I know I had said I was going to do this in one piece but decided it would be easier to make that little patch separate.
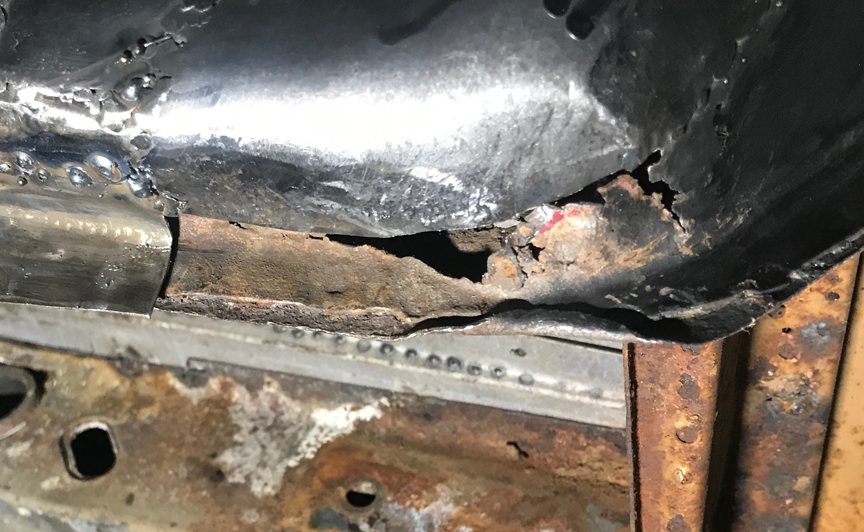
I think I will just make a little angled piece and use the shrinker/stretcher to make the sweep, then cut out the rust and weld it in. You can see on the pinch weld back there where the corner has gotten rolled up over the years, I need to fix that.
I will need to drill a couple of drain holes in that before I am done but I'm getting there. (Almost finished with exterior body rust patching)
See Ya,
Mike
Re: Lavron's '64 Build Thread
Just a quick one today, way too cold out to hang outside for very long I spent maybe 30 to 45 minutes and bent the last patch (on the outside of the car)
This time I started with a flat piece of metal, the only real problem I had is my HF stretcher won't stretch, I need to take it apart and see if there is an issue (besides being a cheap Chinese tool) I used it on the trunk floor and it worked fine, it is almost like it is not gripping the metal before pulling apart, so I did all of this shaping with a hammer and the bench vise (it has a lot of curves that lend itself to this type of thing).
I think this will work ok for where it is, I need to cut out the rust and get this welded in and then I will be done ready to make the trunk drop and the outside inner fender wells, and the front torque box repairs
Can't wait to get this thing flipped up, welded, cleaned up and painted on the bottom so I can start putting it back together, I will run my fuel and brake lines while I have it up and may try and route the exhaust system.
See Ya,
Mike
Re: Lavron's '64 Build Thread
Today started out with a cold rain that turned to sleet and when I came in the house it has changed to snow, at least so far we have avoided the freezing rain today
Frakenpatch is finished which means 99.8% of the outer body rust has been removed Not the prettiest thing but not rust either and once the filler gets applied it should all look good.
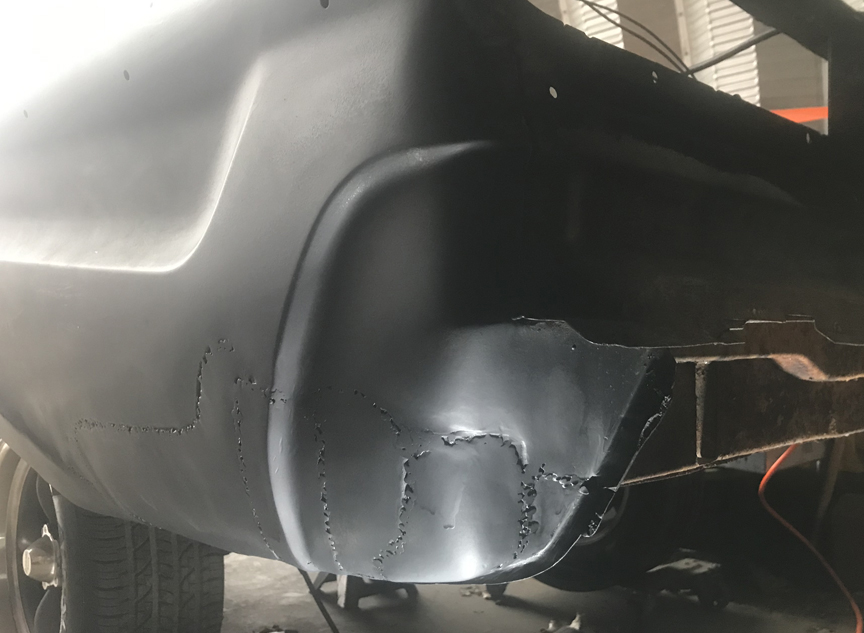
I know it is horrendous to look at but it is behind the bumper and I am not entering any contests or anything, plus I have to tell you that was hard to make so much so I never want to do it again.
What's next? Well not sure but I know I need to recreate the trunk drop, I went ahead and removed the remnants of the old one today, not much left of it, I am glad I have a better one to use as a pattern.
Eventually I will be rust free.
See Ya,
Mike
Frakenpatch is finished which means 99.8% of the outer body rust has been removed
I know it is horrendous to look at but it is behind the bumper and I am not entering any contests or anything, plus I have to tell you that was hard to make
What's next? Well not sure but I know I need to recreate the trunk drop, I went ahead and removed the remnants of the old one today, not much left of it, I am glad I have a better one to use as a pattern.
Eventually I will be rust free.
See Ya,
Mike
Re: Lavron's '64 Build Thread
The last few days have been cold and wet making it hard to get too much done on the body repairs etc. So I decided to try and fix the broken seat tracks on T-Bird buckets.
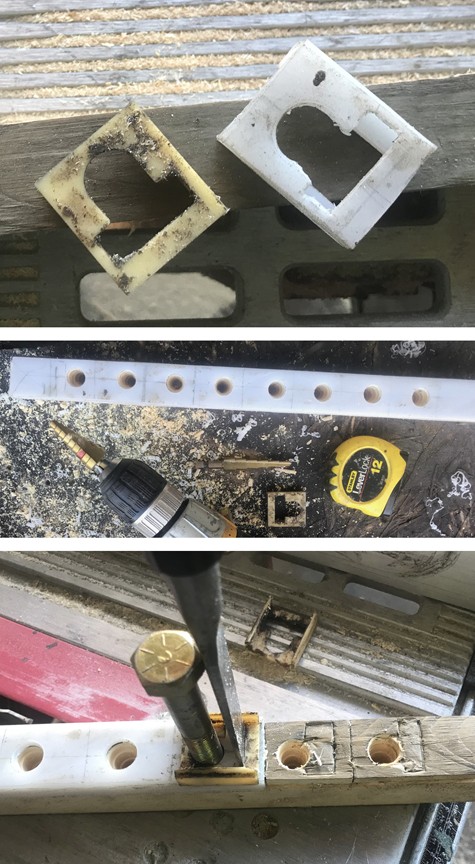
I had bought a stick of high density vinyl machine track guide cover (or something like that) from Graingers, it is about 10' long and is made to slide over a metal T to cover the top so stuff will slide on it easy, it was the only thing I could find that was even close to the original material that the roller retainers(?) are made of in the seat, I also bought some 1/2" ball bearings and some hardened dowel pins (they are a little over 1/4", can't remember off the top of my head) they look like roller bearings and are the right size half of my original bearings were missing.
The problem with the plastic stock is it is a bit thicker material than the original (and a little softer), I made a set earlier in the week and re-did the passenger seat tracks, it works now but is really hard to get to move, so I decided to use the table saw and plane off some thickness, the problem is the stuff would be like trying to shove a snake through the table saw so I cut a piece about 20 inches long and then took a 2X board and ripped it down so one dimension was the same as the inside of the track and then rabbited two grooves down each side and slid the track onto it and ran it through the table saw on three sides to make it a bit smaller, I didn't really take any pictures of doing that but you can see the piece below.
I marked off 8 retainers and drilled holes with a step bit, mostly in a straight line spaced accordingly, then used a sharp wood chisel to cut the roller bearing slot.
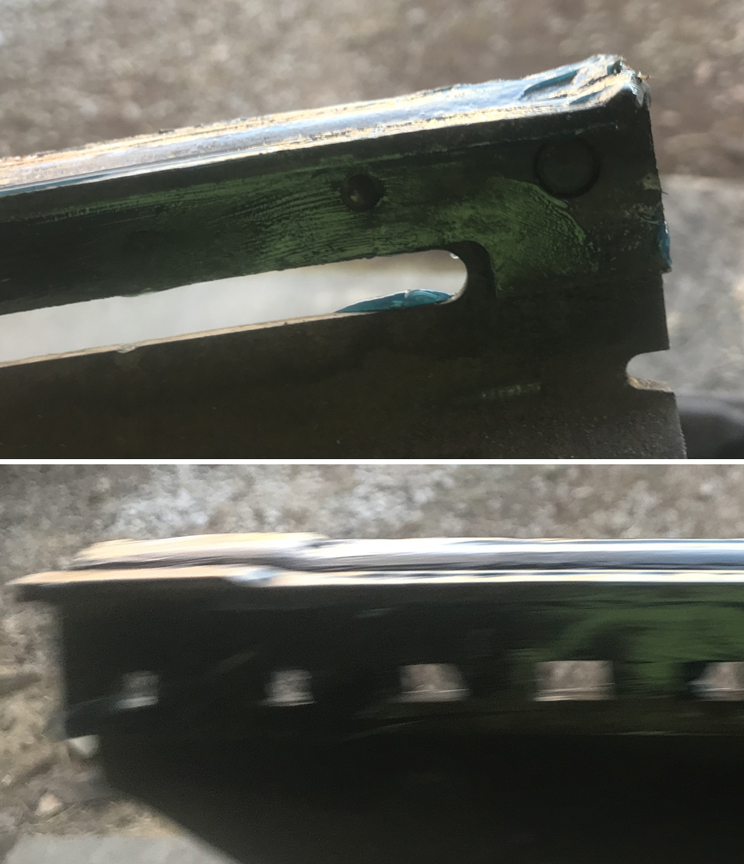
Below in the first picture is what the original looks like and my not too pretty replacement (it works however), in the next picture I have drilled the holes and in the third picture I am using an original piece, a bolt and the chisel to align and cut the slots.
Next these are the replacement bearings and the picture below that shows the silver rivet has to be removed from the track to get it apart (I removed the tracks from the seats and pulled the 4 springs off)
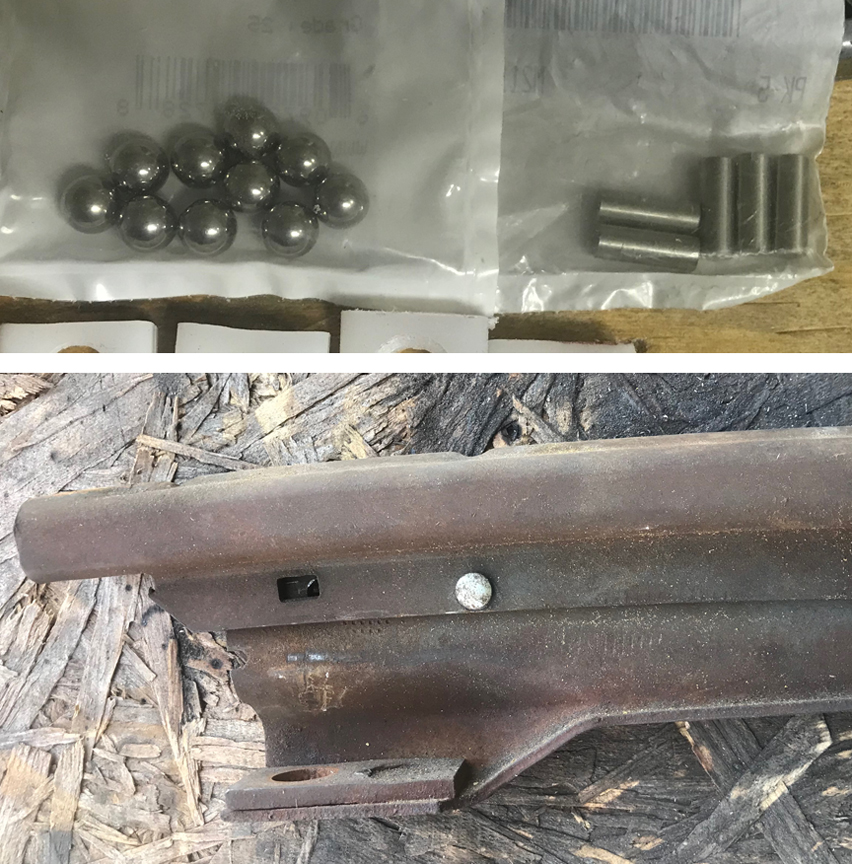
I used a drift punch to remove the rivet and I was able to reuse it, it is just an aluminum pin that keeps the track from over-extending and letting the bearings pop out, it sits in a slot on the lower track.
Before reassembling note that the track looks different on each end (sorry for the fuzzy picture) you have to use the long flat profile end to go in first, I think that is the back of the track so you push it into the front of the slider (upper track).
To reassemble (kinda of a bite) this is the best way I found to do it, you need this highly specialized tool that looks kinda like a stick of wood, I actually cut it to fit in the track two ways, horizontal and vertical. I greased everything with some wheel bearing grease to keep the bearings from falling out constantly (they still liked to fall out) I slid the retainer into the upper track with the roller bearing toward middle of the track and the ball facing out, I did both ends with the roller to the middle, there is a little stop in the top ball track to keep the ball from rolling out the end, the ball has to be behind (inside) the stop, then the stick goes in behind the roller bearing to keep the whole assembly from shoving back as you put the lower rail in which is a process of getting the T part of the track into the retainer and the ball squeezed up under lower track combined with some hard pushing until the raised flat part gets passed the ball.
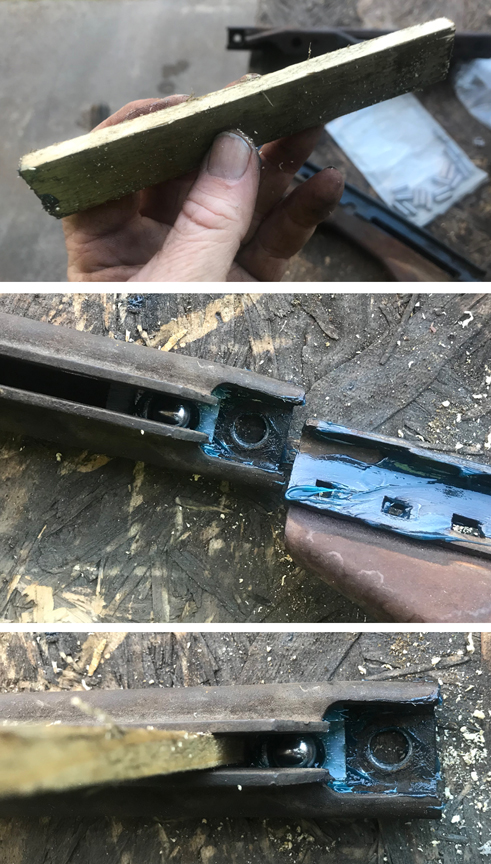
I didn't take a picture at the other end, but you push the bearing assembly up into the upper track just like at the other end and I turned my stick so I could push the retainer in and hold it until I could get the T on the lower track into the retainer and pushed over the ball, again once the ball gets past the raised area of the track everything slides easy.
I put the rivet back in and peened the end down to keep it in. This is them repaired
I put them back on the seat and installed the seat in the car to test it, it works like it is supposed to now, slides easy and unlatches and latches properly, it works so easy now I will have to fix the other side well I drilled enough holes to make 4 more anyway.
I originally mounted the seat in the car so what was comfortable for me was in the middle of travel just in case my legs get longer or shorter not sure it will go up far enough for my wife to drive, oh well
Big relief to have the seat tracks fixed on the cheap, I think I spent maybe $20 or $30 for the stuff to repair them and of course still have leftovers.
I will keep plugging away.
See Ya,
Mike
I had bought a stick of high density vinyl machine track guide cover (or something like that) from Graingers, it is about 10' long and is made to slide over a metal T to cover the top so stuff will slide on it easy, it was the only thing I could find that was even close to the original material that the roller retainers(?) are made of in the seat, I also bought some 1/2" ball bearings and some hardened dowel pins (they are a little over 1/4", can't remember off the top of my head) they look like roller bearings and are the right size
The problem with the plastic stock is it is a bit thicker material than the original (and a little softer), I made a set earlier in the week and re-did the passenger seat tracks, it works now but is really hard to get to move, so I decided to use the table saw and plane off some thickness, the problem is the stuff would be like trying to shove a snake through the table saw so I cut a piece about 20 inches long and then took a 2X board and ripped it down so one dimension was the same as the inside of the track and then rabbited two grooves down each side and slid the track onto it and ran it through the table saw on three sides to make it a bit smaller, I didn't really take any pictures of doing that but you can see the piece below.
I marked off 8 retainers and drilled holes with a step bit, mostly in a straight line spaced accordingly, then used a sharp wood chisel to cut the roller bearing slot.
Below in the first picture is what the original looks like and my not too pretty replacement (it works however), in the next picture I have drilled the holes and in the third picture I am using an original piece, a bolt and the chisel to align and cut the slots.
Next these are the replacement bearings and the picture below that shows the silver rivet has to be removed from the track to get it apart (I removed the tracks from the seats and pulled the 4 springs off)
I used a drift punch to remove the rivet and I was able to reuse it, it is just an aluminum pin that keeps the track from over-extending and letting the bearings pop out, it sits in a slot on the lower track.
Before reassembling note that the track looks different on each end (sorry for the fuzzy picture) you have to use the long flat profile end to go in first, I think that is the back of the track so you push it into the front of the slider (upper track).
To reassemble (kinda of a bite) this is the best way I found to do it, you need this highly specialized tool
I didn't take a picture at the other end, but you push the bearing assembly up into the upper track just like at the other end and I turned my stick so I could push the retainer in and hold it until I could get the T on the lower track into the retainer and pushed over the ball, again once the ball gets past the raised area of the track everything slides easy.
I put the rivet back in and peened the end down to keep it in. This is them repaired
I put them back on the seat and installed the seat in the car to test it, it works like it is supposed to now, slides easy and unlatches and latches properly, it works so easy now I will have to fix the other side
I originally mounted the seat in the car so what was comfortable for me was in the middle of travel just in case my legs get longer or shorter
Big relief to have the seat tracks fixed on the cheap, I think I spent maybe $20 or $30 for the stuff to repair them and of course still have leftovers.
I will keep plugging away.
See Ya,
Mike