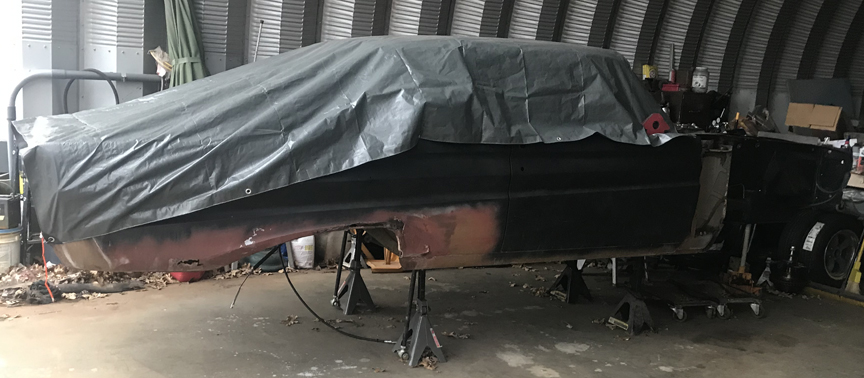
If I have to do the trailer it would probably need tires, they have good tread but are starting to get a little weather checked but then again might not hurt them any. My preference is to drive, will have to wait until we get closer to the date to see how far along I am, I am sure it won't be "done" but the concern is being road worthy.
Currently the only issue I see getting done on the Comet is the custom intake being done, I am pretty sure the motor will be back together soon. (still waiting on the head and I need to decide on what cam to order, which kinda depends on what the final compression ratio ends up being and combustion chamber size, etc. I think) It certainly won't be painted or the interior in the car (maybe the headliner so I can have a windshield) I may have talked my wife out of enough cash (I think) for the A/C system which is the last big expense.
Today I got the rest of the front suspension removed the left side went much better, the bearings were not stuck on the spindle (I got the other one off as well, a few days soaking and just a little prying it popped off) then I started taking things loose in back, I have the air bags and the shocks disconnected on one end each, now I just need to get the e-brakes loose and pull the brake line free from the body mount, then 4 bolts in the 4-link bars and it should be loose.
See Ya,
Mike
Lavron's '64 Build Thread

Re: Lavron's '64 Build Thread
Just about fully stripped down now so I guess the next steps are getting my jigs constructed, no more excuses now 
The rear came out pretty easy a lot of the nuts were just hand tightened, the hardest thing was reaching in places that were open when the floor was out (like unclipping the brake hose, that may need to be repositioned while I am under there), but I planned well enough everything is able to come off with no unexpected issues.
Oh yes and just to see, I can lift the front of the car off of the jack stands but then I am sure I am getting a little help from the rear of the car hanging over the back set of stands. I actually need to lower the front stands one notch to get the car more level, but I think I will use the floor jack
See Ya,
Mike
Re: Lavron's '64 Build Thread
Went out today and thought I would put away all the suspension parts I just recently pulled off of the car, you all have seen the red pickup sitting in the shed, it has been my storage place for a bunch of parts while I have been working, I kinda got in the habit of just throwing stuff in there and piling it up so I thought I better clean it out and organize some things and make sure I wasn't crushing anything important like trim pieces or the grill.
I was pulling everything and putting it in appropriate piles when I pulled the trim piece that runs along below the taillights and above the bumper and it had a bad bent spot, I was positive it wasn't bent before but thought I would just have to find a better one or straighten that one out, then I pulled a straight second one out of the truck 
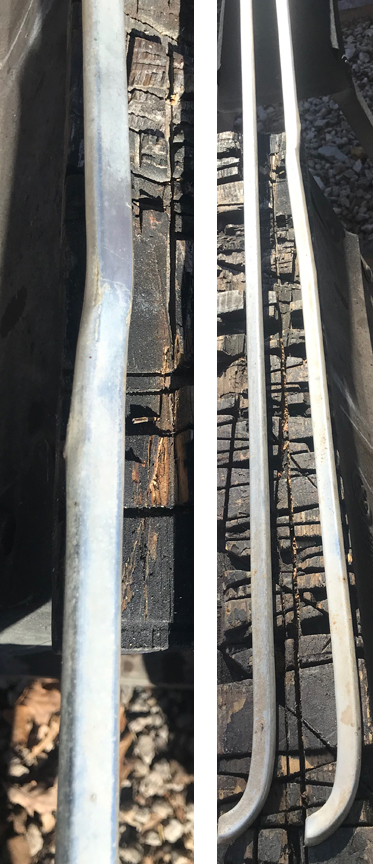
I am sure the one off my car wasn't bent but I am not sure where the other one came from, it may have been thrown in the parts car because the guy couldn't sell the bent part and just left it in there certainly I would of kept it because if anyone was missing one completely they could straighten that one and use it, I guess I have been collecting stuff so long I really don't know what I have tucked away around here.
Tomorrow I hope to start building my tip over jig, Friday doe season starts so will probably try and kill Bambi again if they will show up, otherwise I will be trying with the blackpowder rifle again at the end of December.
Today I finally got the hand rail stained on the deck railing I have been working on the doublewide (aka the guest house) I built the porch roof and pulled off the "temporary" railing that had been on the deck the for several years now, plus I have been trying to get all the trim up after I re-stained the siding (the trim has never been on there either), cutting into my Comet time
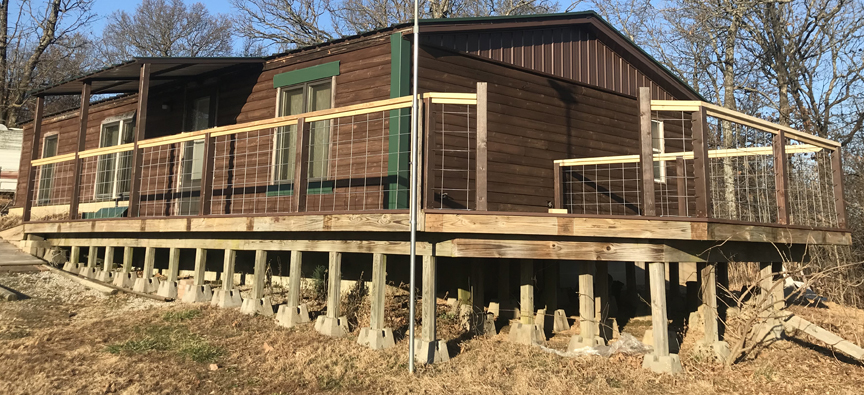
I know you guys give me a little grief over using old junk to work on the Comet and shopping at the farm supply store for car parts, I do the same on the house and used cattle panels for deck railing
See Ya,
Mike
I was pulling everything and putting it in appropriate piles when I pulled the trim piece that runs along below the taillights and above the bumper and it had a bad bent spot, I was positive it wasn't bent before but thought I would just have to find a better one or straighten that one out, then I pulled a straight second one out of the truck
I am sure the one off my car wasn't bent but I am not sure where the other one came from, it may have been thrown in the parts car because the guy couldn't sell the bent part and just left it in there
Tomorrow I hope to start building my tip over jig, Friday doe season starts so will probably try and kill Bambi again if they will show up, otherwise I will be trying with the blackpowder rifle again at the end of December.
Today I finally got the hand rail stained on the deck railing I have been working on the doublewide (aka the guest house) I built the porch roof and pulled off the "temporary" railing that had been on the deck the for several years now, plus I have been trying to get all the trim up after I re-stained the siding (the trim has never been on there either), cutting into my Comet time
I know you guys give me a little grief over using old junk to work on the Comet and shopping at the farm supply store for car parts, I do the same on the house and used cattle panels for deck railing
See Ya,
Mike
Re: Lavron's '64 Build Thread
that's the reason POP never throws anything away...might need it down the road....railing works for me,,cattle or no cattle,,,you sure saved yourelf some work from having to dig post holes,,,pop

pop/glenda
-
Jims65cyclone

- Posts: 2764
- Joined: Sun Nov 23, 2014 10:29 pm
- Location: Lexington, SC
Re: Lavron's '64 Build Thread
Think you got enough posts under that deck?  You could park you Comet up there. Shouldn't be a problem holding a square dance on it. Looking forward to seeing that tip-over jig.
Jim
Jim

Re: Lavron's '64 Build Thread
Same thing the roofer said to me when they were putting the roof on our house, so same answerJims65cyclone wrote:Think you got enough posts under that deck?
And now an intermission...
Today I was going to build my tip over jigs but I couldn't find any jigsaw blades to cut out the round parts but I did find some new Sawzall blades so I thought I would use it instead of the jigsaw but I couldn't (can't) find my Sawzall, I think it got stolen -- rant and vent time -- I don't use my Sawzall all that much but it is a very nice tool to have, so much so that when my original HF Sawzall broke I went bought a Dewalt, one of only 2 Dewalt tools I own (the other is a palm sander), everything else is HF stuff (mostly) or old stuff, usually I put my Sawzall away in the case but I didn't the last time I used it and it was sitting in the shed on the bench, most times this is not an issue, we live at the end of a 1/2 mile or so drive with part being common with neighbors (2) one that has no house on the other end of the fork in the road, the other an old trailer that has been vacant for several years until recently, this summer the lady that bought the trailer had a shady looking guy to work on her trailer and he was there for about a month, never saw him do a thing and the lady said he never did anything either, I think what he did is take my Sawzall just before he pulled out, I can't prove anything but my hypothesis is he only took the Sawzall (that I know of so far) because he would have to hike through the woods and could only take what he could carry away. My wife asked why he would take it and nothing else, now I don't understand the mind of a crook but if I was stealing stuff I would not take a HF grinder.
So it looks like for Christmas I will be buying me another Sawzall, probably go back to HF because they aren't with stealing, this why I can't have nice stuff
I did find one good jigsaw blade in my old broken jigsaw so put it in my non-broken but worthless to steal jigsaw, the one blade and the worthless jigsaw cut great
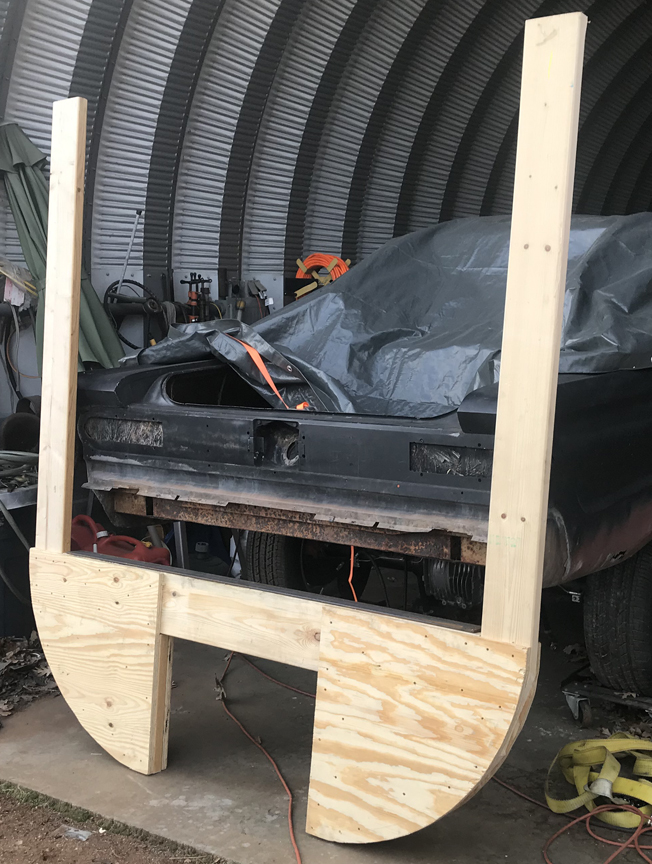
It is 6' wide and probably a bit over 6' tall, I may or may not cut off the uprights and either way I have some scaffold bracing that I think I will brace them with.
Inside the plywood 1/4 rounds it looks like this.

And the last thing I am going to add is this 1/4" angle iron that I am going to weld stubs to to bolt to the frame in the bumper bolt holes.
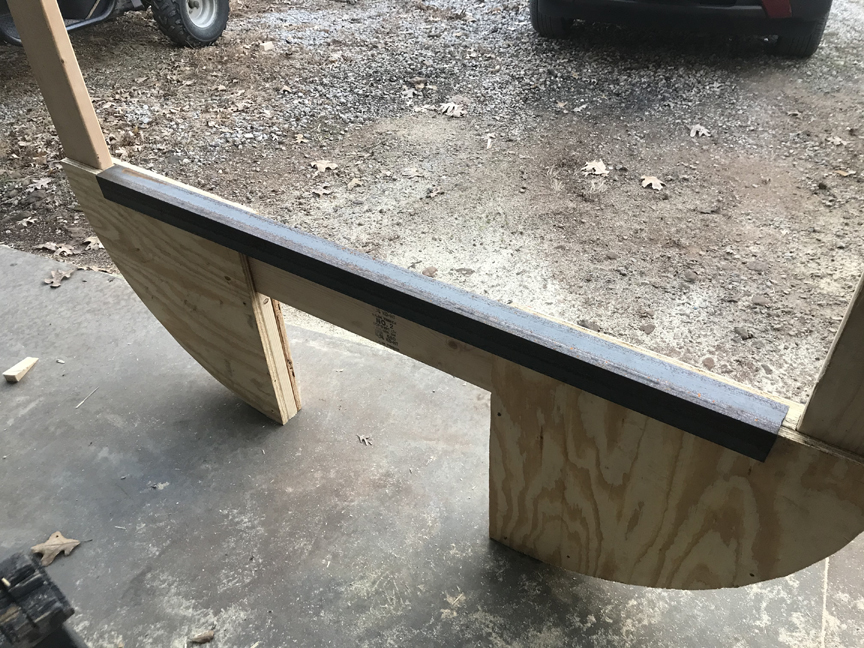
I did it a bit different than any I saw out on the web, most are just a single plywood layer and no inside bracing, remember I am no engineer and I generally over build everything, better safe than sorry, they roll good and because they are like weebles they like being upright (the last picture it is standing on it's own).
You don't see it in the picture but there are two of them (the two bottom pictures are not the one standing behind the car), I still need to put more screws in them but my Ryobi impact driver is about to die I am afraid, I think I just wore it out, it seems to work ok overhead but pointing down not so good, I think it either wore out the brushes or the bearings (I have had it 20 years probably), so that is something else I need to replace
I will give more details when I get it put on there, but for those interested this is what I used; one sheet of 3/4" 5 ply better grade plywood (cut into 8 2'x2' 1/4 rounds), 2-6' 2x8" #2 (the cross member), 4-8' 2x6" just utility or #3 (those make the uprights, each one making a short and a long leg), and maybe an 8' 2x4" for the angled pieces (I already had it), 1-10' piece of 3x3-1/4" angle iron (cut in half). I will also need a few flat scrap parts to make the stubs for the frame mounts and screws and a few bolts.
Hopefully sometime next week I can get this bolted on the car and get it back lowered down to the floor, I hate doing that because I have a convenient place to store the rear end right now
See Ya,
Mike

Re: Lavron's '64 Build Thread
Mike, I don't comment much on your threads, but I'm always following along. Seeing everything you have done keeps me motivated to keep working on my projects. Cant wait to see how your tip over jig works out. Keep up the good work.

Re: Lavron's '64 Build Thread
Thanks Loman I appreciate the encouragement. I can't wait to see how the tip over jig works as well.loman wrote:Mike, I don't comment much on your threads, but I'm always following along. Seeing everything you have done keeps me motivated to keep working on my projects. Cant wait to see how your tip over jig works out. Keep up the good work.
I went ahead today and ordered a new Ryobi Impact driver today, I really don't have any complaints with my old one I have really used it a lot, it is something I can hardly get by without, the new one looks the same except it is florescent yellow/green instead of blue, it comes with a battery and a little mini charger. I figured it would be best to get something that uses the batteries I already have, Home Depot had a special on batteries as well so I got two more 3.0 Ah that included another charger, bag and one free tool for $129 so I got the 18V reciprocating saw (sawzall) so now I will have 6 batteries of various Ah counting the three I already have and three chargers.
I will probably still buy a cheap corded sawzall from HF because those cordless ones never seem to run that long on a charge.
I haven't got out this week yet to work on my jig but bought some carriage and lag bolts today to finish bolting it together.
See Ya,
Mike
Re: Lavron's '64 Build Thread
What do you do when you been a bit under the weather but want to get out and do something, and I am still waiting on my replacement impact driver to finish putting the "weebles" together, and I don't have much welding gas left and didn't feel like welding up the bumper support brackets for the "weebles"?
Well you go out and stare at your Comet and loath the the rust on the rear quarter, so if you have a parts car with less than perfect rear quarters (way less) you go out and cut one off and clamp it on the side of the car.
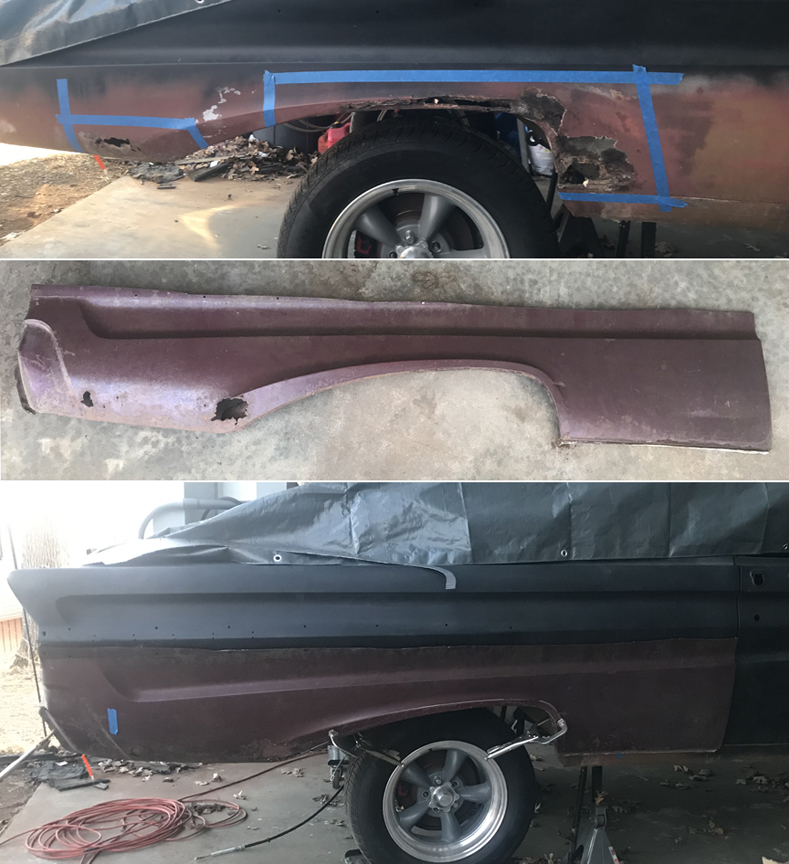
Actually this one is not terrible except the wheel lip edge is not good at all, I have already rough cut a patch for the lip out of 18 gauge to repair the patch to repair the car I will have to make a couple of patches from scratch but they shouldn't be too hard to make.
Of course I will cut the patch down from what is shown but thought I may as well cut a bunch off the parts car and trim out what I need.
See Ya,
Mike
Well you go out and stare at your Comet and loath the the rust on the rear quarter, so if you have a parts car with less than perfect rear quarters (way less) you go out and cut one off and clamp it on the side of the car.
Actually this one is not terrible except the wheel lip edge is not good at all, I have already rough cut a patch for the lip out of 18 gauge to repair the patch to repair the car
Of course I will cut the patch down from what is shown but thought I may as well cut a bunch off the parts car and trim out what I need.
See Ya,
Mike
Re: Lavron's '64 Build Thread
More silliness I went ahead and cut the left rear quarter off of the parts car, not a lot left of it but I think it has some patches in it that will work.
The left quarter is not as bad as the right one and it is untouched, the really bad part is behind the tire on this part and I did not seem to take a picture of that, sadly the it is almost non-existent on the parts car back there so I will have to fabricate a patch, hopefully it won't be too bad it is pretty simple most is not a compound curve until the rear part.

I mentioned that I had cut some patches for the lips themselves, I got them cleaned up the edges to match and bent the sweeping curves into them. where I am deviating from common practice is I am not going to flange the lip edge but weld right on the corner with it it laying on top of the original and then flip it over and cut the old part out carefully.
I also am eliminating the bend at the bottom and replacing it with some round stock that may have started out being a jack handle/crank out of truck that I seem to have several of
I bent it to fit the curve of the opening, it will be a bit harder to do the one for the left side because I will have no guide because all of that is missing and will have to use the wheel opening on the car to fit it up.
I am thinking about going ahead and welding the rod on first but maybe I should do it after I weld the patch to the quarter panel patch before I weld them to the car.
I may not be doing it right but at least I am doing something and if it is an absolute failure it didn't cost me anything and I will still need some replacement quarters.
See Ya,
Mike
The left quarter is not as bad as the right one and it is untouched, the really bad part is behind the tire on this part and I did not seem to take a picture of that, sadly the it is almost non-existent on the parts car back there so I will have to fabricate a patch, hopefully it won't be too bad it is pretty simple most is not a compound curve until the rear part.
I mentioned that I had cut some patches for the lips themselves, I got them cleaned up the edges to match and bent the sweeping curves into them. where I am deviating from common practice is I am not going to flange the lip edge but weld right on the corner with it it laying on top of the original and then flip it over and cut the old part out carefully.
I also am eliminating the bend at the bottom and replacing it with some round stock that may have started out being a jack handle/crank out of truck that I seem to have several of
I bent it to fit the curve of the opening, it will be a bit harder to do the one for the left side because I will have no guide because all of that is missing and will have to use the wheel opening on the car to fit it up.
I am thinking about going ahead and welding the rod on first but maybe I should do it after I weld the patch to the quarter panel patch before I weld them to the car.
I may not be doing it right but at least I am doing something and if it is an absolute failure it didn't cost me anything and I will still need some replacement quarters.
See Ya,
Mike
Re: Lavron's '64 Build Thread
Your car has a lot more around the wheel openings than mine did in 1974!
You'll do a fine job just like the rest of your work.
Keep swingin!
Fred
You'll do a fine job just like the rest of your work.
Keep swingin!
Fred
I'd rather do it myself if it's done right or not,,,isn't that what hotrodding is all about

Re: Lavron's '64 Build Thread
Time will tellSASSY wrote:You'll do a fine job just like the rest of your work.
I have been a little sick, the weather has been terrible, but I was getting cabin fever already, and I have a Comet to build
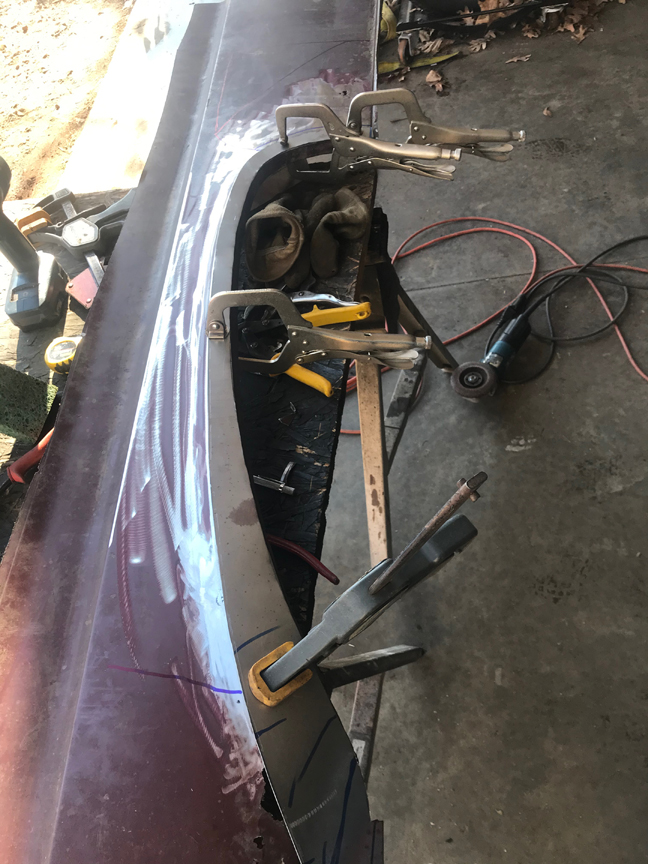
Got out today and got going on the rear quarter patches, that is patching the patches, I actually think it might work but I haven't tried to mount them on the car yet (or worked on one much)
I guess I am not afraid to show what I have done so far and I will give a little explanation as to why certain things look like they do.
Some reason I decided to start with the worse one, which is actually the best one on the car, worse one as far as patch panels go
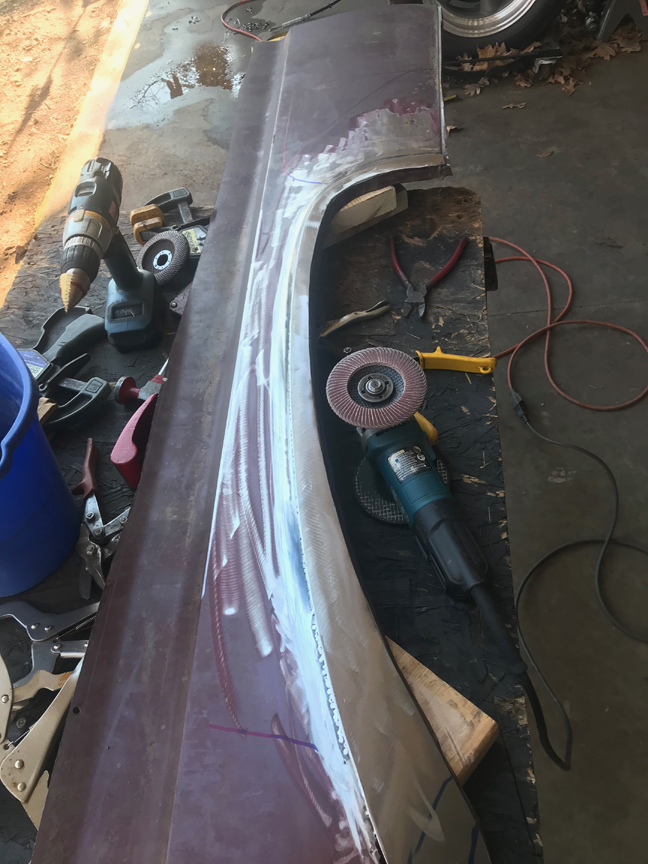
You can remember what I started with and below it is where I am now.
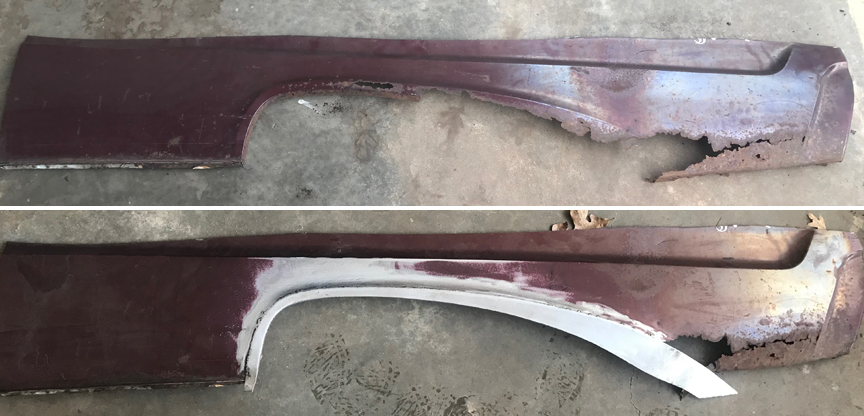
Some of it is not welded and only tacked on in the back part because the metal is pretty bad back there (in the lower picture if you look straight down where the leaf is sticking out there is a faint blue line, I am not using that part) it is good on my car right there so I will cut the tacks and weld it on to the car the same as I have done in the forward part.
If you thought this was going to be a pristine repair with no filler you are looking in the wrong place
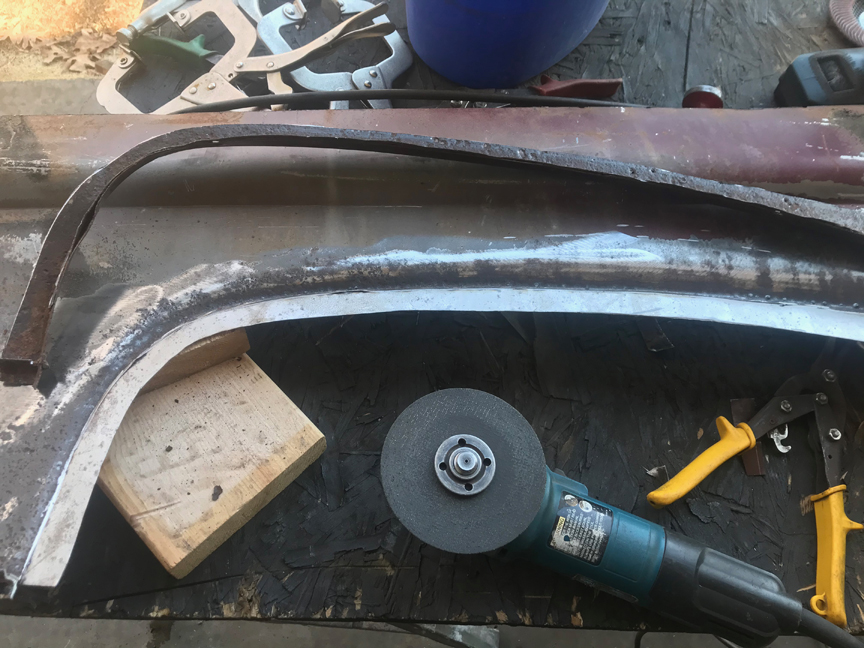
It probably wasn't clear what I was talking about using the old jack handle cranks, I have bent two of them up to match the sweep of the fender opening (a little time consuming) and they will form my new opening instead of folded lip opening. I could have and maybe should have recreated the lip but I wanted it super thin so I could have some more room to get my rear tires off and it is still going to be tight fit even doing this.
They have been bent and welded to the lower edge. (I know it doesn't look like it in the picture but it bends along the lip and curves inward on the front and back, I fit it up to the car as I formed it)

My inner fender will then get welded to rods as well (I am custom making the outer-inner fender wells) You can see in this picture at the rear (top of picture) where the rust is bad and the one spot where I did not cut rusty part out, that will get removed and the original car will be there (it isn't as bad as it looks, most of that is sound deadening material I didn't clean off) I went ahead and ran a line of tack welds all around on the inside as well just as a precaution. The very front part will be cut off as well (lower end of picture) where all the pits are because that is good on my car too (not so much on the other side
My jack cranks are genuine Ford if you had any doubt.
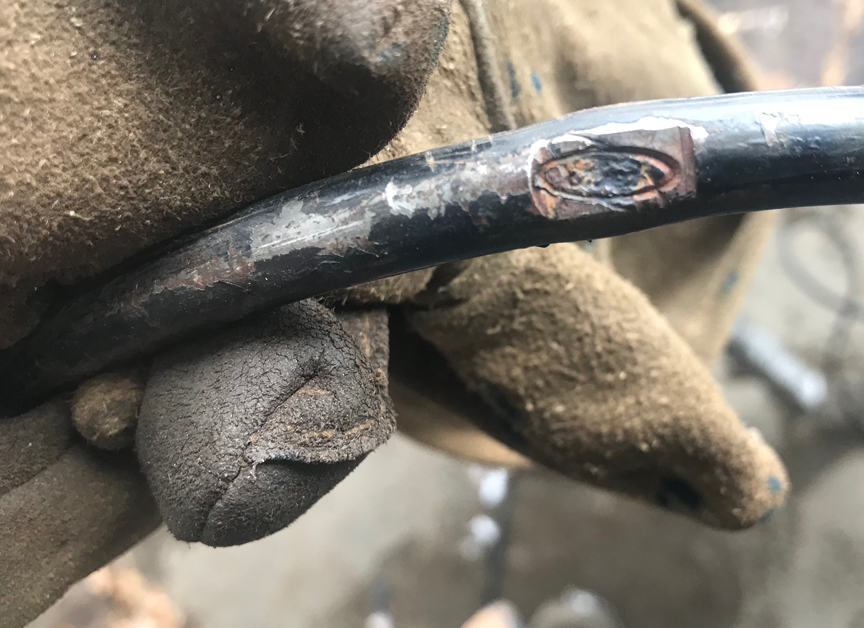
I think the bulk and majority of these cranks were inherited from my dad and uncle both were hard core Ford guys. (and yes I have more of them)
I will keep plugging away on it and probably repair the right patch next, it is actually in better shape (the patch not the car).
See Ya,
Mike
Re: Lavron's '64 Build Thread
Day 2 of the rear quarter repair saga, I started on the right side and took a few more pictures of the process and left them big for the most part so you can see what I am doing.
This was the better quarter and I did more work than I should have to it, I had a set of pictures where I drilled out a spot of rust with the step drill and made a plug and welded it in but I ended up cutting it off in the end so decided this was going to be a long enough post without that and I am not a good example to follow anyway probably
Anyhow Step one after cleaning the edge up that needed the welding done on it (not counting patching a rust hole) is to clamp the lip patch on like I did before, right on top of the rusty lip.
I did several passes tack welding along the edge and used the damp sponge to cool it down after every few tacks so it would not warp.

Then I used my grinding stone to knock the tops of the welds off, followed but the flap wheel to smooth it, I think I had a 120 grit wheel in the grinder.
Next I flipped it over and cut the old part out, carefully with the angle grinder, I took it slow to keep from cutting into the front layer too deep.
I ran some tacks on the backside like before, I shouldn't have done that in the rear because I ended up cutting everything off but the new metal back there. I then welded the round rod to the lower lip of the opening.
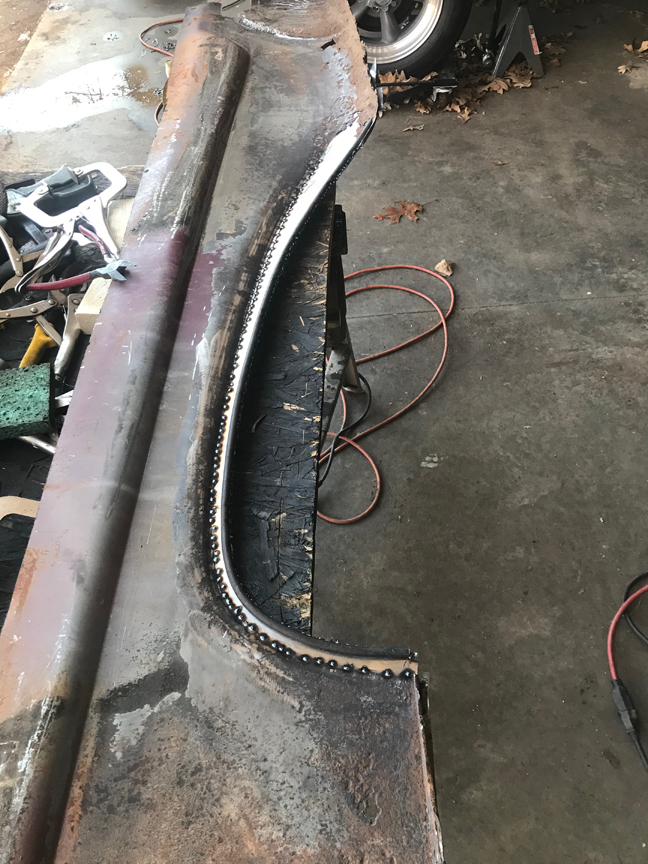
After grinding all the welds smooth like I did on the upper part I got the DA sander out and ran it over the whole thing.
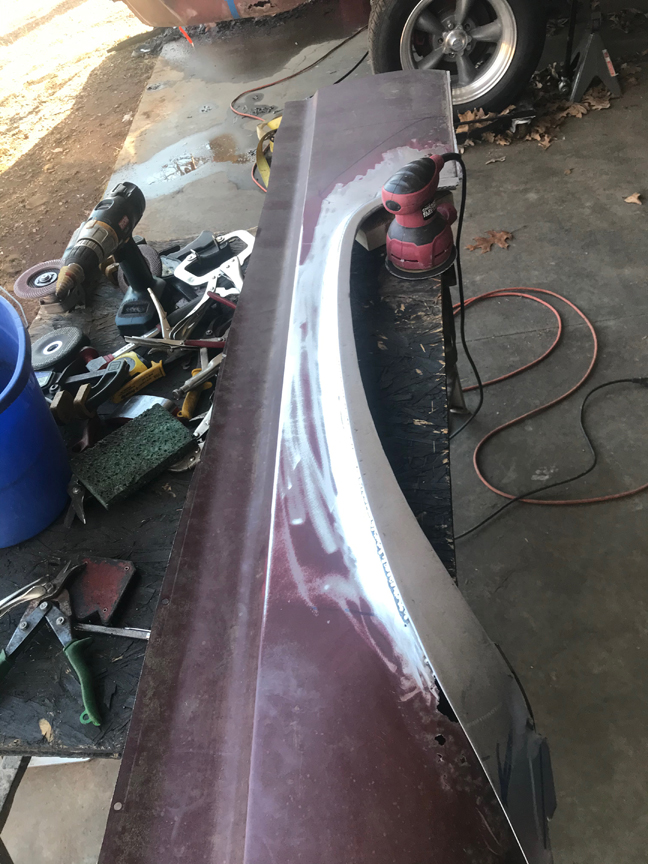
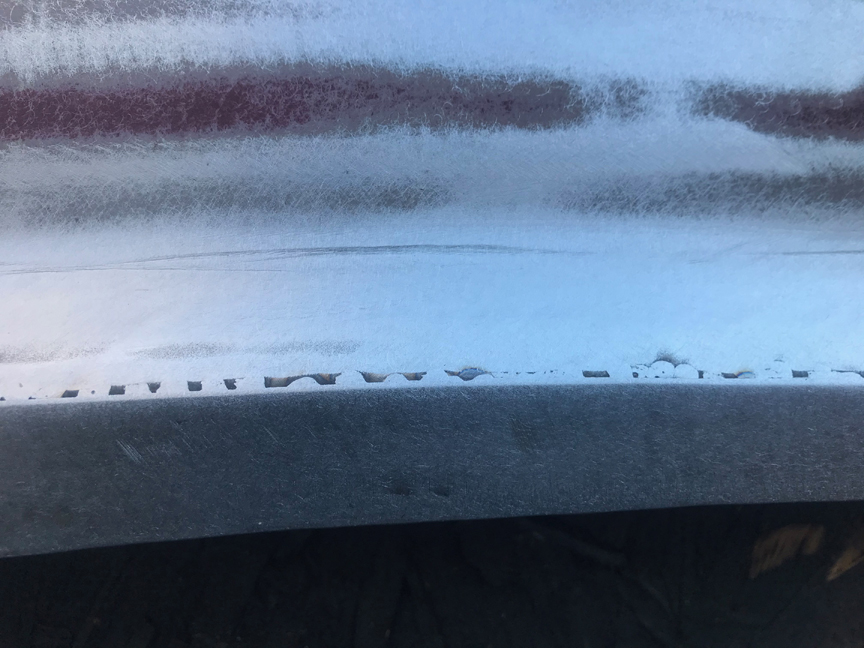
Here is a closeup of what the top edge of the lip looks like, I could have filled the welds in but don't know if that would matter in the long run, I am always happy not to blow a hole so the less welding I can get by with the better (I had very few blow throughs so I think I have my welder set good)
I finally decided to cut on the car, and like most things the rust is really less than I imagined the most work was grinding the old bondo off which was just a skim coat for the most part. I got all the old rust cut out except the spot at the rear of the wheel opening, the patch had to have a patch as well at the front, I got it started and the patch cut down some before it got dark on me,
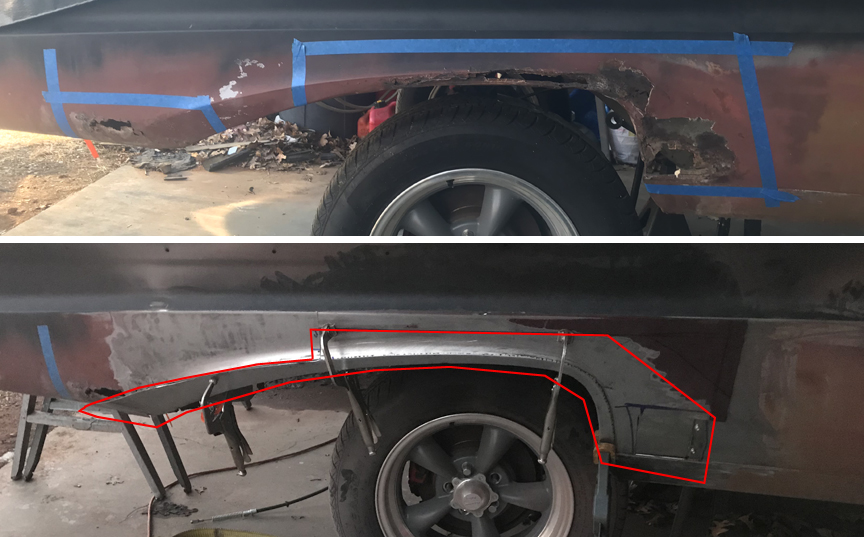
The red line I drew around shows how much I cut off the patch (or will, there is still some that will get cut at the front and top). I left the body line at the top to help align it but will cut half way between the body line and wheel arch.
I have to make both of those sections at the rear (both sides) which is going to be a challenge and I may have to build them in multiple parts because of the compound curves.
My old sedan is really not that bad as far as rust goes, makes me happy it is going away
I will keep on it.
See Ya,
Mike
This was the better quarter and I did more work than I should have to it, I had a set of pictures where I drilled out a spot of rust with the step drill and made a plug and welded it in but I ended up cutting it off in the end so decided this was going to be a long enough post without that and I am not a good example to follow anyway probably
Anyhow Step one after cleaning the edge up that needed the welding done on it (not counting patching a rust hole) is to clamp the lip patch on like I did before, right on top of the rusty lip.
I did several passes tack welding along the edge and used the damp sponge to cool it down after every few tacks so it would not warp.
Then I used my grinding stone to knock the tops of the welds off, followed but the flap wheel to smooth it, I think I had a 120 grit wheel in the grinder.
Next I flipped it over and cut the old part out, carefully with the angle grinder, I took it slow to keep from cutting into the front layer too deep.
I ran some tacks on the backside like before, I shouldn't have done that in the rear because I ended up cutting everything off but the new metal back there. I then welded the round rod to the lower lip of the opening.
After grinding all the welds smooth like I did on the upper part I got the DA sander out and ran it over the whole thing.
Here is a closeup of what the top edge of the lip looks like, I could have filled the welds in but don't know if that would matter in the long run, I am always happy not to blow a hole so the less welding I can get by with the better (I had very few blow throughs so I think I have my welder set good)
I finally decided to cut on the car, and like most things the rust is really less than I imagined the most work was grinding the old bondo off which was just a skim coat for the most part. I got all the old rust cut out except the spot at the rear of the wheel opening, the patch had to have a patch as well at the front, I got it started and the patch cut down some before it got dark on me,
The red line I drew around shows how much I cut off the patch (or will, there is still some that will get cut at the front and top). I left the body line at the top to help align it but will cut half way between the body line and wheel arch.
I have to make both of those sections at the rear (both sides) which is going to be a challenge and I may have to build them in multiple parts because of the compound curves.
My old sedan is really not that bad as far as rust goes, makes me happy it is going away
I will keep on it.
See Ya,
Mike

Re: Lavron's '64 Build Thread
nice work, Mike. You have the nerve that I don't have... yet...

1964 Comet Caliente Convertible
30,000 miles on our rebuild
All Comets start out as dreams...
Re: Lavron's '64 Build Thread
So in your most humble opinion do you think talent with the welder or with the grinder is most beneficial?
Great work!
Fred
Great work!
Fred
I'd rather do it myself if it's done right or not,,,isn't that what hotrodding is all about