Lavron's '64 Build Thread

The Era of The Square Body Racing Comets
lavron
Site Admin
Posts: 4710
Joined: Sat Nov 01, 2003 9:17 am
Location: Missouri, Ozarks
Contact:

Re: Lavron's '64 Build Thread

Post by lavron »

Groover wrote:nice work, Mike. You have the nerve that I don't have... yet...
Once you cut the shock towers out it is all downhill from there :P That and the front core support and trunk floor and...
Groover your build thread helped me to get going just so you know as did numerous people on this Forum, seeing someone do something takes a lot of mystery out of it.
SASSY wrote:So in your most humble opinion do you think talent with the welder or with the grinder is most beneficial?
Welding pretty sure, if I could weld I wouldn't need to grind, but if you can't weld one needs excellent grinding skills :roll:

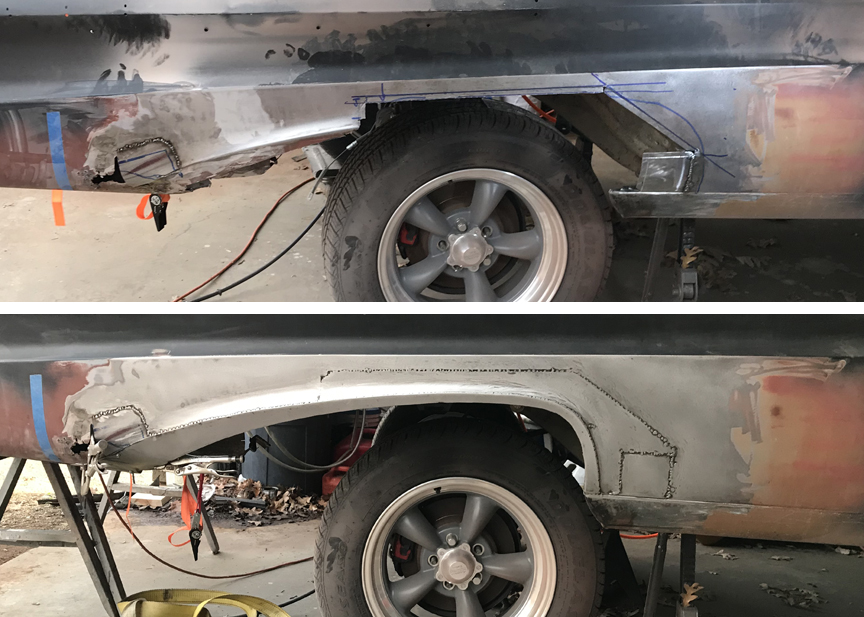
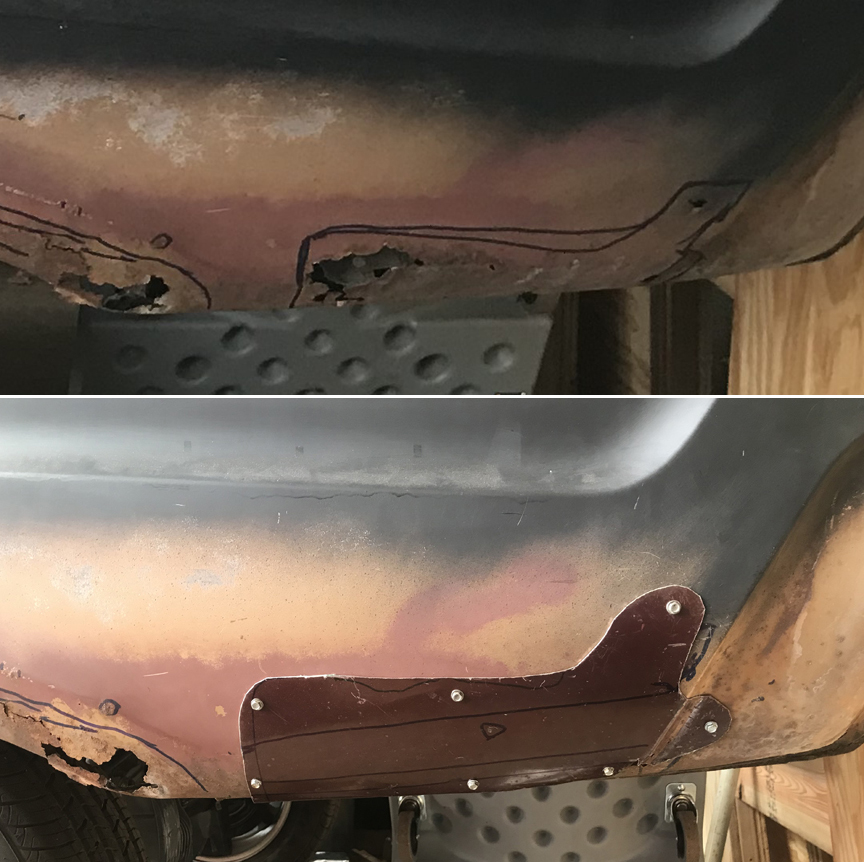
So for the most part using an old HF 110 welder and I haven't welded in a month and a half at least, I think I did ok not blowing holes, it doesn't hurt that the lip edge is 18 gauge either, really the only places I had trouble with was near thin rusty spots (blowing holes that is) and I was able to weld the hole back shut. The tell-tell will be next when I am welding the body parts back together. (I hope I don't run out of gas, it is getting pretty low)

Thanks guys, I am really happy to be getting this done, I know it appears to be delaying the flip but my uncle who is going to come up and help me is gone for Christmas visiting his daughter and I want to do the inner wells while it is flipped up.

See Ya,
Mike
Mike's build thread
viewtopic.php?f=9&t=13058
Image

User avatar
SASSY
Moderator
Posts: 5136
Joined: Sat Jan 07, 2006 12:32 am
Location: Wynndel, BC CANADA

Re: Lavron's '64 Build Thread

Post by SASSY »

Inner wells,,, was a big chore for me.
When I changed the rear wheel openings I got the tubs fit right out to the lip of the new opening. Spent a lot a time crammed up in there, welding helmet, gloves, trying to hold pieces of metal, tack and weld, shoulda pulled the rearend, wasn't a pretty picture for sure!!
Great planning on your part to do the inners with the car rolled up on its side. Are you going to be able to roll it on to both sides??
Fred
I'd rather do it myself if it's done right or not,,,isn't that what hotrodding is all about

Image

lavron
Site Admin
Posts: 4710
Joined: Sat Nov 01, 2003 9:17 am
Location: Missouri, Ozarks
Contact:

Re: Lavron's '64 Build Thread

Post by lavron »

SASSY wrote:Are you going to be able to roll it on to both sides??
Yes. Most roll over jigs I have seen only roll one way but I thought I would be over my head welding one side so went ahead and built it to rock both ways.

See Ya,
Mike
Mike's build thread
viewtopic.php?f=9&t=13058
Image

lavron
Site Admin
Posts: 4710
Joined: Sat Nov 01, 2003 9:17 am
Location: Missouri, Ozarks
Contact:

Re: Lavron's '64 Build Thread

Post by lavron »

Day 3 Patching the right rear quarter.

Cut out the old rusty stuff and weld in the new less rusty stuff :roll:
Image

Not quite that easy there was a lot of trimming and fitting to get it where I wanted it. You can see I made the two patches in the front and rear, still working on the rear one, I am afraid it will need a little filler to get it totally right but not much. I also ran out of gas so I need to get more and weld a few spots where I think it needs more, you can see it in the lower picture where the welds are spaced pretty far apart.

I will need to make the last patch in the far rear but don't think it will be too difficult.

See Ya,
Mike
Mike's build thread
viewtopic.php?f=9&t=13058
Image

lavron
Site Admin
Posts: 4710
Joined: Sat Nov 01, 2003 9:17 am
Location: Missouri, Ozarks
Contact:

Re: Lavron's '64 Build Thread

Post by lavron »

All welded and patched on the right side.
Image

Now to move on to the left side. Will finish the other side when the car is flipped up.

Less rusty every day.

See Ya,
Mike
Mike's build thread
viewtopic.php?f=9&t=13058
Image

User avatar
Jims65cyclone
Posts: 2764
Joined: Sun Nov 23, 2014 10:29 pm
Location: Lexington, SC

Re: Lavron's '64 Build Thread

Post by Jims65cyclone »

You're doing some great work, Mike. Hope I can do as well when the time comes. I don't have any "holes" in the exterior body panels, but I've got bubble rust in a number of places. :roll:

Jim
Image

lavron
Site Admin
Posts: 4710
Joined: Sat Nov 01, 2003 9:17 am
Location: Missouri, Ozarks
Contact:

Re: Lavron's '64 Build Thread

Post by lavron »

Jims65cyclone wrote:You're doing some great work, Mike. Hope I can do as well when the time comes.
Thanks Jim, it is one of those things you dread to do but, in this case, is something I have wanted to do for 40 years, I just wish 40 years ago I had bought some rear quarters for it. I have to get this Comet to PF to see if my "new" quarters match a perfect Comet close enough.

I may not know what I am doing (first time for much of this) but I am doing something and now I have at least one lower quarter that is more metal than rust for the first time in 40 years.

To help and encourage you, if I can, the first cut is the hardest, and I think you will do great.
Jims65cyclone wrote: I don't have any "holes" in the exterior body panels, but I've got bubble rust in a number of places.
Hopefully bubbles won't become holes when you start working on it.

I would have liked to had some pristine quarters to weld on there, it would have been a fairly easy project then but I look at it this way, I haven't spent anything so far except for some welding supplies and time, the only new metal there is the wheel arches themselves the rests cut off of my parts car that has given all that it was intended for (core support) so the patches off the rear quarters that most people would not even mess with are basically free as well. And I have saved another set of nice quarters for somebody out there that needs them for a nice restoration job that sits in a dark warehouse from now on not a driver that will get some use and probably dinged ups a little even.

It is taking every bit of my restraint not to start putting filler on there and finishing it but it would be a waste with the welding I have to do to attache the inner well etc. this one has a good trunk drop so the back could be finished but I may discover something I could not see when I flip it up so I need to call it good for now and hope no one sees it and thinks it looks like Frankenstein's monster too much before I can get the pretty dressing on it. Most of the spots you see in the pictures with pronounced welds showing are low spots that the filler will cover.

See Ya,
Mike
Mike's build thread
viewtopic.php?f=9&t=13058
Image

lavron
Site Admin
Posts: 4710
Joined: Sat Nov 01, 2003 9:17 am
Location: Missouri, Ozarks
Contact:

Re: Lavron's '64 Build Thread

Post by lavron »

This isn't a touch sketchy :roll:
Image

I took it slow. I was turning the car around so I could get to work on the other side, I did make it without a spill.
Image

You ever have one of those times that you can't figure out how you even got a bolt in, this is like one of those wooden puzzles with nail or a ship in a bottle :P
Image

I actually know how I got it in there the problem is the rust on the bolt, that concerns me some, the car has never even been on the road or outside and that bolt is that rusty, it is the part that goes through the frame, makes me wonder about getting a stainless bolt to go there or if I should keep the grade 8 bolt and apply some anti-seize or grease to it? It is going to get something but like the front spindles I didn't do anything yet because I knew I was taking it back apart. (That is my lower front link on my 4 link rear, in the old leaf spring hole, if you were wondering)

Finally all marked up for surgery.
Image

This side has it's unique challenges but now I have some experience. not sure how bad it is in front of the wheel well that doesn't have rust showing but has those bubbles like Jim was talking about, I will see how it is after I strip the paint off to know how much will have to be patched. The worse thing about patching this way is the part behind the wheel well was shot on the parts car (bad) and on my car as well so it is going to take some creativity on my part to made a decent repair back there.

On a good note the machine shop called and my head is ready to pick up, he said he CC'ed the chambers with the valves installed and they were 60cc calculated the compression ratio from what he had with the work done earlier to the block and said he thought it should be around 9.5 ratio, I was worried it would be closer to 10 and make it hard to run pump gas. I think I finally have all the info I need to get my cam ordered (hopefully).

See Ya,
Mike
Mike's build thread
viewtopic.php?f=9&t=13058
Image

User avatar
StPro
Posts: 382
Joined: Wed Mar 30, 2011 7:44 pm
Location: Coon Rapids MN
Contact:

Re: Lavron's '64 Build Thread

Post by StPro »

I would like to say the project is looking great. I would have thought about spinning the car around. I would have thought twice and chickened out until I had a ton of help
Only use the brakes to stop and get gas.
Projects
65 Comet 421Stroker
93 Mark VIII Supercharged w/Fogger
70 Torino GT

lavron
Site Admin
Posts: 4710
Joined: Sat Nov 01, 2003 9:17 am
Location: Missouri, Ozarks
Contact:

Re: Lavron's '64 Build Thread

Post by lavron »

StPro wrote: I would have thought twice and chickened out until I had a ton of help
Help is rare around here, most of the time I was spinning it it was only on three stands, the one on the front left kept getting left behind, I made sure to stop and replace it just to be safe. Really wasn't that bad, I swept the floor so I wouldn't run over anything to stop a wheel and the body alone is really light.

Like I said I went and got my head today from the machine shop, a bit more than I hoped in cost (a bit over $600) but he did a little more than originally planned.
Image

What was done is new valves (he supplied the valves) the intakes are the largest that came in the little Ford sixes, the head is a '72 and he recut the intake seats to fit '78 valves, he also installed hardened exhaust seats and valves, new valve guides and freeze plugs (again he supplied those so those are part of the cost)
Image

The chambers are 60cc, he had to un-shroud a couple of intake valves (#6 & I think #4). he milled the head but very little (he did not say how much).

He welded in the port divider that divides the siamese ports at 3&4 giving them a port that is equal in size to all the others (don't know it is needed but I would think it would change the tone a little and I would think it would even pressure some) he welded it a little different than I imagined but he said he did not know what the possibility of leaks would be along the top unless he welded it solid, of course he milled the exhaust gasket face after he welded and at the same time he drilled out 3 broken exhaust bolts and Heli-coiled them.
Image

The last machine work he did was cut the valve stem guide tops for Viton seals.
Image

I had supplied the valve springs from a 302 (exhaust springs, '78?) one piece spring keepers and new stem locks. He installed the valves and CC'ed the chambers as well.

I got it home and mocked it up on the block, mostly for a place to store it until I am ready to do final assembly.
Image

I need to get it all painted (and repainted) the block and head are going to be satin black.

I also need to finish getting the intake ready to be cast so I can get it on there.

Need to order a cam now, I think I have all the specs I need to contact cam manufactures and see what they recommend for my application and motor.

See Ya,
Mike
Mike's build thread
viewtopic.php?f=9&t=13058
Image

lavron
Site Admin
Posts: 4710
Joined: Sat Nov 01, 2003 9:17 am
Location: Missouri, Ozarks
Contact:

Re: Lavron's '64 Build Thread

Post by lavron »

Dang it I haven't worked on the Comet since last year, I guess I need to get busy :roll:

See Ya,
Mike
Mike's build thread
viewtopic.php?f=9&t=13058
Image

User avatar
Jims65cyclone
Posts: 2764
Joined: Sun Nov 23, 2014 10:29 pm
Location: Lexington, SC

Re: Lavron's '64 Build Thread

Post by Jims65cyclone »

Slacker!! :lol:

Jim
Image

User avatar
StPro
Posts: 382
Joined: Wed Mar 30, 2011 7:44 pm
Location: Coon Rapids MN
Contact:

Re: Lavron's '64 Build Thread

Post by StPro »

Jims65cyclone wrote:Slacker!! :lol:

Jim
I do have other things I have accomplished this year. OH you weren't talking to Me :D :D :D
Only use the brakes to stop and get gas.
Projects
65 Comet 421Stroker
93 Mark VIII Supercharged w/Fogger
70 Torino GT

User avatar
SASSY
Moderator
Posts: 5136
Joined: Sat Jan 07, 2006 12:32 am
Location: Wynndel, BC CANADA

Re: Lavron's '64 Build Thread

Post by SASSY »

StPro wrote: I do have other things I have accomplished this year. OH you weren't talking to Me :D :D :D
One of things you haven't accomplished is throwing up some pics of that Torino!
I really like those cars, my kid brother had 2 of 'em.
Both orange, one was auto with shaker, other and drag pac car 4speed, tac,,,, lots a fun!!
Fred
I'd rather do it myself if it's done right or not,,,isn't that what hotrodding is all about

Image

lavron
Site Admin
Posts: 4710
Joined: Sat Nov 01, 2003 9:17 am
Location: Missouri, Ozarks
Contact:

Re: Lavron's '64 Build Thread

Post by lavron »

OK new year same old stuff :roll: I finally got out a few minutes and made a patch for the left rear quarter in the far back.

Image

It will need a little hammer and dolly work when I start welding it in but I think it will work ok, the hard part was the hole just behind the bumper line, so I used the piece from the parts patch cut from just under the body line and moved it down, I had to add some more curve to it of course, but with a little tweaking I got it close enough, I still need to cut the old metal out.

Next I need to sand/grind the paint off ahead of the wheel opening and see what I have to do there, I will patch it before doing the wheel opening as well as that rear one. I will have to do a little on the bottom at the rear but am going to wait until I can see it good, the trunk drop is toast on this side so I will make a new to replace it and finish all that corner then.

Getting a little nervous about making the PF deadline this year, less than 5 months and there is a lot to get done, I haven't even started on the wiring harness :roll:

Kinda my short list of main things to get done; Putting the engine together the rest of the way (still need to order my cam), intake needs cast and fit up on the head (I may try and find the one barrel that goes on the 250 as a back-up plan temporary) all the cooling system need done, windows put back in which means getting weatherstripping and the headliner goes in before the glass (all the rest I don't want to think about), fuel system needs done, and all the little nitpick things like final brake lines etc.

Right now I need to concentrate on getting the car flipped up and all the welding and painting done on the undercarriage, then I can get the suspension reinstalled and make it a roller again, I think I will feel better after I get to that point (maybe) stuff can finally start going on the car permanently.

I will keep at it!

See Ya,
Mike
Mike's build thread
viewtopic.php?f=9&t=13058
Image

Post Reply