Lavron's '64 Build Thread

The Era of The Square Body Racing Comets
lavron
Site Admin
Posts: 4710
Joined: Sat Nov 01, 2003 9:17 am
Location: Missouri, Ozarks
Contact:

Re: Lavron's '64 Build Thread

Post by lavron »

I have to say it; It has been too cold to work in the open shed, went to town today and the truck was reading 9 degrees :shock: I did sweep the leaves out and look and ponder for few minutes until my nose began to freeze.

Supposed to be in the 60s this weekend.

Got to get those motor mounts cut apart so I can weld them, I am going to bolt the oil pump back on just to make sure I still have clearance and the water pump, etc before I do any welding, I might even chop the oil pan to fit because as long as I have been avoiding that I need to get going on it.

See Ya,
Mike
Mike's build thread
viewtopic.php?f=9&t=13058
Image

Kingspeedy2
Posts: 272
Joined: Tue Mar 31, 2015 2:36 pm

Re: Lavron's '64 Build Thread

Post by Kingspeedy2 »

Lavron ,I work away from home 2weeks in and 2 weeks home.So I daydream about my "Mistress" and al the things I want to accomplish when I get home..Sometimes a little retail therapy helps so I have parts for the next project waiting when I get home .There always seems to be one more puzzle piece required before you can continue .
Pics of my car haven't changed for months as mine is modified like yours and I am trying to get all the brackets and welding , and mock up out of the way before stripping it again for paint .
I have spent hours and hours on my creeper underneath trying to figure out how everything is going to snake around the 4 link and tie together underneath. in the end we will have a cars we are proud of .
Our puzzles will be complete one day.. I just hope I will still be alive then.. keep up the good work

lavron
Site Admin
Posts: 4710
Joined: Sat Nov 01, 2003 9:17 am
Location: Missouri, Ozarks
Contact:

Re: Lavron's '64 Build Thread

Post by lavron »

Kingspeedy2 wrote:I have spent hours and hours on my creeper underneath trying to figure out how everything is going to snake around the 4 link and tie together underneath.
Nothing like lying under your car trying to figure out how it is all going to fit :roll: Usually I think I need more space than I actually do, of course there are times when more space would help immensely in just one little tiny spot or another.

I was looking the other day about how I want to snake my header down pipes out around the starter (or over) looks tight but I am sure it will work out.

Nicer today so I might go out and cut the rear hump enough to get the car all the way down to the bumps with the driveshaft installed, just to make sure :roll: same with needing to get the oil pan design going, all needs to happen before I mod the motor mounts in case there needs to be additional modification.

There is a lot of satisfaction when you actually see the stuff operational. I keep looking at that engine block and trans mocked in there and wish they were complete and ready to fire up and take for a drive.
Kingspeedy2 wrote:Our puzzles will be complete one day.. I just hope I will still be alive then.
I feel that way at times too, of course I thought I would never be to the point I am right now either :roll:

See Ya,
Mike
Mike's build thread
viewtopic.php?f=9&t=13058
Image

Cobraguy
Posts: 39
Joined: Wed Sep 12, 2018 10:35 am
Location: El Cajon CA

Re: Lavron's '64 Build Thread

Post by Cobraguy »

Mike I would wait on the motor mount final until you have the pan on. I had to adjust mine after final fitment also. I have pics. The front hump for the oil pump barley clears the rack. Its all a tight fit in the round body falcon. I think you have an extra inch or two to play with in the square body. Firewall to head is about 1 1/2". Waterpump snout to radiator 3/4". Hump to rack 3/8". Oilpan to crossmember 1/2". Air cleaner to hood 1".

Cobraguy
Posts: 39
Joined: Wed Sep 12, 2018 10:35 am
Location: El Cajon CA

Re: Lavron's '64 Build Thread

Post by Cobraguy »

Let's see if I did this right
Image
It's tight

Cobraguy
Posts: 39
Joined: Wed Sep 12, 2018 10:35 am
Location: El Cajon CA

Re: Lavron's '64 Build Thread

Post by Cobraguy »

Here are my pics of the oil pan
Image
Image
Image
Image
Image
I coated it with some epoxy just in case I missed any pin holes. No leaks after several hundred miles.

lavron
Site Admin
Posts: 4710
Joined: Sat Nov 01, 2003 9:17 am
Location: Missouri, Ozarks
Contact:

Re: Lavron's '64 Build Thread

Post by lavron »

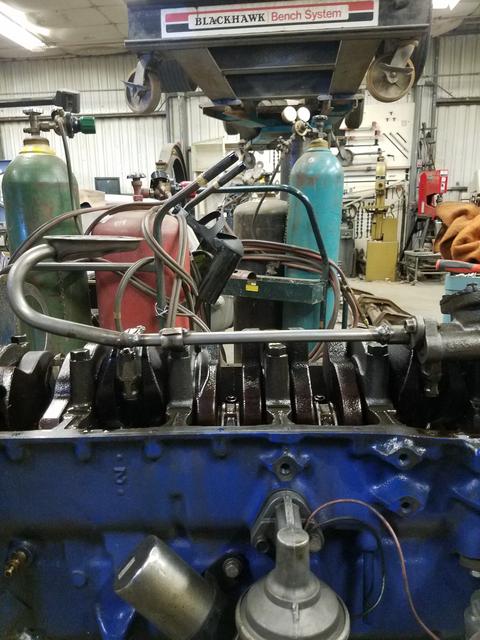
Cobraguy wrote:Here are my pics of the oil pan
Thanks for those they look good, you like the the way it is driving? I will be studying on your work :P

Way to go on getting pictures posted up, BTW 8)

Got out today and cut another hole in the floor of the Comet, I hate cutting out good parts, doesn't bother me so much when they are rusty :roll:

Here is the car all the way down, you can see the offset on the rear pumpkin here, makes it really tight on the right side. one thing to remember, when the car is all the way down it will not be moving, so even though the clearance is tight it should be ok (I hope)
Image

I went out and cut a piece out the floor of the parts car and made part of the hump, it is from the front just behind the floor support, I would have liked it to be longer but the rest of the floor in that car is near non-existent. Here it is next to the part I cut out so you can get an idea of how much larger it is.
Image

I trimmed it a little neater around the edge after I took this picture, I just used a pair of channel lock pliers and a hammer and my little anvil to make the flange along the upper edge then I punched holes around the lip and edge (the holes you see there are from where I had it screwed down while fitting it)

I got it welded in (mostly) after flap wheeling the paint off everything, I have a couple of welds that I did not do too well (haven't welded in month or so, I am out of practice) I think I missed the base and just welded the hole closed, I will stitch weld it some when I do the other patch just to make sure.
Image

I still have to come up with a piece of metal to finish the front part of it, here I have the piece I cut out sitting there so you can see how much taller and wider I made the tunnel.
Image

I noticed where those wrinkles are on the piece I welded in it is different on my car in the same spot and has some ribs right there (going long ways), the parts car must be an earlier or later built Comet than mine because somewhere along the line they changed the floor pan tooling, this is a shot of the same spot on my floor the patch came from, notice the ribs right where the seat mount is, the parts car did not have those.
Image

I thought that was interesting, just one of those things that shows you they are not all the same even if they are both '64 Comet 2dr sedans, I need to go decode the vin on the parts car but I bet it is older than mine which is a mid 64 car and they modded to get rid of the wrinkle there (use up excess metal) and add a little strength at the same time.

I will make a pattern of the missing part, I can probably cut a patch out of the front part of the transmission hump on the parts car, not rusty up there.

See Ya,
Mike
Mike's build thread
viewtopic.php?f=9&t=13058
Image

tomb22
Posts: 684
Joined: Thu Jan 28, 2016 8:11 pm

Re: Lavron's '64 Build Thread

Post by tomb22 »

Hi Mike
Good to see all the progress your making. In one of the pictures I see you have the cross member for the transmission mount just about cut out. You planning on strengthening that area any or do you have a different trans mount, that I don't see. Just wondering!!!
Tom
Image
tomb's 65

lavron
Site Admin
Posts: 4710
Joined: Sat Nov 01, 2003 9:17 am
Location: Missouri, Ozarks
Contact:

Re: Lavron's '64 Build Thread

Post by lavron »

tomb22 wrote:Hi Mike
Good to see all the progress your making. In one of the pictures I see you have the cross member for the transmission mount just about cut out. You planning on strengthening that area any or do you have a different trans mount, that I don't see. Just wondering!!!
Tom
It is cut half in two, I have not decided if I will reinforce it or not, I have read that some people cut it completely in two when doing a rear shifter T5 without issues, they never reinforce it or replace it and that is on V8 cars, some just weld the ends of it closed.

Since 1/2 of mine is still there and I only have a six, I thought I might be ok with it like that. Any advice from you guys on here are welcome.

If I was using a V8 bell housing the shifter would fall right in the center"ish" of the support and that is why they cut them out, I am using a V6 bell so it moves my shifter back further.

See Ya,
Mike
Mike's build thread
viewtopic.php?f=9&t=13058
Image

lavron
Site Admin
Posts: 4710
Joined: Sat Nov 01, 2003 9:17 am
Location: Missouri, Ozarks
Contact:

Re: Lavron's '64 Build Thread

Post by lavron »

Got out a little today and patched some more on my floor hump, I welded on the one I had in there some more as to fix my few dodgy welds from the other day (I actually just stitch welded all the around it after squeezing it a little with a big "C" clamp to bring the metal in contact).

I started looking for a piece of floor metal in the parts car big enough to finish the patch out but there wasn't any :roll: I could have made the transmission hump top work but would have had to cut the spot welds out from the trans brace to have one long enough and didn't feel like it, so I just reused the one I cut out and still have to add a little more to it on one edge to make it wide enough.

Image

I think I can dig up a little piece to fill that open strip in.

I decided to butt weld that piece in after I vowed never to do that again, actually it wasn't bad except I had too big a gap between the panels so it was a little tough to fill the gap, I got it done but next time I am going to get them tighter together, you can see one spot (at least) where I blew through and it took me a little while to get the hole filled in, I decided not to grind it too smooth.

Hopefully this week I can get the other patch welded in and this little part of my project will be done for a while :P (inside the car) The only other major structure work in the cabin is I am going to make a firewall between it and the trunk area but not doing that until after I build a new trunk floor.

I know it is crazy, but I like using the 1964 metal if I can instead of new shiny stuff from China :roll:

See Ya,
Mike
Mike's build thread
viewtopic.php?f=9&t=13058
Image

lavron
Site Admin
Posts: 4710
Joined: Sat Nov 01, 2003 9:17 am
Location: Missouri, Ozarks
Contact:

Re: Lavron's '64 Build Thread

Post by lavron »

Quick one today, I had other stuff to do but got a few minutes and got the last patch welded in, mostly, I still have a few spots to touch up and a couple of places I just decided to not weld I guess :roll: It is all welded in solid however but I will finalize it sometime, by Dan's rule it is 98% done.

Image

Used a leftover piece of front floor pan patch to make this patch out of, I guess it was good I don't throw out anything until I am absolutely sure I can't use any of it, my only problem is finding the things I did not throw out :roll:

Of course I will seam seal all of this but may wait until I can get underneath and check if there is anymore welding that needs done underneath.

A few minutes at a time and will have her done.

See Ya,
Mike
Mike's build thread
viewtopic.php?f=9&t=13058
Image

lavron
Site Admin
Posts: 4710
Joined: Sat Nov 01, 2003 9:17 am
Location: Missouri, Ozarks
Contact:

Re: Lavron's '64 Build Thread

Post by lavron »

I checked the VIN data plate on the parts car (actually a picture of it I took before I bought the car, it had no doors when I got it), it is 14L so it would be a November 14, 1963 Comet, My Comet is a 13E - May 13, 1964.

All this is concerning the difference in the floor pan stampings, I suspected the parts car was an earlier Comet. Not saying that all of them are like it with the wrinkled trans hump and no ribs, that is just how the two I have are.

See Ya,
Mike
Mike's build thread
viewtopic.php?f=9&t=13058
Image

lavron
Site Admin
Posts: 4710
Joined: Sat Nov 01, 2003 9:17 am
Location: Missouri, Ozarks
Contact:

Re: Lavron's '64 Build Thread

Post by lavron »

So you guys don't think I haven't been doing anything :P a picture.
Image

Basically finished the rear hump modification, will need seam sealed but welding is done.

See Ya,
Mike
Mike's build thread
viewtopic.php?f=9&t=13058
Image

pugs65
Posts: 870
Joined: Wed Jun 05, 2013 7:21 pm
Location: Knoxville, TN

Re: Lavron's '64 Build Thread

Post by pugs65 »

Looking great Mike. Keep up the good work, Pugs.
302 roller
4 speed
Real cars are built to be driven and driven hard!!!

lavron
Site Admin
Posts: 4710
Joined: Sat Nov 01, 2003 9:17 am
Location: Missouri, Ozarks
Contact:

Re: Lavron's '64 Build Thread

Post by lavron »

pugs65 wrote:Looking great Mike. Keep up the good work, Pugs.
Thanks Pugs!

Tried to make an impromptu video today of progress on the Comet but it made me seasick to watch it so I will have to try again :roll:

I set the radiator down in there and bolted the water pump on, in stock form there is almost 2" between them.

See Ya,
Mike
Mike's build thread
viewtopic.php?f=9&t=13058
Image

Post Reply