Lavron's '64 Build Thread

The Era of The Square Body Racing Comets
lavron
Site Admin
Posts: 4710
Joined: Sat Nov 01, 2003 9:17 am
Location: Missouri, Ozarks
Contact:

Re: Lavron's '64 Build Thread

Post by lavron »

bigdan wrote:Also, take a couple of bolts and cut the heads off for guides while you're lining everything up on your back
Well I could but I have no motor right now :P Just wanting to check and make sure the shifter is coming up through the floor console ok before I weld it in, I don't want to re-live the MII install and cut back out and move scenario again, easier to fix anything now while it is not welded together :P

I think just some 2X lumber screwed together to make a cradle should get me up there close enough to get the rear mount hooked up. I think I have plenty of space and I am being over cautious.

Back to visit the dentist this morning but maybe I will get a few minutes to try and get that up in there after I get back home.

See Ya,
Mike
Mike's build thread
viewtopic.php?f=9&t=13058
Image

lavron
Site Admin
Posts: 4710
Joined: Sat Nov 01, 2003 9:17 am
Location: Missouri, Ozarks
Contact:

Re: Lavron's '64 Build Thread

Post by lavron »

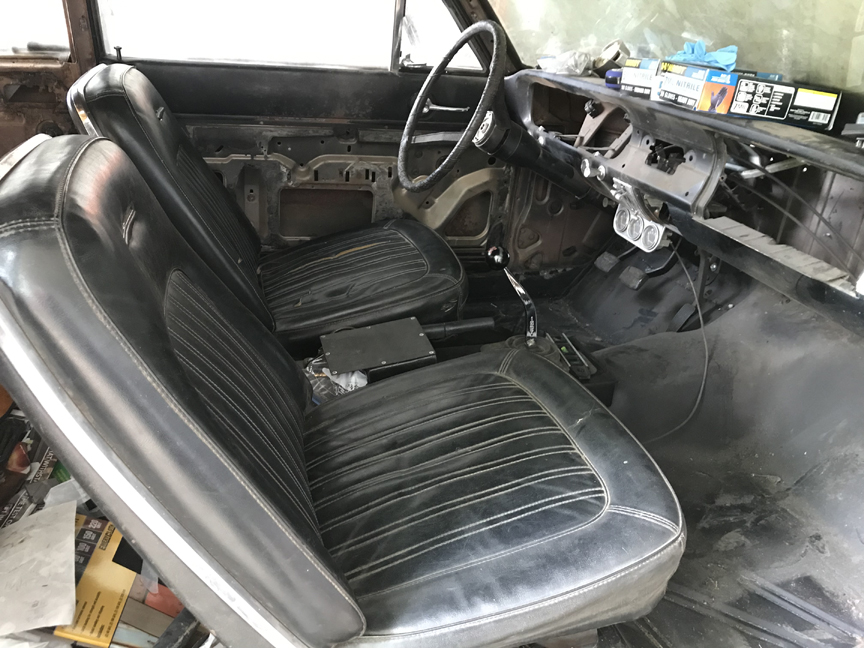
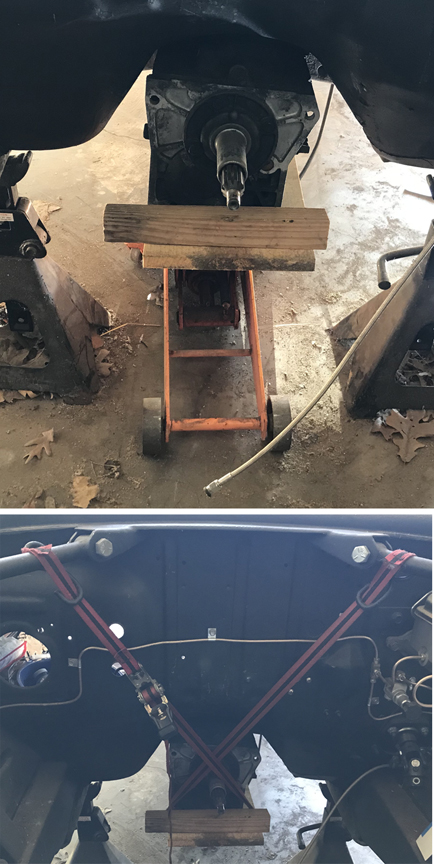
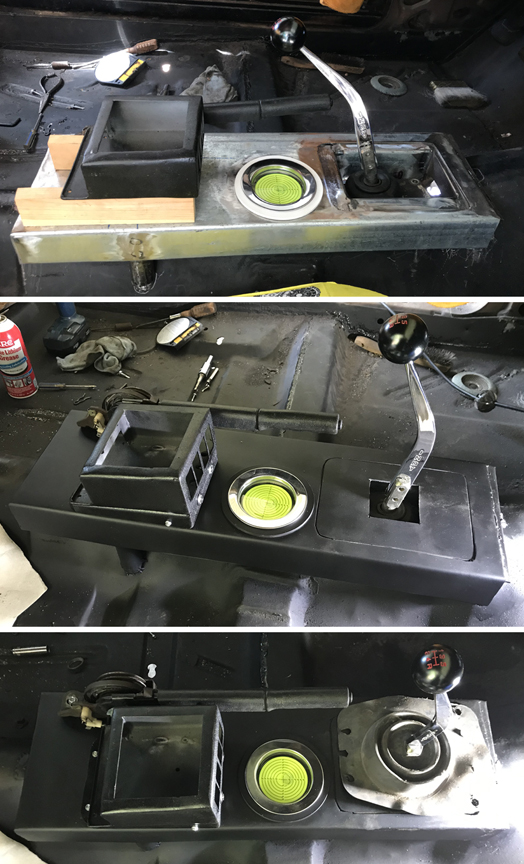
Got the transmission up close to where it will be when attached to the motor, I hope, I know it is in the rear mount pretty close but I can't really say if the front is high or low enough, it is fairly centered however. I screwed a 2X2 to the front and then a piece of 1X under the transmission so I would have a flat area to lift it with the jack, worked the first time easy :P I then used a ratchet strap to hold the front up and, of course, the rear transmission mount, it is not held super steady and the trans has a tendency to rock back and forth a little :roll:
Image

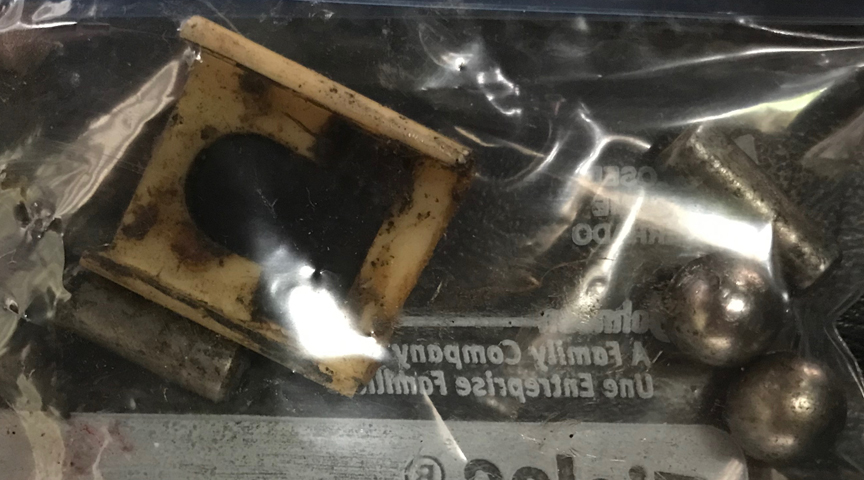
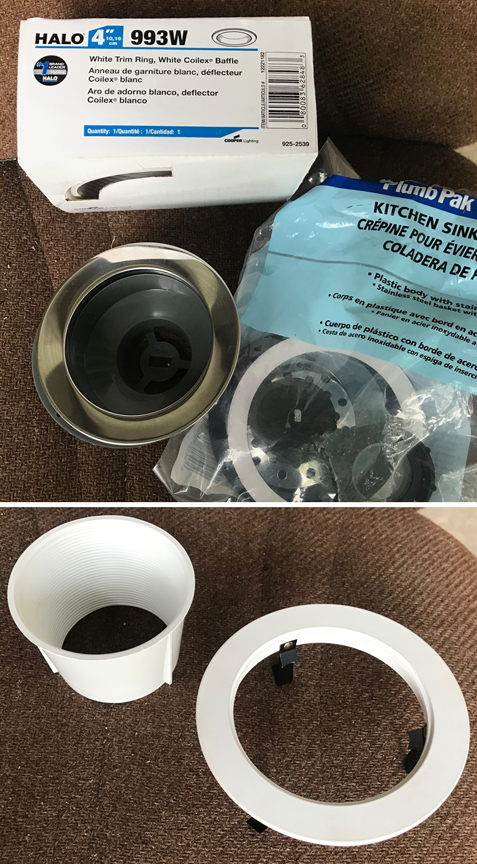
I made the trim ring for my level out of a stainless rimmed sink drain (stainless over plastic) and a 4" recessed light fixture. When I went to the lumber yard the other day I found the light fixture on clearance for $2 and the sink drain was $6. I just cut the bottom part off the sink drain leaving just the stainless rim and about 3 threads where the big nut goes that holds it in the sink, the light fixture ring is metal and drilled the rivets out that hold the black spring clips on there and then the baffle is plastic and the tapered interior is actually threaded and I could screw the sink drain into it so I cut the baffle down to about 1/2" tall and screwed the drain into it. Of course the baffle sits in the recess of the light ring.
Image

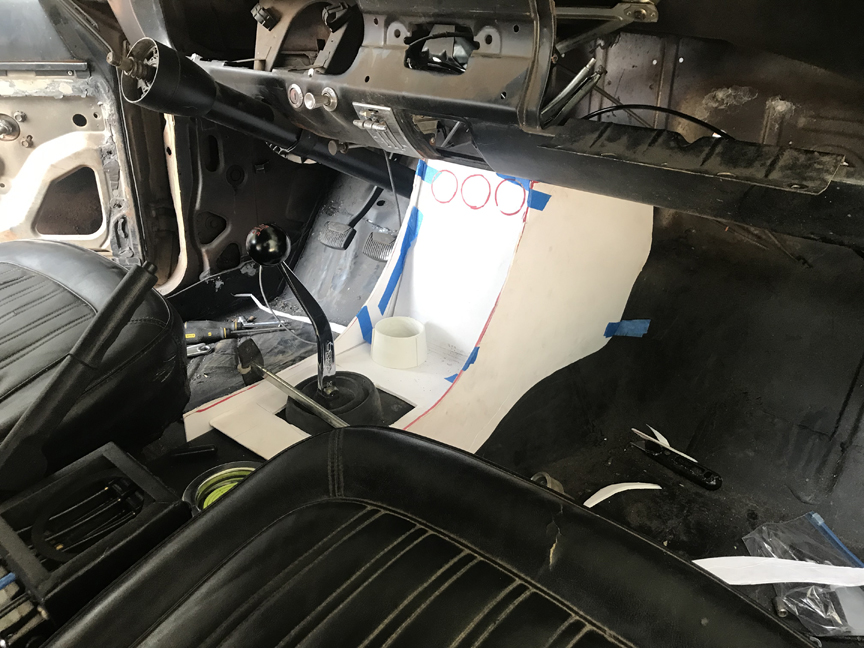
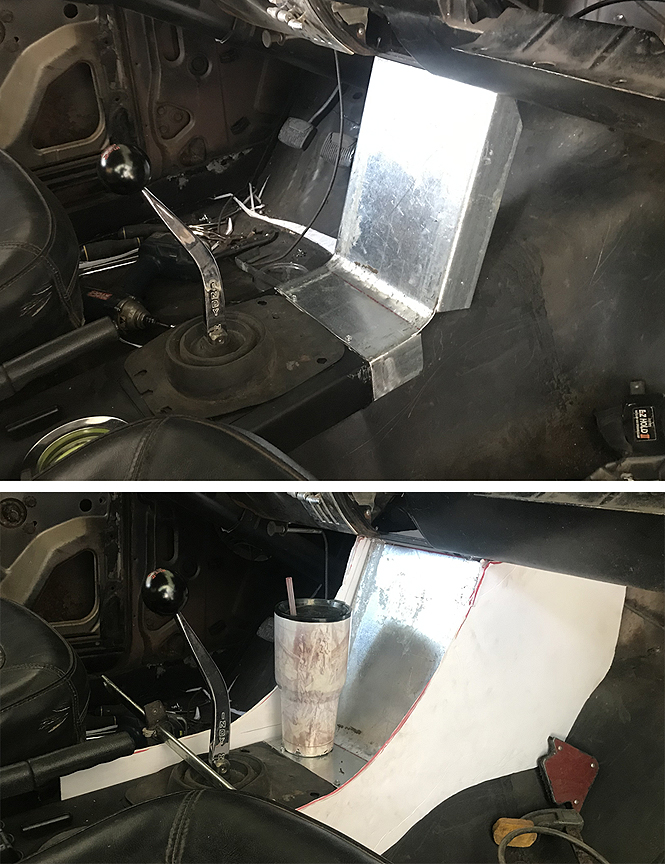
Finally with the transmission mocked up in there I finished fitting the console base in and welded it in place, I also made a riser mount for the air bag control box that houses the two switches I had originally over to the side before I cut the width of the box down (one switch is an override to cut power to the compressor if I need too, the other in a momentary contact switch for an electric tank drain). I replaced the top over the shifter with a plate with a smaller hole but after that I went back in the shed and dug out the original Mustang T5 boot, I think I will cut the hole to match it and sandwich it between the plate and the box as a seal, someplace I have the hurst boot so will install it on top of the final console cover.
Image

While I was putting some black primer on there to protect the bare metal I went ahead and primed the white ring.

I am going to see if I can find a 3.5" O ring to put around the level bezel to hold it in so it can be pulled out to adjust the level, the bigger ring will be attached more permanently.

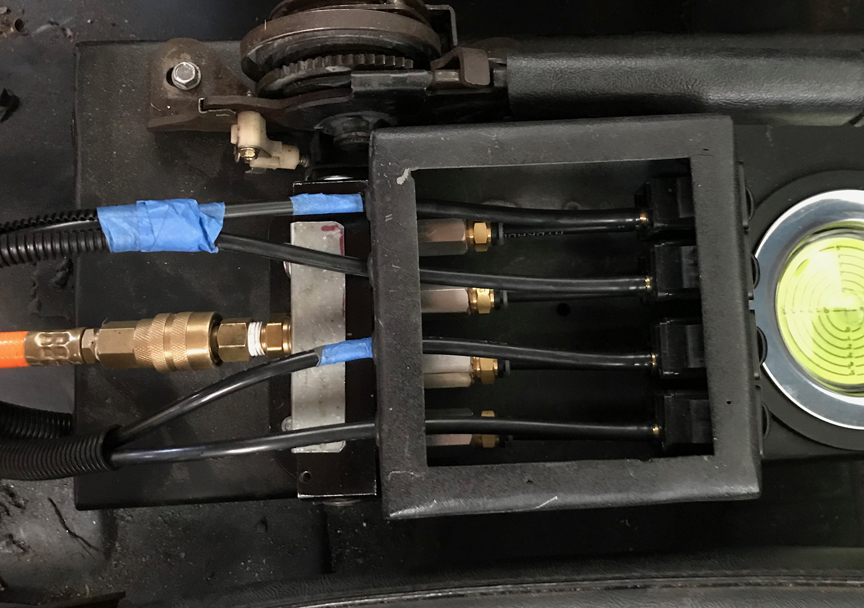
I need to go ahead and get the air valves reinstalled and run my air lines back to the bags so I can get the car back on it's own suspension instead of jack stands, also need to get the e-brake hooked back up and adjusted so the car can hold itself in place now that everything is welded down solid.

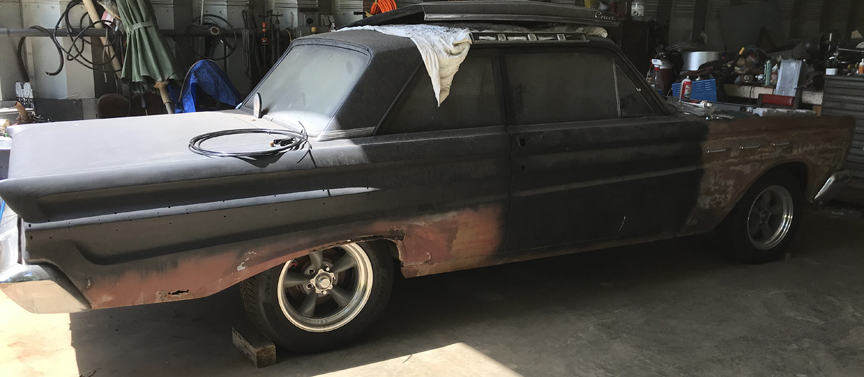
That about finishes that little project up until I get ready to build the console outer skin.

See Ya,
Mike
Mike's build thread
viewtopic.php?f=9&t=13058
Image

User avatar
Jims65cyclone
Posts: 2769
Joined: Sun Nov 23, 2014 10:29 pm
Location: Lexington, SC

Re: Lavron's '64 Build Thread

Post by Jims65cyclone »

You're just a regular MacGyver when it comes to making something out of something else. :shock: :lol: :lol:

Jim
Image

lavron
Site Admin
Posts: 4710
Joined: Sat Nov 01, 2003 9:17 am
Location: Missouri, Ozarks
Contact:

Re: Lavron's '64 Build Thread

Post by lavron »

Jims65cyclone wrote:You're just a regular MacGyver when it comes to making something out of something else. :shock: :lol: :lol:

Jim
Well you can just call me "Mikegyver" but there are many more people more talented than I am at this, not a lot that are cheaper however :roll:

Did not get a bunch done today, while I was under the car messing with the transmission I saw a spot where I did not weld the new floorpan down very good (a gap between the frame and floor) so I cut the dodgy welds and screwed it down tight and re-welded it, did a couple of other spots while I was at it, all is good now.

I got the e-brake hooked back up and made a little bracket to attach the front cable up under the floor, I was afraid to pull it too tight because I think it is going to pull the cable end off where I shortened it and added the bolt on end, I twisted the bolt off tightening it down and don't want to mess with fixing it right now, I guess when it pulls off there I can modify the arm a little so I can slip the cable in without removing that part, right now it is trapped on there and I would have to try and drill the bolt out or cut the cable. The brakes sort of engage right now and I have more pull on the handle so they should work.

Next I want to get my seat mounts built and hook the air bags back up, at least temporarily. At some point soon I need to remove the fenders and bumper and get the core support replaced.

See Ya,
Mike
Mike's build thread
viewtopic.php?f=9&t=13058
Image

lavron
Site Admin
Posts: 4710
Joined: Sat Nov 01, 2003 9:17 am
Location: Missouri, Ozarks
Contact:

Re: Lavron's '64 Build Thread

Post by lavron »

Got the seats installed today, I know I had them mocked up before but this time I made a stand-off for the rear inside on each and removed the long studs and replaced them with shorter grade 8 bolts, added some fender washers on the inside and outside of the floorpan and they are bolted in solid.

Image

I went ahead and took off the seatbelts for now because I am sure they need replaced with new ones or rebuilt.

I have one problem however and I am not sure how to resolve it, the drivers seat would not adjust the tracks were binding so when I had the tracks off I checked them out and I am missing a few of the little nylon slides and ball/roller bearings, there are two on each track, the outside drivers seat has none, they are completely gone, the inside drivers track has only one, they are all on the passenger side except it spit one out after I got the seat installed (It had fallen out when I was messing with the track and reinstalled it, that is it in the bag) it is actually missing one side that wraps around the track.
Image

The problem is I can't seem to find any out on the internet or I don't know what they are called, if I could find them I would just buy all 8 (really if I could find the nylon part I think I could source the bearings) what you see in the picture is one nylon slide and two sets of bearings (each has the roller bearing in the long slot and the ball bearing in the round hole)

I will keep Googling around and maybe I will figure out what I need or I might have to buy some tracks if I can find them.

See Ya,
Mike
Mike's build thread
viewtopic.php?f=9&t=13058
Image

popscomet
Posts: 9693
Joined: Sat Jan 01, 2011 11:19 pm
Location: Jacksonville, Arkansas

Re: Lavron's '64 Build Thread

Post by popscomet »

MIKE,I know your pass seat tracks,,,,,but to my surprise,I own a 64 mustang for over 30 odd years,it is titled as a 64,it was built on the 17th day of production,,am the 3rd owner,to my surprise the pass seat does not track,it bolts to the floor and does not move,,I researched this stang and found out that was one of many things that says it's an early built car,,,,your seat problem caused me to recall this oddity....good luck pop
Image
pop/glenda

lavron
Site Admin
Posts: 4710
Joined: Sat Nov 01, 2003 9:17 am
Location: Missouri, Ozarks
Contact:

Re: Lavron's '64 Build Thread

Post by lavron »

It does make me think Pops that the passenger seat really doesn't need to move, that may be a solution to my problem.

See Ya,
Mike
Mike's build thread
viewtopic.php?f=9&t=13058
Image

User avatar
Jims65cyclone
Posts: 2769
Joined: Sun Nov 23, 2014 10:29 pm
Location: Lexington, SC

Re: Lavron's '64 Build Thread

Post by Jims65cyclone »

Have you looked on the Mustang parts sites? You can practically build a stang from scratch with repro parts. I would think something as susceptible to wear as seat rollers would not be available. Maybe check with a local car upholstery shop to see if they have any go-to parts suppliers that they use.

Jim
Image

lavron
Site Admin
Posts: 4710
Joined: Sat Nov 01, 2003 9:17 am
Location: Missouri, Ozarks
Contact:

Re: Lavron's '64 Build Thread

Post by lavron »

Jims65cyclone wrote:Have you looked on the Mustang parts sites?
I have, I don't think anyone makes them, there are whole tracks but I can't find ones that look like mine, the release handle on mine comes out the side all of the Mustang ones I have seen are going out the front.

Tomorrow I am going to check the seat tracks on the parts car even though it is a '64 with a bench seat maybe it is a common part.

Staring at seat tracks not sure if it is possible but the closest appearing ones are '68 Camaro/GM ones (hmm I have some late 60s GM buckets in the shed I will check tomorrow), I can't imagine that one company built all the seat tracks for the factory but stranger things have happened :roll: I know the mount points are different on the bottom but if they contained the parts I need I would use them.

I did finally find a site where someone was trying to rebuild Mustang tracks and from what I could see I may be missing the nylon clips/bushings/whatever that retain those so that may be why they were popping out, I can get Mustang tracks for around $60 a set but I have to do that not knowing if they would fit.

I guess look at it this way, someone gave me these seats so I am into it for $0 so far (except the bolts I bought)

See Ya,
Mike
Mike's build thread
viewtopic.php?f=9&t=13058
Image

User avatar
SASSY
Moderator
Posts: 5148
Joined: Sat Jan 07, 2006 12:32 am
Location: Wynndel, BC CANADA

Re: Lavron's '64 Build Thread

Post by SASSY »

Hey Mikegyver,, enjoying the progress!
Any word on the motor?
Fred
I'd rather do it myself if it's done right or not,,,isn't that what hotrodding is all about

Image

lavron
Site Admin
Posts: 4710
Joined: Sat Nov 01, 2003 9:17 am
Location: Missouri, Ozarks
Contact:

Re: Lavron's '64 Build Thread

Post by lavron »

SASSY wrote:Any word on the motor?
No I may try and call the guy Friday or Saturday, I would like to know what my bearings need to be at least so I can get them ordered, and I might need to set at least a small fire under him. :roll:

See Ya,
Mike
Mike's build thread
viewtopic.php?f=9&t=13058
Image

lavron
Site Admin
Posts: 4710
Joined: Sat Nov 01, 2003 9:17 am
Location: Missouri, Ozarks
Contact:

Re: Lavron's '64 Build Thread

Post by lavron »

Got out this morning and got the air ride box hooked back up and ran the lines in semi permanent locations, I had a little trouble because I had cut the box down and for some reason the little short lines from the valves to the manifold were too short, I made the box narrower did not change the front to back dimensions I don't think, oh well I just had to take it back apart cut all the lines off and make longer ones, went back together and far as I can tell there are no major leaks.
Image

I did put the car back down on the floor at least temporarily been a while since it has been off the stands, I was able to get it swept out good underneath.
Image

Sitting close to ride height here so I can see if it leaks down any. The only issue still address is the car still rolls with the e-brake pulled so I need to do some adjustment (I haven't done any just talked about it :roll: )

Didn't get a chance to look at the seat tracks today trying to get ready for a big cookout get together here Sunday so I am probably done this week unless I have some little things I can do.

See Ya,
Mike
Mike's build thread
viewtopic.php?f=9&t=13058
Image

lavron
Site Admin
Posts: 4710
Joined: Sat Nov 01, 2003 9:17 am
Location: Missouri, Ozarks
Contact:

Re: Lavron's '64 Build Thread

Post by lavron »

Yesterday stopped by Harbor Freight and picked up one of their packages of assorted springs and a couple with different stainless machine screws and was able to get the level screwed down and adjusted today, I have the car mostly level and at ride height, which it has held for the last couple of days so hopefully I am leak free.

The level is fairly sensitive, if I lean in the car and put my hand on the seat to steady myself it moves. It is centered now.

I was also measuring between the Comet and my wife's Focus, I was surprised that my roof is an 1" lower at ride height, I do have about +8" under my rockers where her car is about 5.5 - 6" but mine really only has about 6"of ground clearance under the MII crossmember and transmission mount, I am going to have a hard time straddling possums on the road :roll: Might have to make a skid plate or an air dam/scoop under the front bumper, like Fred suggested , out of 1/4" steel to act as a cow catcher of sorts :P only problem is I don't want to scoop up the varmints :? Just a couple of other little trivia items that surprised me when comparing the Focus to the Comet, they are basically the same width, same height, but the Comet is much longer :P now I want to use the drivetrain out of a Focus to build a mid-engine turbo charged Comet (probably not going to happen) I have watched too many YouTube videos where they are working on modern cars and there is way too much wiring and computer controlled stuff for me to want to mess with them :roll:

I also picked up the scrap aluminum from my buddy so I should be getting closer to casting up an intake, I forgot to call the machinist so looks like it will be next week before I can call him. :oops:

See Ya,
Mike
Mike's build thread
viewtopic.php?f=9&t=13058
Image

lavron
Site Admin
Posts: 4710
Joined: Sat Nov 01, 2003 9:17 am
Location: Missouri, Ozarks
Contact:

Re: Lavron's '64 Build Thread

Post by lavron »

keeping it a short day today and I didn't want to start anything major so i decided to start designing the console, I had some foam core board I picked up at the dollar store so I cut the front sides out and the center part out and then placed them in the car and trimmed them slowly till I got a fit I liked. So far I like it, I drew the spots approx. for the air gages and it looks like I might be able to fit some cup holders in front of the shifter.
Image

I figure I will have to trim some up under the dash for AC clearance etc. I am going to build the sides out of 1/4" UHMW Polyethylene Plastic Sheet, currently thinking aluminum sheet for the center, there will be an arm rest as well just haven't messed with laying it out yet.

I think I found the stuff to manufacture new parts for my seat slides as well and I will show how I am going to do it as soon as I pickup the parts and try making one :P

Guy who is going to help me cast my intake was here yesterday at the cookout and he looked at my pattern and said it looked good, I think he is ready to cast them I just have to get my pattern mounted down on a board and build some flasks. I also showed him the hood ornament I had made and cast when I was in school and I still have my original pattern, he wants to cast one in bronze for me this summer I think, I might let him but I need to clean it up some first :P
Image

The reason this one has filler on it I was going to perfect it and use it for a new pattern to cast a final one, I just never did. I am not going to have a hood ornament now anyway but thought it might make an interesting conversation piece.

See Ya,
Mike
Mike's build thread
viewtopic.php?f=9&t=13058
Image

lavron
Site Admin
Posts: 4710
Joined: Sat Nov 01, 2003 9:17 am
Location: Missouri, Ozarks
Contact:

Re: Lavron's '64 Build Thread

Post by lavron »

I guess I moved past the design stage on my center console because I made the center section out of steel and screwed it in place :roll:
Image

I will more than likely cut some of the center section metal out (make holes) because this is way overkill but I think I will wait until later to do so because I may end up doing something really thin for the covering/veneer and might need to support.

May or may not do the cup holders in front of the shifter I have not decided yet.

I have decided I am going to put a little trap door on the passenger side of the console and put my fuse boxes behind it, on the drivers side will be the ignition system.

One big mystery is if the A/C will clear everything but I can aways trim the side pieces if I need to for that.

Moving along, seem to be procrastinating on getting the core support replaced, I know it won't be that bad a job once I get going on it and once that is done I will be ready to pull the glass out of the car all suspension, basically everything, and get the car flipped up so I can get the bottom finished up, once I get that done I should be ready to get all the suspension installed for the final time.

The other major thing I need to get going on is the wiring harness I am getting close on having all the stuff for that. Closer every day.

See Ya,
Mike
Mike's build thread
viewtopic.php?f=9&t=13058
Image

Post Reply