Lou's 65 Comet Build

The Era of The Square Body Racing Comets
User avatar
SASSY
Moderator
Posts: 5149
Joined: Sat Jan 07, 2006 12:32 am
Location: Wynndel, BC CANADA

Re: Lou's 65 Comet Build

Post by SASSY »

Lou's Comet wrote:]
Thanks Roger, My Connector should come thru the floor like yours when done. What did you do to get carpet to fit???
My rails as well are high in the rear seat area. I simply added a bit of sound deadner to flush it out in that area.
Your my ginda guy,, never let a little hard work get in your way!!
I believe everyone one here is looking forward to a VERY clean build, as someone else said,,keep the pics coming
SCHOOLS IN!!
Fred
I'd rather do it myself if it's done right or not,,,isn't that what hotrodding is all about

Image

Lou's Comet
Posts: 1544
Joined: Sat Nov 26, 2011 8:56 pm
Location: Jeannette, Pa.

Re: Lou's 65 Comet Build

Post by Lou's Comet »

SASSY wrote: My rails as well are high in the rear seat area. I simply added a bit of sound deadner to flush it out in that area.
Your my ginda guy,, never let a little hard work get in your way!!
I believe everyone one here is looking forward to a VERY clean build, as someone else said,,keep the pics coming
SCHOOLS IN!!
Fred
I"m Definitly going for clean look. Effects every decision on car Want clean, simple, uncluttered. Going to hide every wire I can. Debadge it. Just basic Black. Also want it to look 60's 70's era kwim Crager SS's, MrGasket V gate, Chrome tach.
I am taking a TON of pictures so posting them won't be a problem, LOL

Lou's Comet
Posts: 1544
Joined: Sat Nov 26, 2011 8:56 pm
Location: Jeannette, Pa.

Re: Lou's 65 Comet Build

Post by Lou's Comet »

No Quote. But Question for you sheet metal workers. When I bought the steel for my connectiors no one could bend them around here. and I tried. They told me the Throat?? on their machines couldn't do 3.25". I need 3.25" high and 2.5" wide. They said they could do 2.5"H and 3.25"W. Is this common or do I need better steel place?? lol

Lou's Comet
Posts: 1544
Joined: Sat Nov 26, 2011 8:56 pm
Location: Jeannette, Pa.

Re: Lou's 65 Comet Build

Post by Lou's Comet »

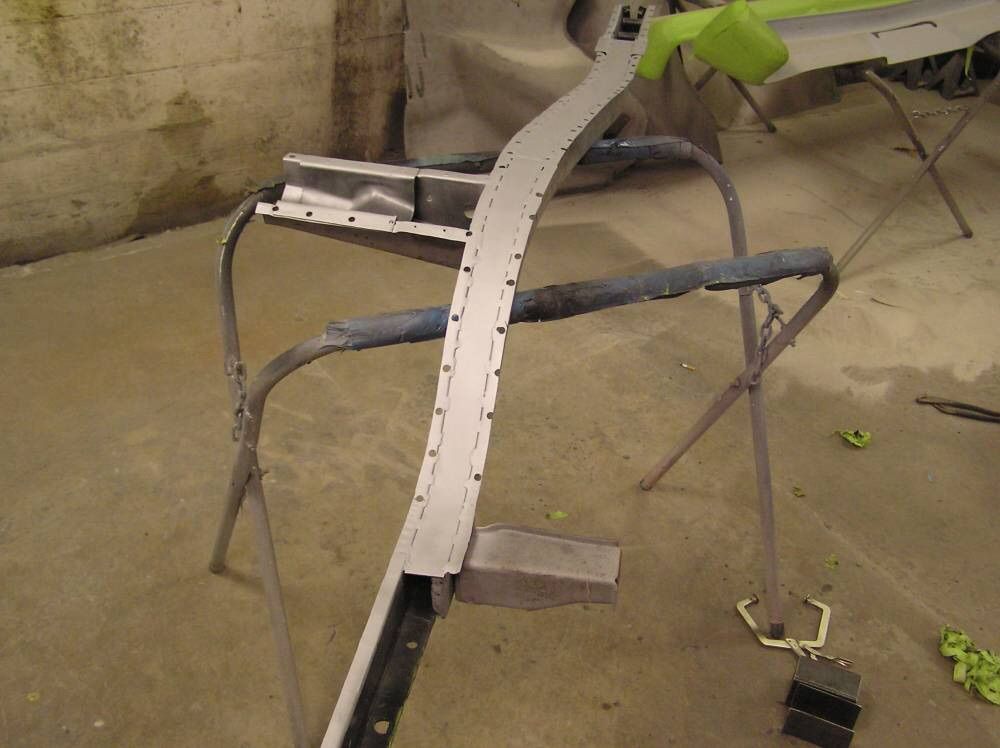
Made some more progress. Took my rear frame rail sandblasted the inside and coated inside and bottom of pieces I made to box it with POR15. When I was boxing the rail I started at the front and fitted it so it fit inside rail, then tacked the front. As I was working my way back the rail I would take my grinder and fine tune/fit the piece as I went. And tacked every 5-6 inch. I did this because I did not want the piece to push out on the rail any. I have a lot of markings to line it back up and didn't want the rail distorted??. But here is rail after boxing it. Pieces I welded in are 16 Gauge same as rail.

Image

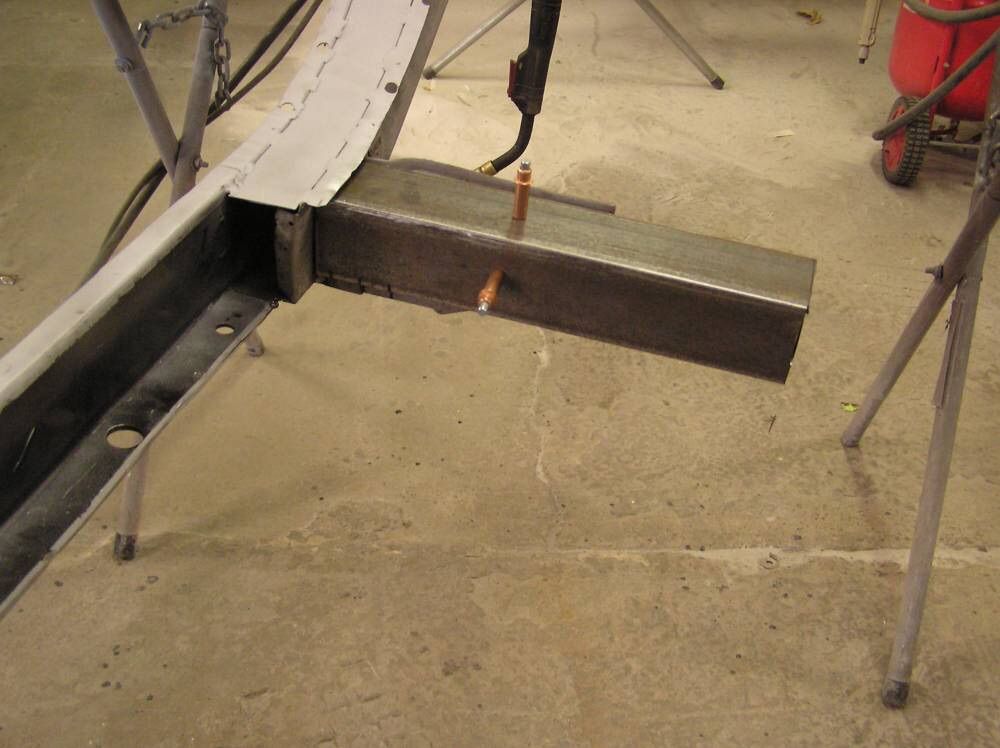
I needed to revamp front spring mount. Original is 1/8 inch thickness. I bought 2.5X2.5 angle 3/32. Couldn't find 1/8 that size and since it was going to be 5" longer figured the extra thickness couldn't hurt Piece is 13" long will run from inner rocker to rail over the orig mount.

Image

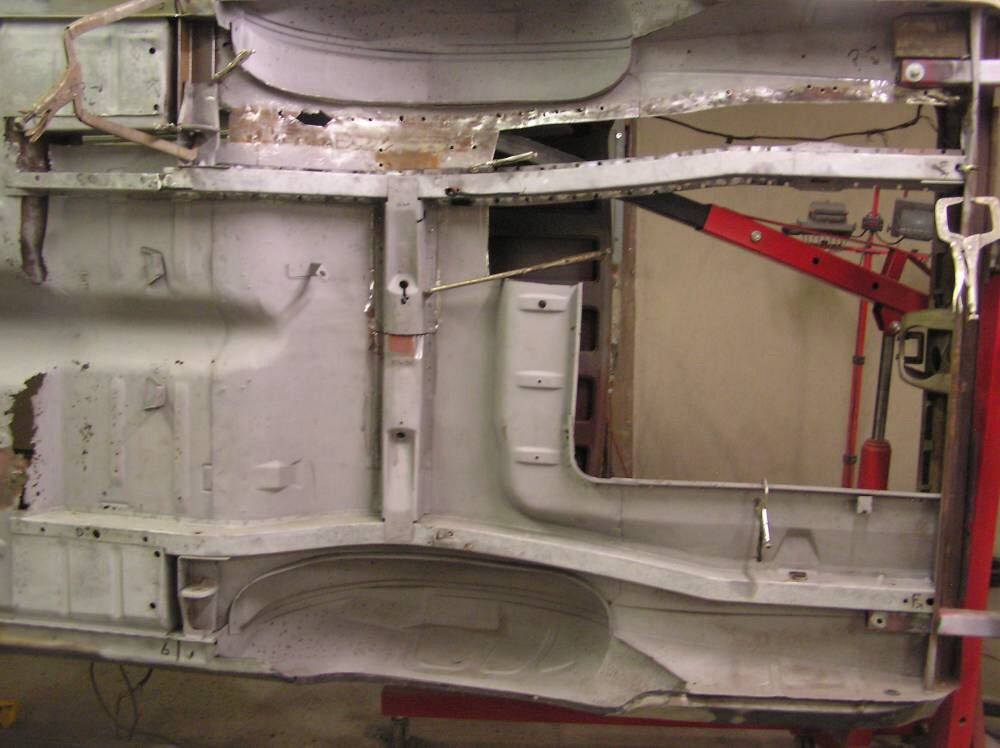
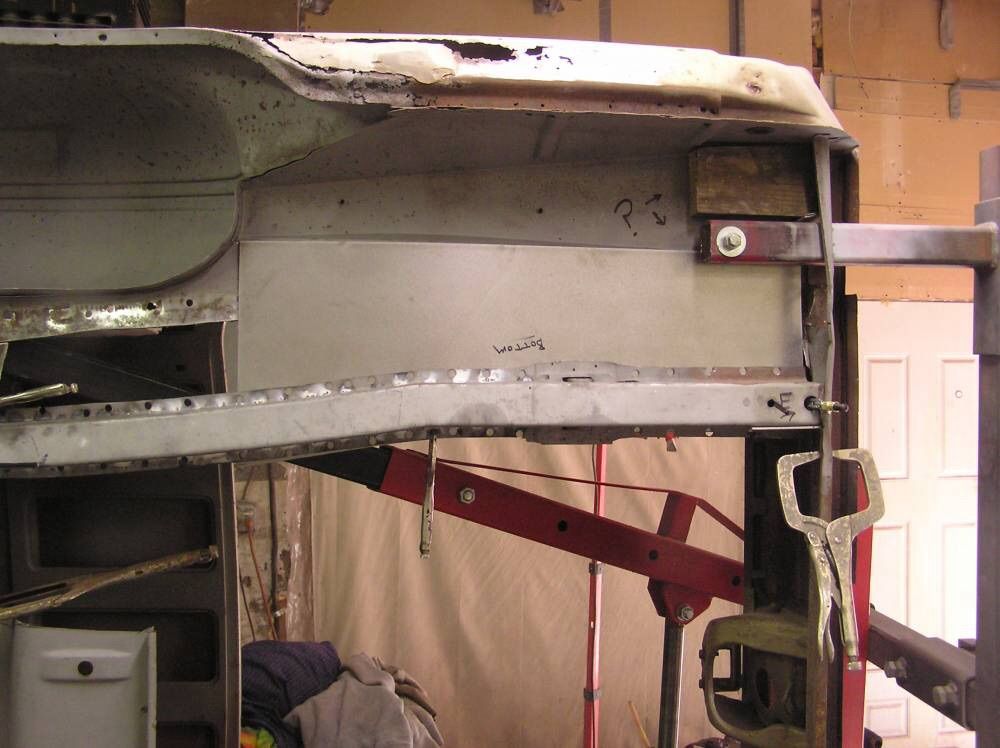
I then test fitted the rail on car make sure my measurements didn't move
The new spring mount fit nice, Just barely touching inner rocker when everything was clamped in place.

Image

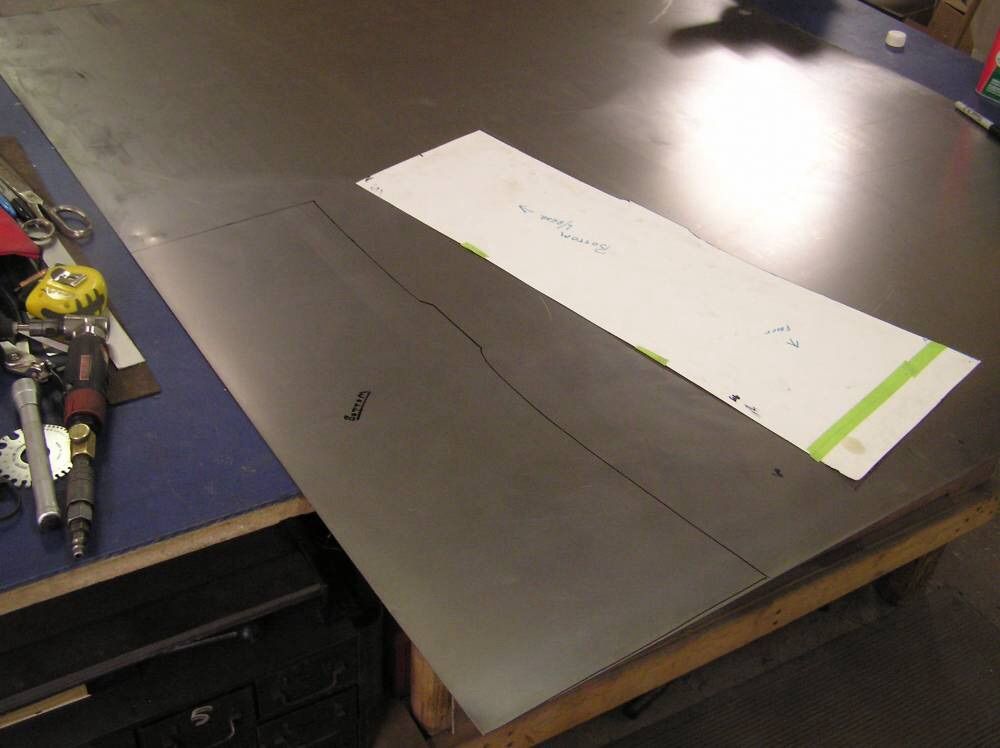
The rail is pretty much ready to be welded back on. While it was clamped on I made my template for the trunk floor. from inner rail flange out toward trunk drop. Did this with poster paper. WAY easier to cut lol

Image

After making template. I cleaned a section of 18 gauge sheet and marked it . (Actual floor measured 19 gauge) and cut out with cut off tool.

Image

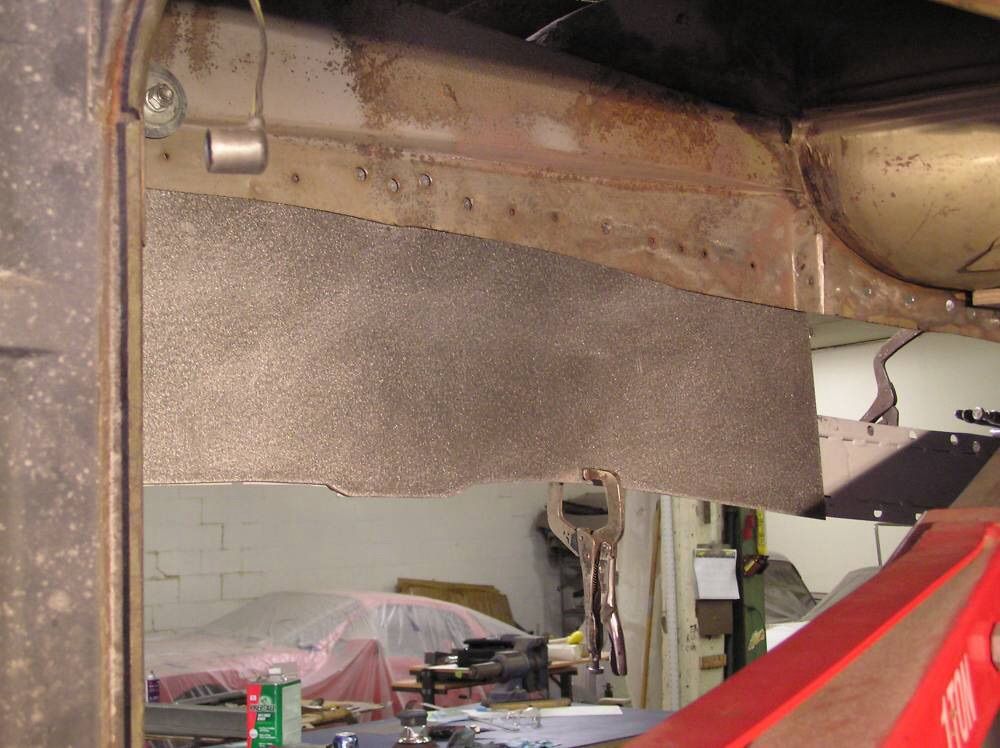
After cutting it out I do ALL edges with angle grinder get rid of SHARP edges they suck. and then took a DA with 80 to it. Here is what it looked like fitted on car. From bottom of car and inside trunk

Image

Image

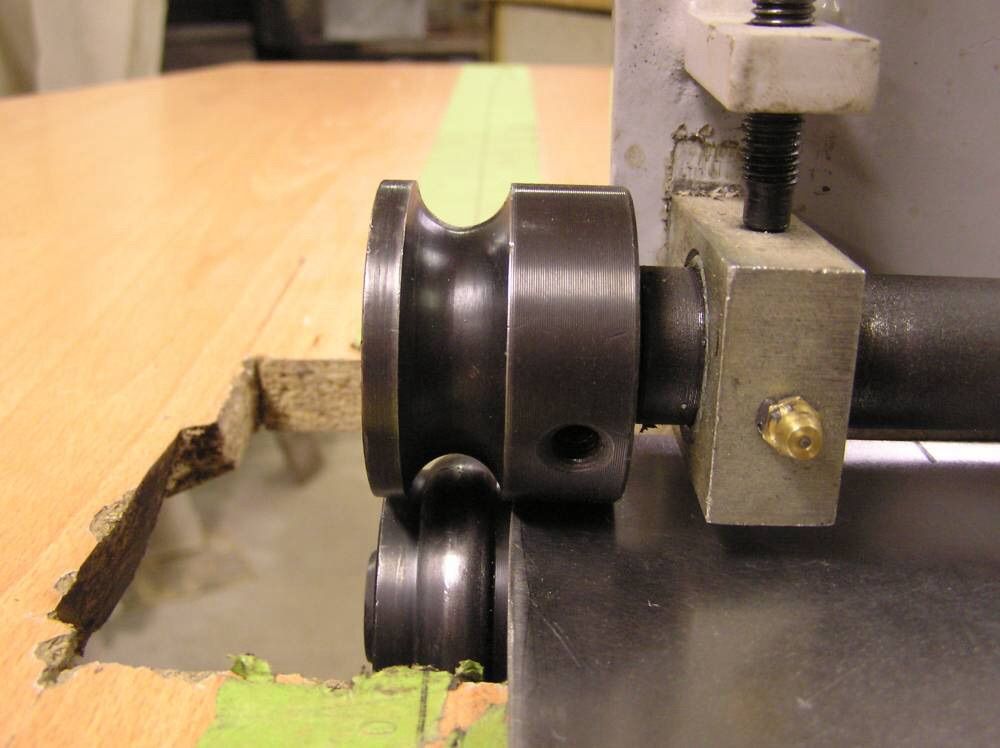
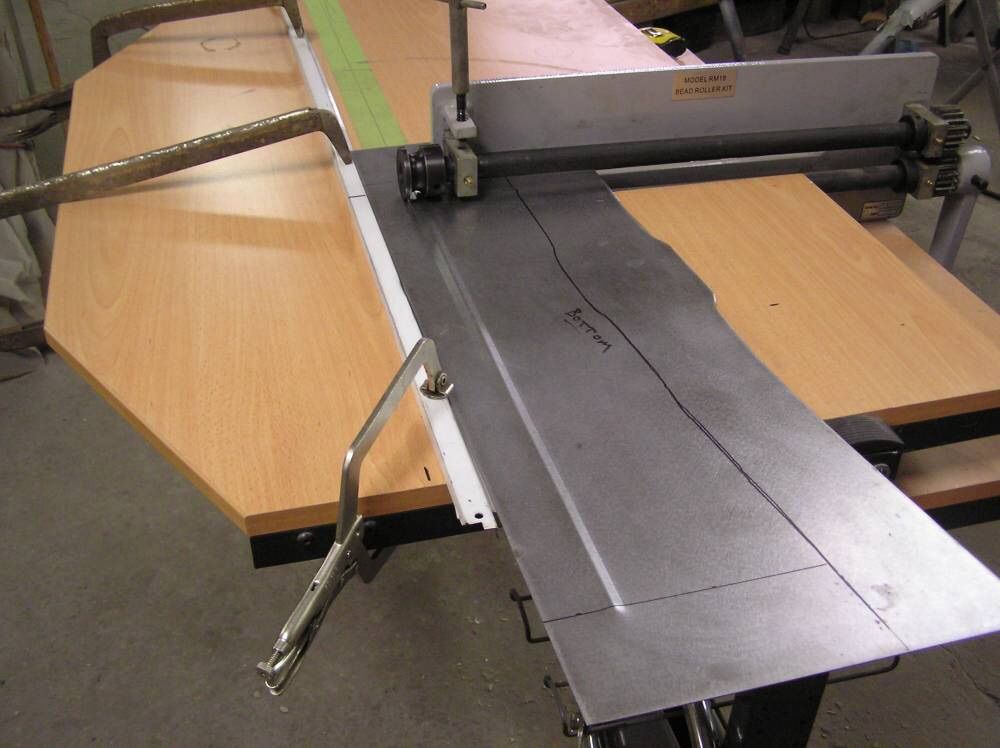
It fits nice But not big on flat sheetmetal look. Didn't want it to look like a patch being so flat. Decided to put a bead or 2 in it. Before I do the actual piece I will do a test on same thickness scrap. To make sure it will look like I want without ruining the piece. First I need to set my bead roller for the thickness 18gauge. To do this loosen tension bolt and slide in test piece between the FLATS of the rollers not the actual die? part But like this

Image

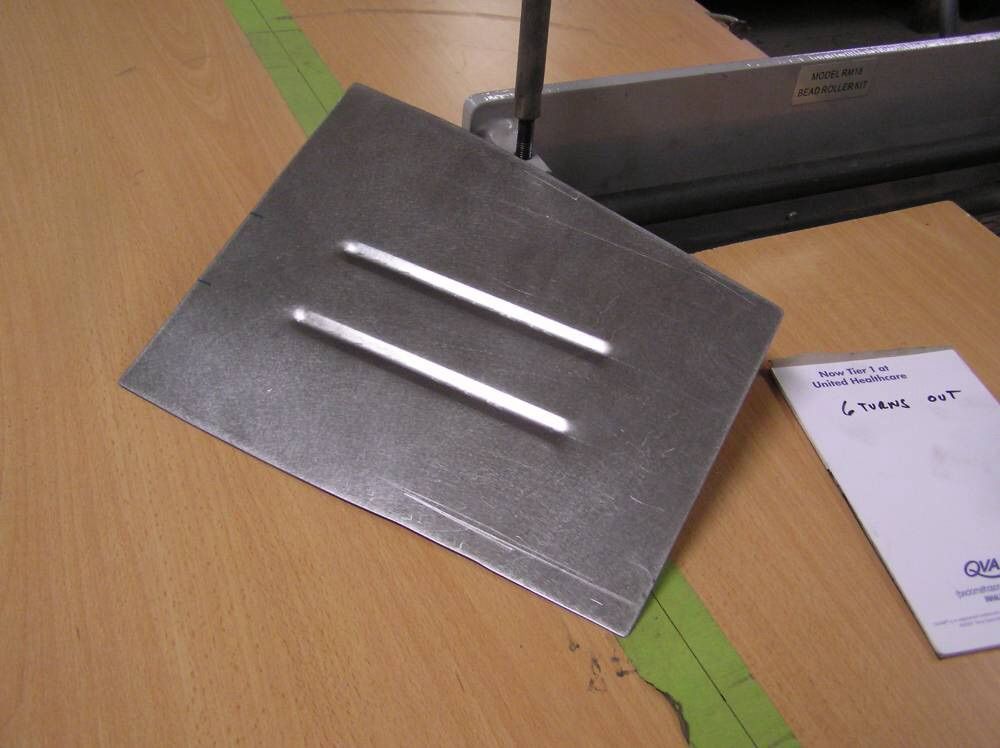
As you tighten the tension bolt make sure you can slide the metal through with your hand. If the rollers turn when you push the metal thru then back off a little. Should feel a drag on metal but rollers shouldn't spin as you push metal. I mark the position on my tension bolt, has a "T" handle. Then turn bolt out 6 revolutions. Then put sample piece in to roller. Line up mark I put on where to start bead with roller and tighten bolt 6 turns. This keeps metal from getting bowed from over tightening. Here is how sample piece turned out

Image

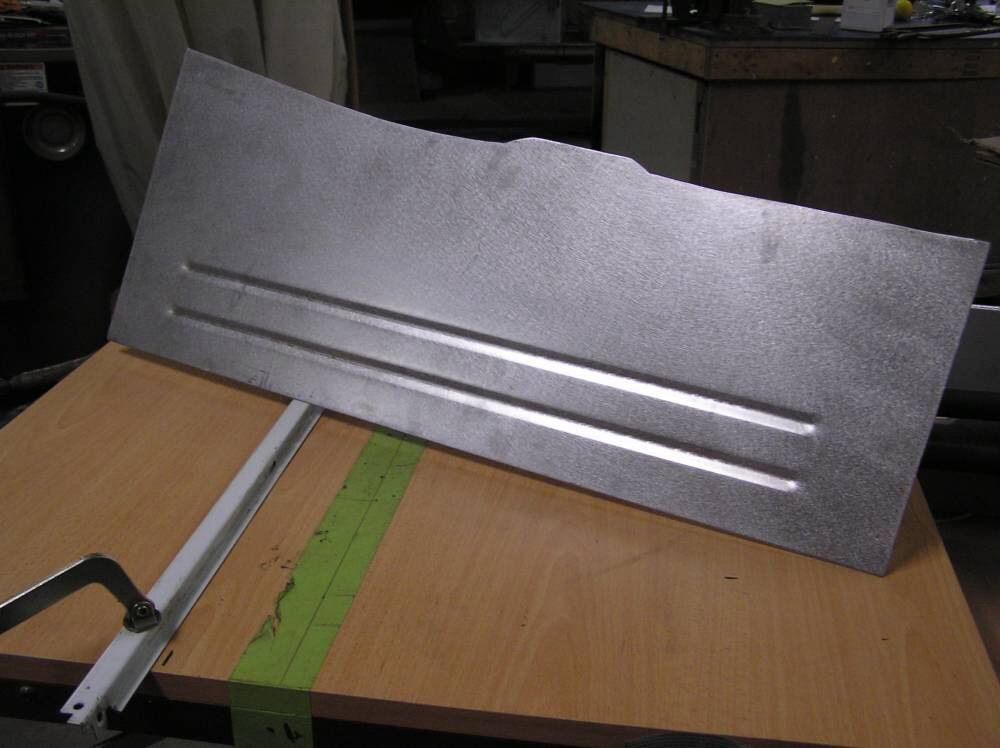
Here is the good piece with first bead in it. I also clamp a piece of straight scrap on table for a guide.

Image

Here is piece finished with the second bead rolled into it.

Image

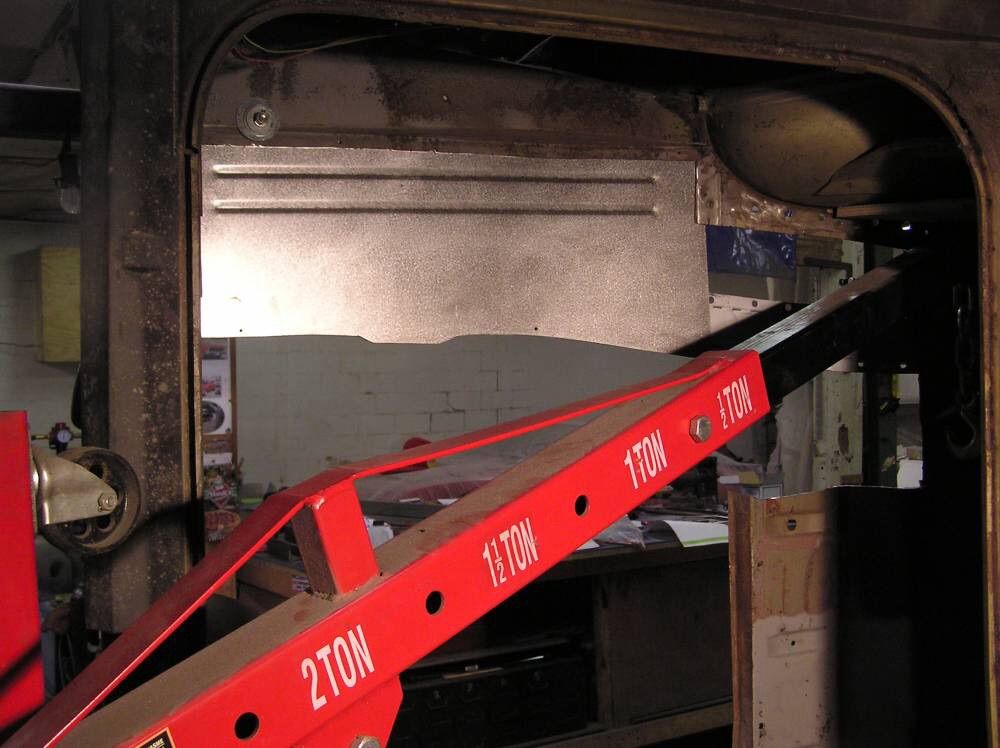
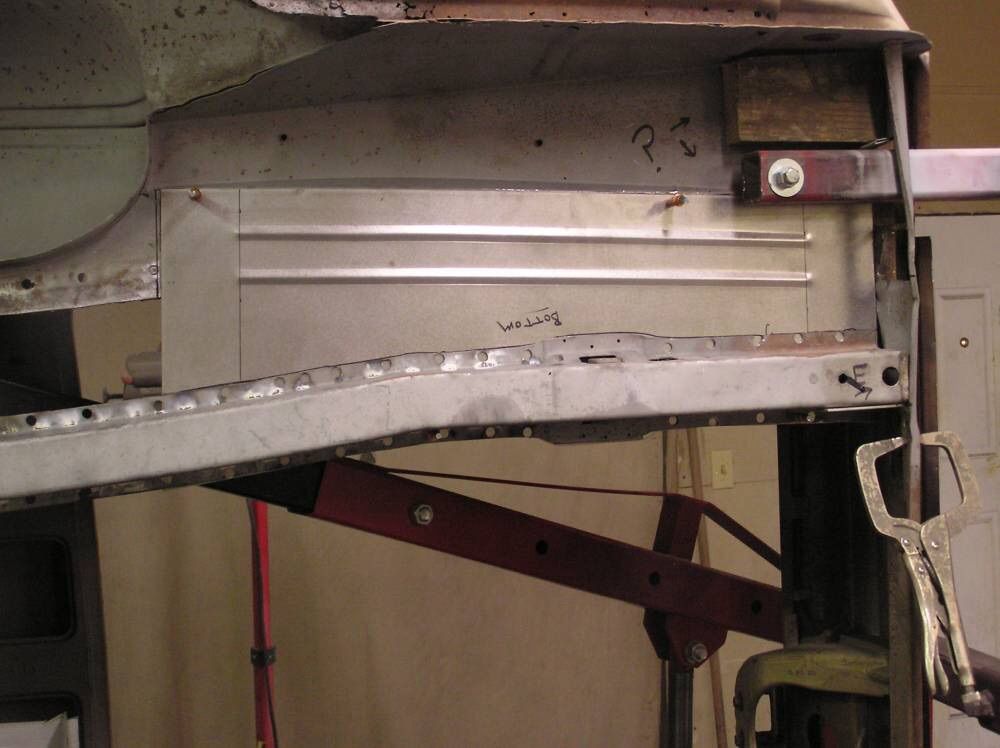
And here is what new pice looks like fitted on car. From in trunk and from bottom of car

Image

Image

Rail is pretty much ready to weld in now. Got a few little things that need fine tuning. Still not happy with the looks of the front mount But will get to that next and hopefully have this welded in soon.

Lou
Last edited by Lou's Comet on Wed Nov 18, 2015 7:55 pm, edited 1 time in total.

CALIFORNIA CALIENTE
Posts: 5933
Joined: Mon Feb 20, 2006 12:57 am
Location: Camarillo,California

Re: Lou's 65 Comet Build

Post by CALIFORNIA CALIENTE »

Lou;the standard 8 or 10 foot hand brake should do the job but they probably did not want to mess with it as they would need to make a few extra bends.A shop with a press brake should have been able to do it no problem,but I worked at a well equipped shop. I like the way the frame rails are turning out,should be plenty strong.I would not worry about matching gauge thickness to original,auto body sheet never seems to match up to common gauge sheet metal as they use proprietary sheet,when in doubt,go heavy!I like your having a table around your bead roller,the one I used was free standing,no table! ROY.
Real Racecars have 3 pedals
Image

User avatar
SASSY
Moderator
Posts: 5149
Joined: Sat Jan 07, 2006 12:32 am
Location: Wynndel, BC CANADA

Re: Lou's 65 Comet Build

Post by SASSY »

Lou's CometI wrote:I'm Definitly going for clean look. Effects every decision on car Want clean, simple, uncluttered. Going to hide every wire I can. Debadge it. Just basic Black. Also want it to look 60's 70's era kwim Crager SS's, MrGasket V gate, Chrome tach.
I am taking a TON of pictures so posting them won't be a problem, LOL
Jezz I musta had the right look back then,
Traded the Cragars I had on he car for the slots I have on it now
and still have the V-gate and chrome tack in boxes somewhere!
Fred
I'd rather do it myself if it's done right or not,,,isn't that what hotrodding is all about

Image

CALIFORNIA CALIENTE
Posts: 5933
Joined: Mon Feb 20, 2006 12:57 am
Location: Camarillo,California

Re: Lou's 65 Comet Build

Post by CALIFORNIA CALIENTE »

Lou;I just looked over your pictures again.I think I would tie your spring pocket extension into the torque box for added strength. JMO,ROY.
Real Racecars have 3 pedals
Image

b.guggenmos
Posts: 405
Joined: Sat Dec 31, 2005 7:19 pm
Location: Olympia, Washington

Re: Lou's 65 Comet Build

Post by b.guggenmos »

Lou's Comet wrote:
SASSY wrote: My rails as well are high in the rear seat area. I simply added a bit of sound deadner to flush it out in that area.
Your my ginda guy,, never let a little hard work get in your way!!
I believe everyone one here is looking forward to a VERY clean build, as someone else said,,keep the pics coming
SCHOOLS IN!!
Fred
I"m Definitly going for clean look. Effects every decision on car Want clean, simple, uncluttered. Going to hide every wire I can. Debadge it. Just basic Black. Also want it to look 60's 70's era kwim Crager SS's, MrGasket V gate, Chrome tach.
I am taking a TON of pictures so posting them won't be a problem, LOL
I like your plan. This will be a cool classic Comet. Brian
1965 Comet Cyclone Drag Car Aquamarine, 351C, 4 speed, 5:14, ladder bars, 10.50@129mph
1965 Falcon Tube Chassis Drag Car, 347, Jerico, 4 Link 9.?
1970 Boss 302 Yellow, Deluxe Interior, Shaker, Slats, 4:30 Drag Pac
1932 Ford 5 Window Coupe

Lou's Comet
Posts: 1544
Joined: Sat Nov 26, 2011 8:56 pm
Location: Jeannette, Pa.

Re: Lou's 65 Comet Build

Post by Lou's Comet »

popscomet wrote:A big 10-4 on being to old to lay on back under one.............POP
Somehow i missed this, Sorry Pop. But yea laying under car is no longer fun . Yet still find myself doing it :(

Lou's Comet
Posts: 1544
Joined: Sat Nov 26, 2011 8:56 pm
Location: Jeannette, Pa.

Re: Lou's 65 Comet Build

Post by Lou's Comet »

SASSY wrote: Jezz I musta had the right look back then,
Traded the Cragars I had on he car for the slots I have on it now
and still have the V-gate and chrome tack in boxes somewhere!
Fred
Slots are cool, Era correct. I had the right look back then too, lol then Marriage, son, divorce, start business, Pretty much life interupted.

Maybe I am going thru 2nd childhood? But looking forward to the V-Gate. Smile everytime I think about it.

Lou's Comet
Posts: 1544
Joined: Sat Nov 26, 2011 8:56 pm
Location: Jeannette, Pa.

Re: Lou's 65 Comet Build

Post by Lou's Comet »

CALIFORNIA CALIENTE wrote:Lou;I just looked over your pictures again.I think I would tie your spring pocket extension into the torque box for added strength. JMO,ROY.
I was looking at pictures thinking same thing. Didn't like how it looked either. The extension looked like someone just added angle iron.
Somebody reading someones mind??
Got a couple hours on car today. looked around shop and found some smaller angle iron and cut 13" same as extension. Fit like a glove.

Image

tacked it pulled rail "again" and welded it on.

Image

Here is what it looks like on car. When finishing the torque box I will weld it all together. also have to touch up a few spots on weld. Stronger plus it looks more finished not like a piece of angle.

Image

And............I got the rail tack welded into place. felt good to see it back on car LOL

Image

Still have to finish welding it back on but shouldn't take long. then I can reattach rotisserie to rail. remove engine lift and cut out wheelwell.
Lou
Last edited by Lou's Comet on Wed Nov 18, 2015 8:13 pm, edited 1 time in total.

Lou's Comet
Posts: 1544
Joined: Sat Nov 26, 2011 8:56 pm
Location: Jeannette, Pa.

Re: Lou's 65 Comet Build

Post by Lou's Comet »

b.guggenmos wrote: I like your plan. This will be a cool classic Comet. Brian
Thanks Brian. You have some nice cars. Seen a article somewhere, don't recall where with couple Cyclones that look like yours. Were they?

CALIFORNIA CALIENTE
Posts: 5933
Joined: Mon Feb 20, 2006 12:57 am
Location: Camarillo,California

Re: Lou's 65 Comet Build

Post by CALIFORNIA CALIENTE »

Lou;did you weld the angles to the rockers? It is looking good,and strong!! ROY.
Real Racecars have 3 pedals
Image

Lou's Comet
Posts: 1544
Joined: Sat Nov 26, 2011 8:56 pm
Location: Jeannette, Pa.

Re: Lou's 65 Comet Build

Post by Lou's Comet »

CALIFORNIA CALIENTE wrote:Lou;did you weld the angles to the rockers? It is looking good,and strong!! ROY.
The close up picture I posted was with everything clamped. When I tack welded the rail on I did tack weld the angles to inner rocker. Hopefully today will get to finish welding rail on and when I do I will weld the angles solid to inner rocker.
I really want to start cutting and fabbing inner wheel well LOL.

tinnocker
Posts: 127
Joined: Wed Mar 23, 2011 8:08 pm
Location: Jasper ,Geprgia

Re: Lou's 65 Comet Build

Post by tinnocker »

Lou, as Roy said a standard brake would do it but you have to have the right top die to do the braking. We called it an offset die and there are different sizes. Dies are expensive and the shop you are using just doesn't have the one that they need to do the brake that you are wanting. Doesn't mean you need to hunt another shop but you could call around. A simple duct work shop probably doesn't have one, it would need to be a custom metal fabrication shop.

Post Reply