Lavron's '64 Build Thread

Re: Lavron's '64 Build Thread
SAVE THOSE ORIGINAL PLATES !  laws may change. hang em on a nail,they wont be in the the way & they dont eat.

Johno
Re: Lavron's '64 Build Thread
I agree Tom that subframe connectors do a good job at stiffening the car up, I think part of the difference with my car is it is a sedan, I could be wrong, but I think the sedan design is inherently stronger than the hard tops because of the "B" pillar. Again I may add some later or change my mind and do them anyway if I can ever get this Comet tipped overtomb22 wrote:Another thought on the sub frame. My car came originally with a 6 and all the factory joints on the sail and the rear deck where cracked. It was a very solid car. I figure the cracks came from the twisting of the uni-body construction. After welding up the joints and installing a good sub frame; I feel the cracks should not come back.
I might keep them, I have every license plate I ever got, there is a stack in the Comet about 10 high (just two sets from the Comet, one is still on the back of the car, the front one was removed for the Comet Central platepoboyjo65 wrote:SAVE THOSE ORIGINAL PLATES !
See Ya,
Mike

Re: Lavron's '64 Build Thread
No pictures because I was lazy and not too exciting, I got the rear floor pans patched and sealed (mostly) so the inside floors are basically done on the Comet, I will take a picture after I get everything cleaned up in there 
I still need to build some seat mounts and have that figured out, they need to be strong since the seat belts are attached to the seats.
Hoping to get the motor, trans and driveshaft all mocked in there soon to see if the driveshaft will need modified.
See Ya,
Mike
I still need to build some seat mounts and have that figured out, they need to be strong since the seat belts are attached to the seats.
Hoping to get the motor, trans and driveshaft all mocked in there soon to see if the driveshaft will need modified.
See Ya,
Mike
Re: Lavron's '64 Build Thread
OK! There they are all patched up 
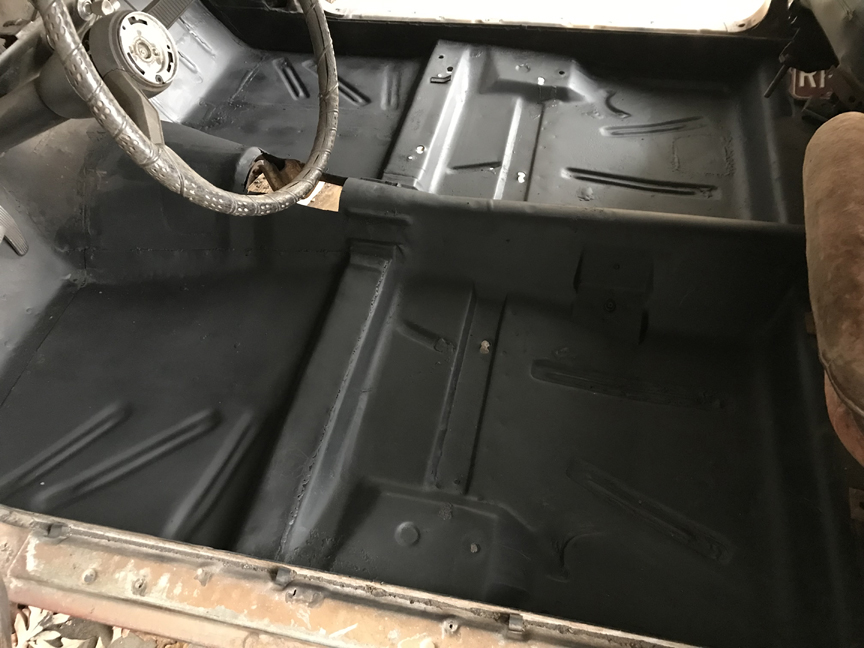
Will probably DA them or Scotch Brite (or a combination) and apply POR15 later when I am sure I am done welding on the floors.
They may not be the prettiest but I think they will be ok.
I guess I would POR15 and then seam seal? Or vice versa?
Still need to build seat mounts, BTW.
See Ya,
Mike
Will probably DA them or Scotch Brite (or a combination) and apply POR15 later when I am sure I am done welding on the floors.
They may not be the prettiest but I think they will be ok.
I guess I would POR15 and then seam seal? Or vice versa?
Still need to build seat mounts, BTW.
See Ya,
Mike

-
Lou's Comet
- Posts: 1540
- Joined: Sat Nov 26, 2011 8:56 pm
- Location: Jeannette, Pa.
Re: Lavron's '64 Build Thread
POR 15 over paint really doesn't work well, if it works at all. For POR to stop rust it needs to be directly on the metal. If put on over another paint you are losing the main benefit of the POR 15.
From my experiences it sticks the best to cleaned rusty metal or seasoned metal, really sticks and stops rust. Doesn't stick that well to new clean metal unless prepped well with the POR prep products, then it sticks well and stops rust. And really doesn't like sticking to paint at all, plus you don't get the rust preventive benifits when you POR over paint.
What kind of paint do you have on the floor now?
If you want to paint the floor over a primer I would use a product like Ripper used(think on his inner fenders) Raptor. After seeing Ripper use the Raptor I bought some for a customer project to try out. Goes on over primer and I was pretty impressed with it. I don't think you will get the rust preventive that you would get with POR over rusty/seasoned bare metal. But if you are going over primer I think the Raptor would seal as good (Prob better) and you would also get some more insulation/sound deadening value with the Raptor.
The seam sealer should go on after the POR 15, tho I don't think you would need seam sealer if the POR is applied correctly. We have used POR to seal rusted motorcycle gas tanks with success. So not sure you would need to seam seal over it unless the holes are bigger than the typical pinholes from welding.
Lou
Re: Lavron's '64 Build Thread
It is just Rustoleum Rust Reformer, not exactly primer and not on there very heavy, just wanted something over the bare spots to prevent rust, maybe I shouldn't have done that but it might be a while before I am ready for final finish work.Lou's Comet wrote:What kind of paint do you have on the floor now?
You think I could sand it later and treat it all with Phosphoric acid and then POR15?
Mostly need to seam seal where the new panel was welded in (drivers floor pan) along the edges like they did at the factory. I used POR Patch (really thick POR15) where I welded the patches in on the passenger side after grinding and cleaning them with acid, after it dried I did a quick hit with the DA to roughen the surface before I did the rust converter spray.Lou's Comet wrote:So not sure you would need to seam seal over it unless the holes are bigger than the typical pinholes from welding.
Like I said I am going to do a little more welding on the floor when I build the seat mounts so will be grinding/sanding the metal clean where that happens (hopefully I can fix the knarly holes I drilled when I mocked the seats in
Speaking of seats, the T-Bird seats have these really long studs attached that are not threaded all the way up, does anyone see an issue with me cutting those off and replacing them with a shorter grade 8 bolt? I really don't like using spacers under the floor to be able to tighten them down, the only one that needs to be longer is the inside rears on both seats because they will need a spacer on top of the floor.
See Ya,
Mike
Re: Lavron's '64 Build Thread
Here is my summary for the 7th month and what I have gotten done so far;
)
Pretty much my goals for next month is the same as last month to get that torque box finished, at least tacked in, build a mount for the air ride controller and reinstall it. Put the motor and trans back in with the driveshaft so I can see if it will fit or needs modded and see if I will have to mod the tunnel in the rear for driveshaft clearance. In addition I am going to contact the machine shop and see about getting the motor work started.
I think things should be settling back in to normal routines again, I got my kitchen floor repair mostly done and still need to finish the bookcase but I will work that all in.
Hopefully more progress to report this next month.
See Ya,
Mike
December 15th - January 15th; Got my CV aluminum driveshaft and replaced the yoke with one from the top loader 3 speed, continue to collect electrical stuff, not much but got a new shifter knob installed, cleaned out the interior of the car and patched the last of the rust holes in the rear floor pan and sealed all the patches in the floor so the passenger compartment floor is basically done with the structural work. That is mostly it, it was a busy month with non-Comet related things (little things like ChristmasJune 15th - July 15th; Pushed into the shed, removed all the drivetrain (front and rear suspension, engine, transmission, exhaust) started installing rear 4-link.
July 15th - August 15th; Finished the rear 4-link install (98%) and started on front M2 install.
August 15th - Sept 15th; All suspension components installed, steering installed, airbags installed at least to test.
September 15th - October 15th; Got both the master cylinders mounted, the pedals and firewall mount cleaned up, wiring harness completely stripped out, cleaned up the firewall and painted, mocked up the engine and transmission and built the mounts for both, mocked up my front seats, front brake calipers installed.
October 15th - November 15th; Ran all my brake lines, finished steering wheel, built the air ride control box and tested the air ride, repaired drivers torque box, toe board and floorboard, started repairing the passenger side floorboard.
November 15th - December 15th; Installed the cable accelerator pedal and mount. welded the old accelerator rod hole up in the firewall. Built the top of the right torque box and finished the patches on the right floorpan. I have been doing other stuff and collecting parts up, mostly electrical components.
Pretty much my goals for next month is the same as last month
I think things should be settling back in to normal routines again, I got my kitchen floor repair mostly done and still need to finish the bookcase but I will work that all in.
Hopefully more progress to report this next month.
See Ya,
Mike
Re: Lavron's '64 Build Thread
The floor looks great!
Your progress is pretty darn good. I need to make up some kind of schedule to keep me on track too
Joe
Your progress is pretty darn good. I need to make up some kind of schedule to keep me on track too
Joe
1965 Caliente HT- 289/4 speed
1964 Falcon HT- track car- 302/4 speed
1964 Falcon HT- track car- 302/4 speed
Re: Lavron's '64 Build Thread
I got out for an hour or so today and got the engine and transmission mocked back in the Comet.
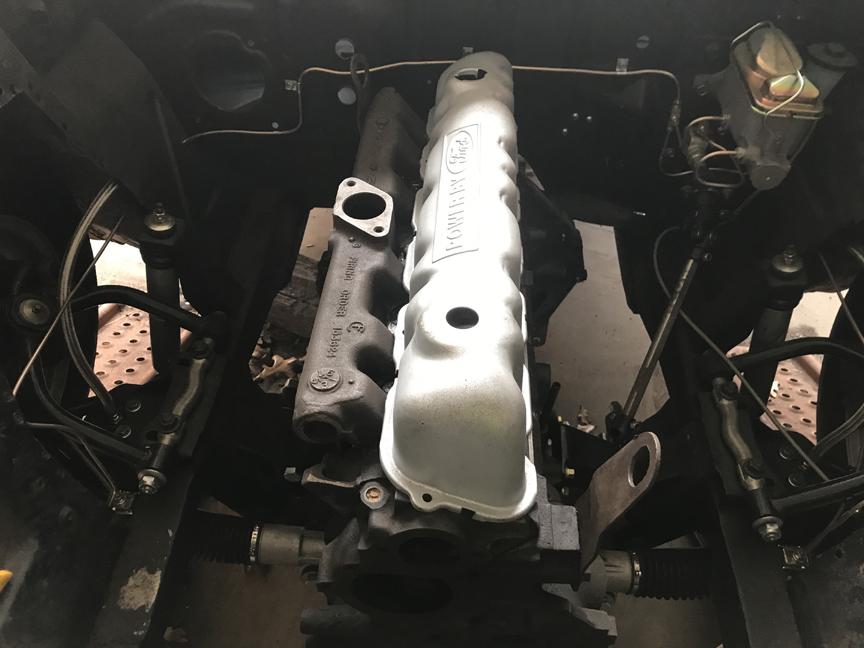
I discovered it was easier (the only way for someone alone) to remove the motor mount from the left side of the motor to get it back in and then once the transmission was jacked up in place bolt the mount back on. It comes out without removing them but sure doesn't want to go back in, no big deal they are easy to take off.
The bad thing is the driveshaft won't quite go on, this is with the suspension all the way down, I think once it was bolted on it might fit but it won't clear the bolt sticking out of the end of diff flange.
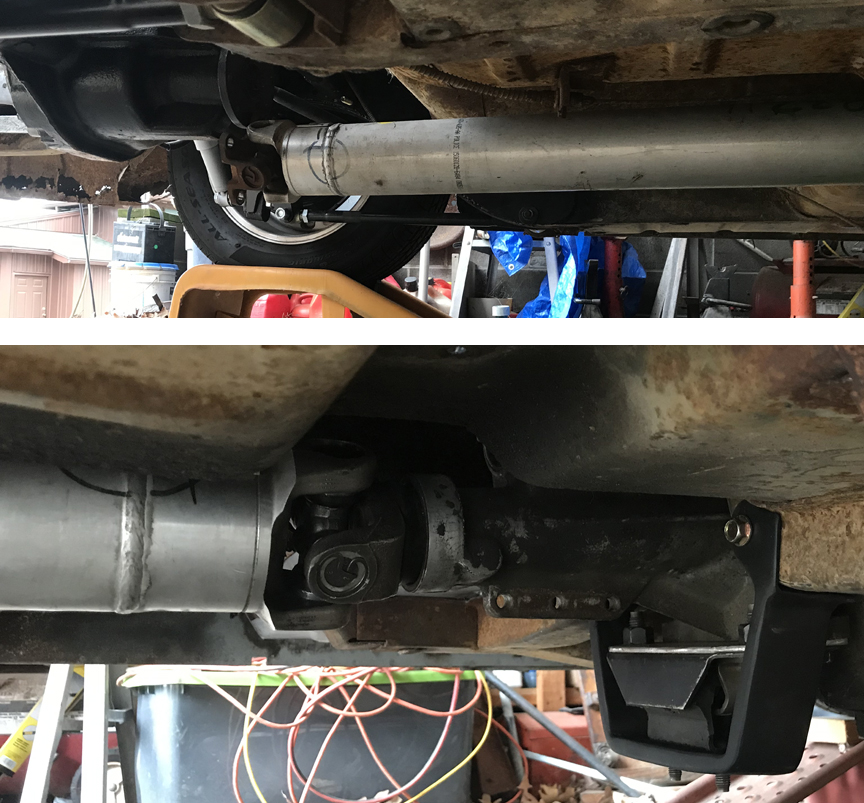
You can see I hung it up there with one bolt and the lower picture shows how far it is up against the trans.
Now the question I have; If I raise the car up to ride height it should go on, it looks like it will not bind up when the rear is all the way up, you just can't bolt it on, and finally, won't it be the furthest extended where the rear is lowered all the way (at full extension)?
I don't mind having it shortened if it needs it and maybe I can tell more after I get out there and get the car back up to ride height. Certainly I would prefer not having it shortened but will do whatever I need to.
It looks like the trans tunnel in the back will only need minor modification, if any, for the driveshaft to clear, again I need to get it bolted on and check, there won't be a lot of clearance when the car is all the way down but you don't drive it that way anyhow.
Ok, that is my report today.
See Ya,
Mike
I discovered it was easier (the only way for someone alone) to remove the motor mount from the left side of the motor to get it back in and then once the transmission was jacked up in place bolt the mount back on. It comes out without removing them but sure doesn't want to go back in, no big deal they are easy to take off.
The bad thing is the driveshaft won't quite go on, this is with the suspension all the way down, I think once it was bolted on it might fit but it won't clear the bolt sticking out of the end of diff flange.
You can see I hung it up there with one bolt and the lower picture shows how far it is up against the trans.
Now the question I have; If I raise the car up to ride height it should go on, it looks like it will not bind up when the rear is all the way up, you just can't bolt it on, and finally, won't it be the furthest extended where the rear is lowered all the way (at full extension)?
I don't mind having it shortened if it needs it and maybe I can tell more after I get out there and get the car back up to ride height. Certainly I would prefer not having it shortened but will do whatever I need to.
It looks like the trans tunnel in the back will only need minor modification, if any, for the driveshaft to clear, again I need to get it bolted on and check, there won't be a lot of clearance when the car is all the way down but you don't drive it that way anyhow.
Ok, that is my report today.
See Ya,
Mike
-
redhotcomet
- Posts: 349
- Joined: Mon Jan 27, 2014 2:22 pm
- Location: Saskatchewan, Canada
Re: Lavron's '64 Build Thread
I think I would extend the suspension enough to get the driveshaft located and loosely bolted on. Then go to full suspension compression and make sure there is at least some bit of travel before the slip yoke bottoms out in the trans. Your suspension should control the rear end location much better than a leaf-sprung car, so I would think you'd be able to get away with a lot less slip yoke travel, but you'd want a small amount to be safe.
Could you move your rear end aftward at all with your suspension adjustments?
Could you move your rear end aftward at all with your suspension adjustments?
1964 Caliente hardtop, 302/T5/8.8"

Re: Lavron's '64 Build Thread
IMO if it ain't binding tight all the down and the seal surface on the input is good all the way out, your good.
Before I changed the yoke on the 9 inch I had about a quarter inch travel to bind on the front yoke and the front yoke bound on the trans when the rear suspension was hanging. It was like that for years with no problem.
As Red says about the rear but at this point in your build could the engine and trans move forward like a quarter inch?
Fred
I'd rather do it myself if it's done right or not,,,isn't that what hotrodding is all about

Re: Lavron's '64 Build Thread
Fred was that the same trans that the tailshaft blew up on you during a burnout?SASSY wrote: Before I changed the yoke on the 9 inch I had about a quarter inch travel to bind on the front yoke and the front yoke bound on the trans when the rear suspension was hanging. It was like that for years with no problem.
Fred
If you can't get it on with the suspension compressed it is too long ! I'd want it short enough to clear that big bolt with the suspension hanging (at its longest distance to trans) then DS removal is simple in the future. [JMO !!!]
Johno
Re: Lavron's '64 Build Thread
That would have been it but that was about its 400th burnout!poboyjo65 wrote: Fred was that the same trans that the tailshaft blew up on you during a burnout?
I heard Pops say something about a anvil one time,,, that applies here
Big tires, lots a Rpm, manual trans,,, something's gotta give
I'd rather do it myself if it's done right or not,,,isn't that what hotrodding is all about
Re: Lavron's '64 Build Thread
Thanks guys, yes I can adjust the rear back a 1/4 - 1/2" pretty easy I think (I do not think it would hurt anything and might help a couple of things, I have an adjustable rear suspension I may as well use it), can't move the engine forward without a lot of pain and really trying to keep as much space ahead of the motor as I can to fit everything in up there.
When I get a chance I will get the air bags hooked back up and raise the car install the driveshaft and check all clearances, biggest issue I had this time is there is not enough room to fit big old me under there except by scooting along on the floor on my back, I am too thick if I am on the creeper it was kinda dark under there as well when I was under there. I was in a rush to get everything in and had to move the riding lawn mower back to get to the motor and hoist so the mower was sitting right next to the car as well so I had to squeeze between the car and mower because you know it would take me too much time to move the mower out of the way I say that to tell you, I am not totally sure the driveshaft won't go on there right now it was just too tight under there to mess with it too much
See Ya,
Mike
When I get a chance I will get the air bags hooked back up and raise the car install the driveshaft and check all clearances, biggest issue I had this time is there is not enough room to fit big old me under there except by scooting along on the floor on my back, I am too thick if I am on the creeper
See Ya,
Mike