
That's awesome man! I can't wait to get my kids involved with my project! My son and daughter love to help me, but they sit in it and pretend to drive! Lol
Nice progress and I also am going to be teaching myself to weld here shortly. Keep up the good work and I look forward to more progress!
Brad
Father and Son Comet Project (with photos)
Re: Father and Son Comet Project (with photos)
We all pay the price for having something unique!
Re: Father and Son Comet Project (with photos)
GREAT TEAM WORK!!!!!!keep it up....looks good,,,proud of it---proud for ya!! POP

pop/glenda
Re: Father and Son Comet Project (with photos)
I really enjoy watching the progress and more importantly the BOND!
Fred
Fred
I'd rather do it myself if it's done right or not,,,isn't that what hotrodding is all about

Re: Father and Son Comet Project (with photos)
Very nice.. great progress and great learning experience.. although my dad didn't teach or help me welding (he's a woodworker) he did teach me the mentality that anything can be done.. and not just by throwing tons of cash at it. I've been very lucky to have him along with many other great teachers along the way. And im sure "the boy" appreciates it, or will. Im also sure you are just as proud, thanks for the pics.
Be Good and You Will Be Lonesome

Re: Father and Son Comet Project (with photos)
Well it's a 4-day non-stop Caliente Weekend here in southern Illinois... we've put in two 12 hour days and have two more ahead... and July 1, 2011 officially marked the first day we put some sheet metal BACK ON instead of cutting it all out.
The inner rockers arrived on Thursday. Friday, we started fabricating the last pieces on the front end torque box to receive the rockers. Most of the pieces are now fabricated, some are already in. We should finish the inside and outside torque box pieces tomorrow, then cut to receive the inner rocker and start fitting it in. Hope to start welding it in on Monday, but we'll see.
In a cruel twist of fate, we have to be out of the garage where we've been working all along by the end of next weekend, so we're planning to get passenger side rocker in, get it off the jacks and back on four brand new wheels, and move it to my house where we'll jack it back up, and do the driver's side. Not an ideal workshop, but it's going to have to do.
Photos later, but I left the camera at the shop and this is about all the time we have before crashing, getting back up and hitting it again.
Hope you all are having a wonderful 4th weekend, and doing something with your Comets.

1964 Comet Caliente Convertible
30,000 miles on our rebuild
All Comets start out as dreams...
Re: Father and Son Comet Project (with photos)
GROOVER,,I think of all the times,I changed motors,trans.,done it all in good bad wet dry weather,in the day and night time,,even in the snow.had no choice.my chain-hoist hung from a limb on a tree in my front yard for yrs.then one day i got ahead e-nuff to build a 24x32 shop.I felt so blessed--MR.GOOD-WRENCH didn"t have a damn thing on me!! YOU and your son can and will...make that COMET happen,,no matter what!! WE"VE been there!!! Best of luck POP
pop/glenda
-
Boss/Cyclone

- Site Admin
- Posts: 2744
- Joined: Thu Oct 19, 2006 9:55 pm
- Location: South Central Michigan (Near Michigan International Speedway)
Re: Father and Son Comet Project (with photos)
Me too. Had an old chain hoist hanging from and oak tree for years. Then built a pole barn and still had dirt floor for years, still loved just being inside. At least you do have a garage to move to even if it is not ideal.popscomet wrote:GROOVER,,I think of all the times,I changed motors,trans.,done it all in good bad wet dry weather,in the day and night time,,even in the snow.had no choice.my chain-hoist hung from a limb on a tree in my front yard for yrs.then one day i got ahead e-nuff to build a 24x32 shop.I felt so blessed--MR.GOOD-WRENCH didn"t have a damn thing on me!! YOU and your son can and will...make that COMET happen,,no matter what!! WE"VE been there!!! Best of luck POP
1965 Mercury Cyclone former drag car, 1971 Boss 351 engine, 4 speed, ladder bars, etc. Now returned to a street car.

Larry
Larry
Re: Father and Son Comet Project (with photos)
YES-sir,,,that 24x32 shop at the time,meant more to me,than this 30x60,I have now!!..I was much younger and my son was constaly by my side.so much work went on in that little shop.Great memories,in fact I still own that place,bought it when I was 19yrs old.WE won"t even consider selling,,we raised our 2 kids there,we bought the places on both sides just to have some type of control.Son lives on 1 side,He watches over all of it.time to go to daughter"s for BBQ HAPPY 4th to each one of you pop&mrs pop [robert & glenda]
pop/glenda
Re: Father and Son Comet Project (with photos)
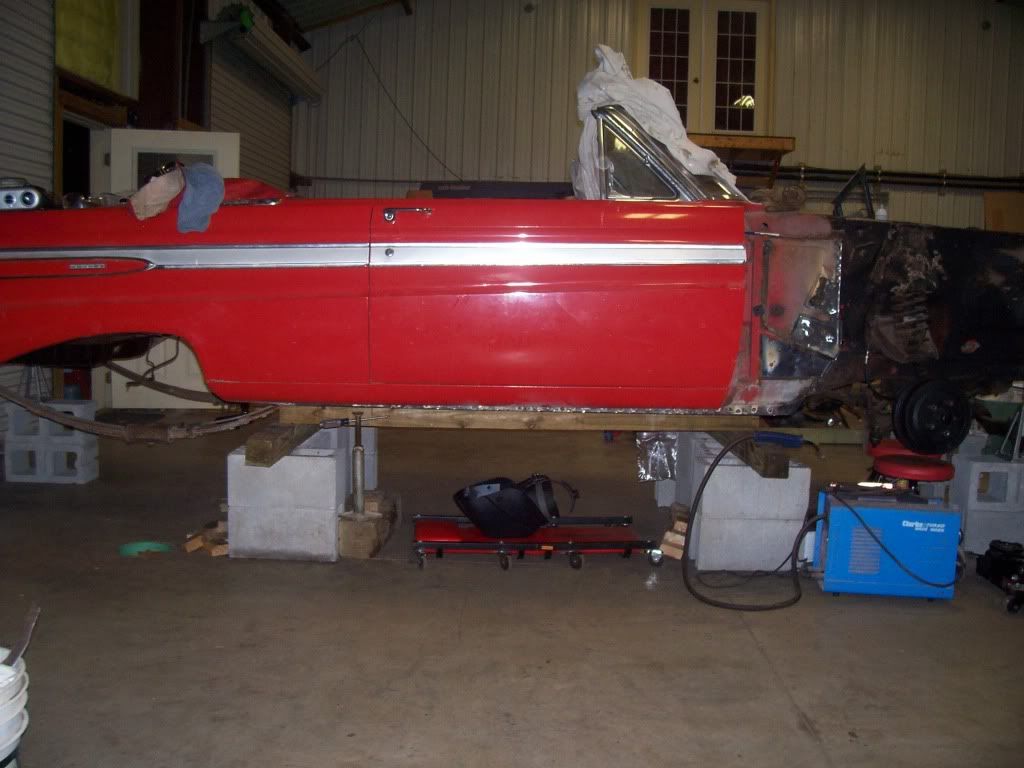
So after four full days this past weekend and another 5 hours last night, here's where we stand. Spoiler alert. Inner rocker is in.
1. We originally thought we were going to patch the front torque box, but in the end, we just cut it all out. This has been a bit of a time suck, as it's not our best skill set to create those pieces shaping 16 gauge steel by hand. We've finally got a nice inner piece, but it's going to take a little more time to get the outer piece right.
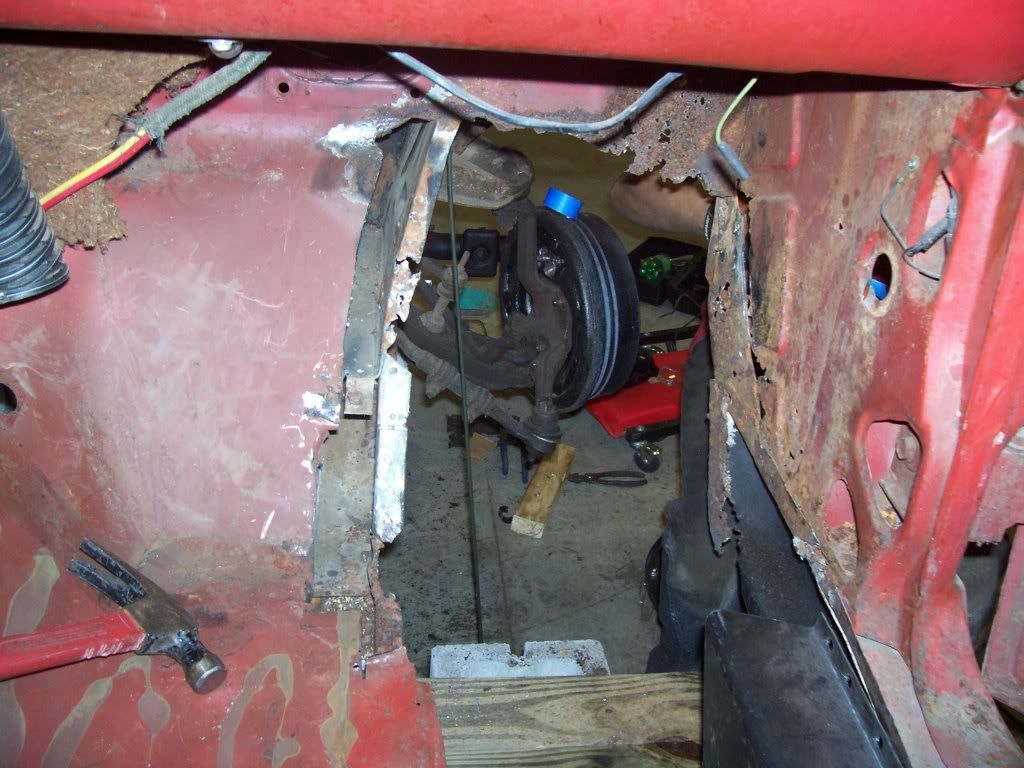
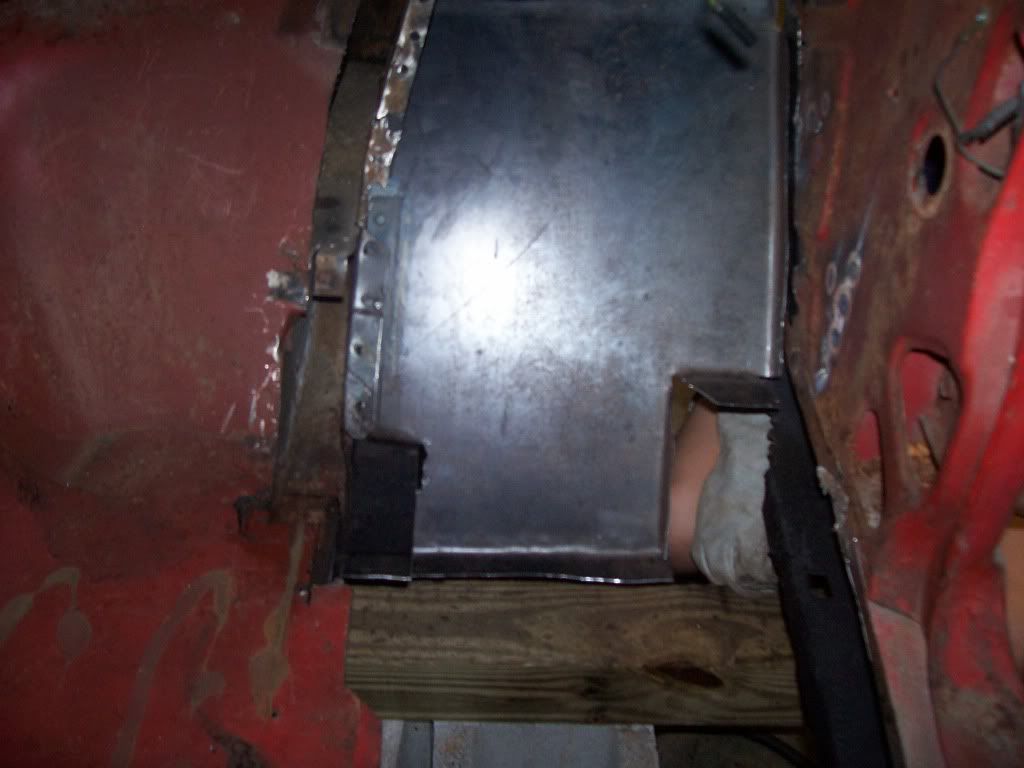
2. Of course before we can weld that piece in, we had to do some patching on both sides. Made a full length patch from the frame rail to the front frame complete with tabs for welding pieces in. On the outside we made similar pieces with tabs to receive the outer torque box piece (eventually, once we finish shaping that).
2a. Stiffener and inner rocker were painted with black implement paint. Nobody locally had POR and we're under the gun to get the car moved (as I noted in a post above) so we went with the best thing we could get. It's not as hard as POR but it is thicker than regular spray primer.
3. After several fitting and checking attempts, we put in the stiffener and spot welded a few holes to see how it would fit.
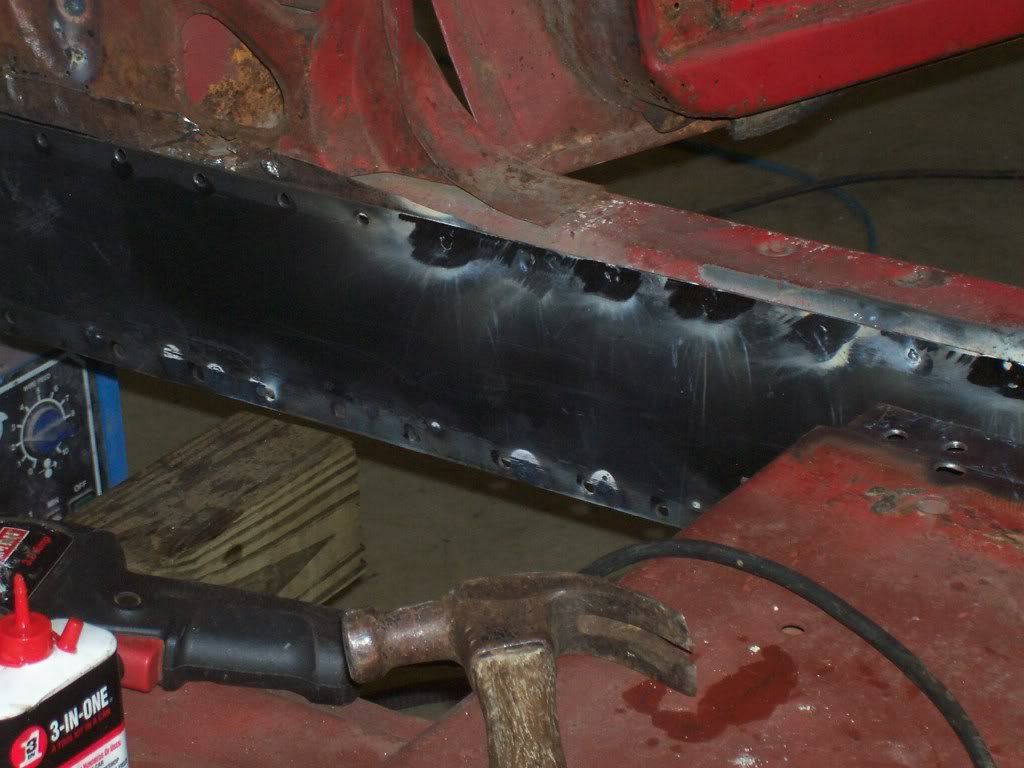
It turns out the new stiffener was a little taller than the outside rocker (as we were warned by the supplier). Unfortunately, we drilled the holes BEFORE we noticed this (sorry no photos of that, too frustrating). So some of the bottom holes stuck halfway below the outer rocker. We drilled staggered holes in the outer rocker and welded it from the outside. Not as pretty, but it should do. Some of the stiffener holes did line up nicely so we welded those from the inside too.
Had a bit of a time getting the rear part of the outer rocker to line up correctly with the stiffener. The outer rocker got chewed up a bit with the air chisel and the fact that it was kind of rusty, plus it all happens in a tight space under the convertible top support and inside the fender tub. Didn't want to cut out too much metal, so we clamped and twisted and angle grinded and got a pretty good fit. I think the outer rocker has collapsed a bit (i.e. the bottom has sprung upward a bit -- unless the bottom surface is supposed to angle up slightly). We can't seem to do much about that (would need some sort of spreader inside the rocker), but when this is all complete, I believe the inside rocker is doing more of the structural work here and the outer rocker is pretty, ads some strength and ties the front cowl and fender to the back fender (or at least that is what I hope is happening). It's all there, and welded, just that it isn't a mirror image of the inner rocker.
Oh and after we got it in (and after reminding ourselves several times) we noticed we forgot to cut the stiffener for length, so we had to do that while it was already welded into place. Nice working the cutter inside the wheel tub where there is no escape from the sparks.
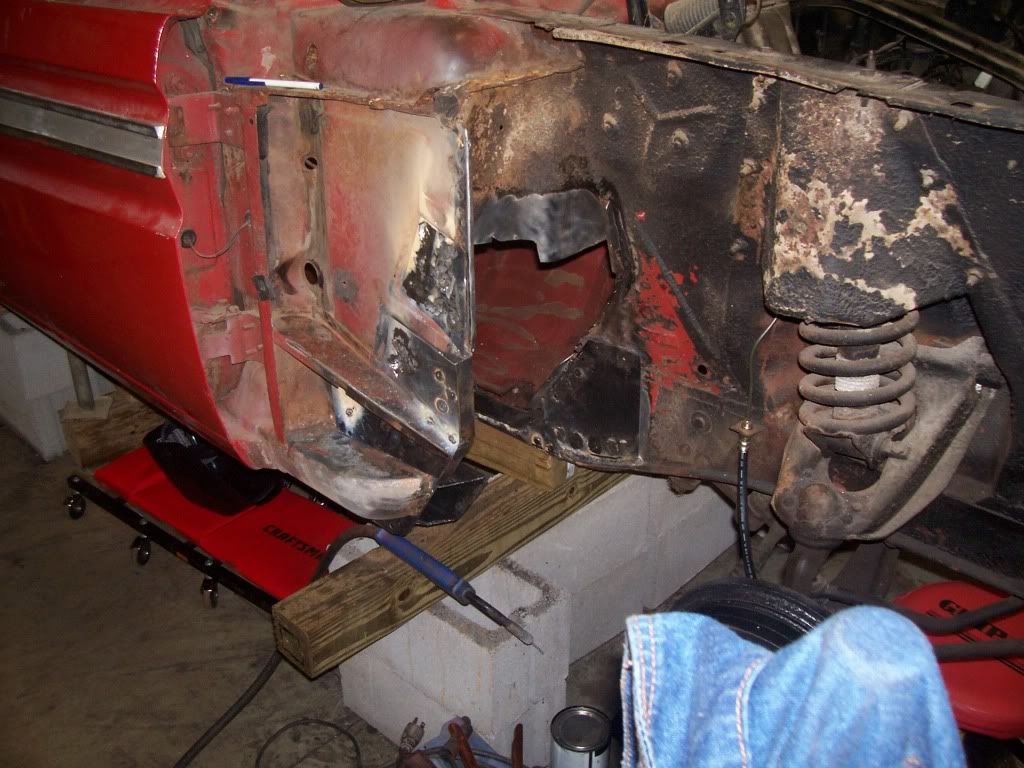
4. Once the stiffener plate was in and ground smooth, we took a few shots at fitting the inner rocker. Very tight fit (which is good, right) but it took a sledge hammer, a block of wood and about 50 one handed hammer taps from my back holding a block of wood over the tail of the rocker to push it in through the rear wheel tub.
But it's in now and has a dozen welds to hold it in place. We had to use some screw jacks to push it up into place and flex the bottom just a bit to get it to line up with the stiffener. This is kind of a head scratcher as the two pieces were pretty much exactly the same size when they arrived. My guess is that there is some pressure on the side of the inner rocker that was flexing the top and bottom tabs outward. A slight amount of upward pressure below the spots where we are welding takes care of it.
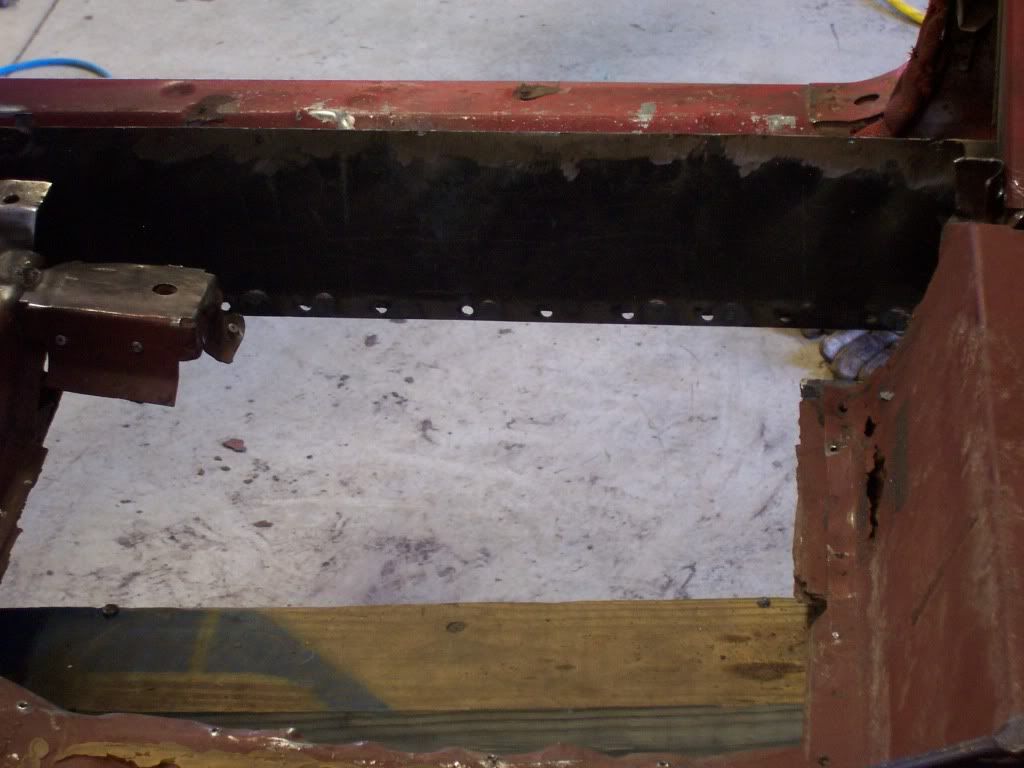
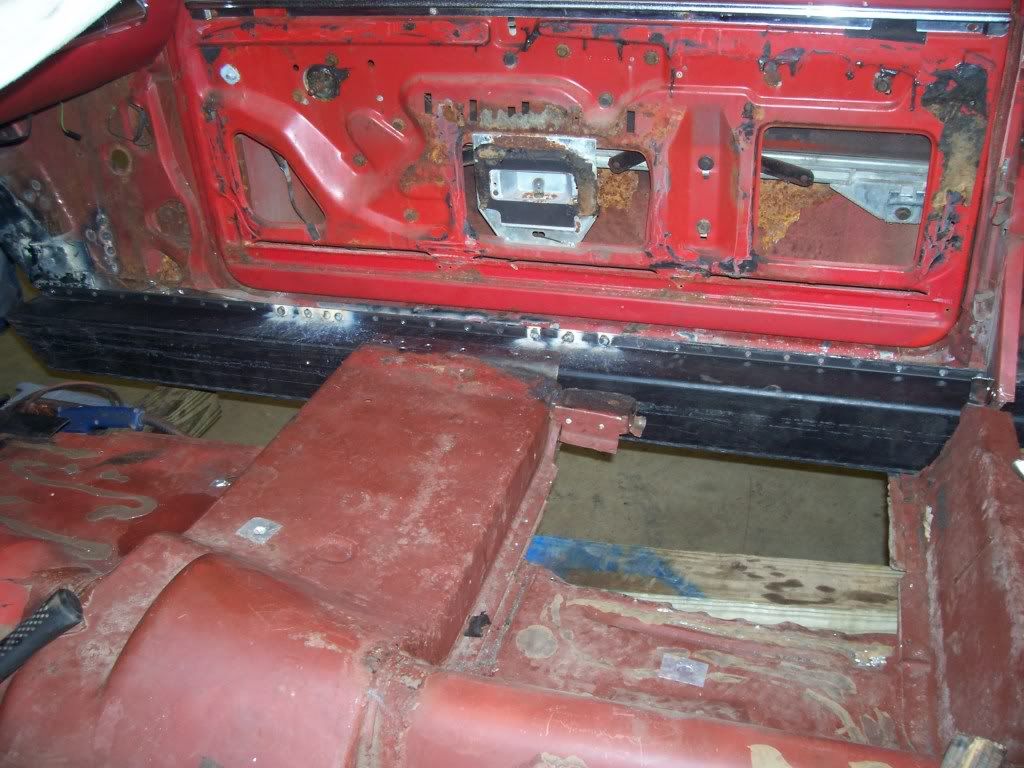
5. We checked the doors constantly and they seem to close better than they did when we started.
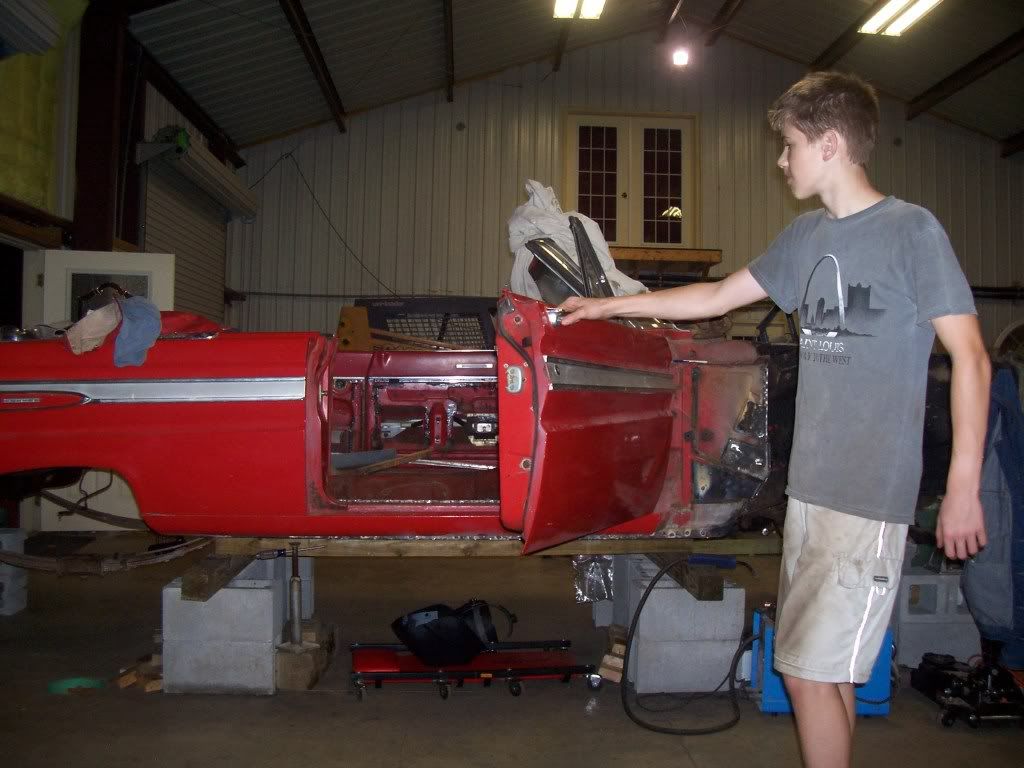
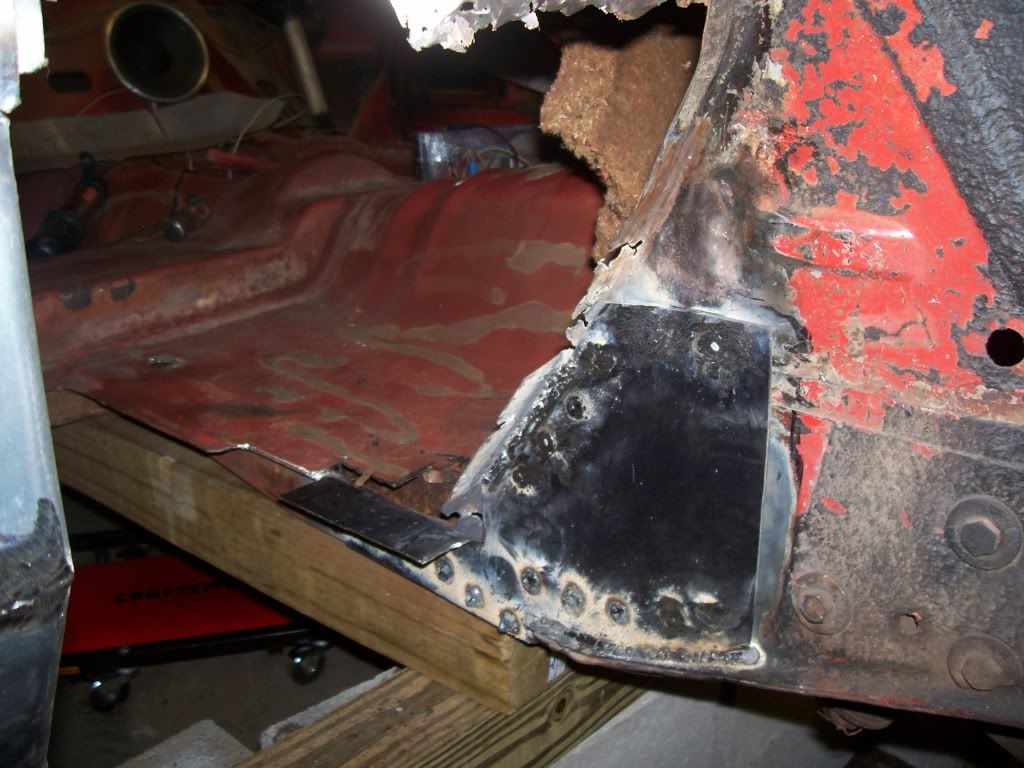
About the only thing we've noticed is that the very back of the outer rocker (right below the door handle) now drops ever so slightly away from the door. But the top is straight across from the rear quarter to the door and it works nicely. I think this is a slight sag in the outer rocker (again from is weary state/condition. I don't know what to do about it because if I jack up the back, then the gap at the top closes too much.
I suspect (somebody check me on this theory) that since the area of the rear fender right above the tail end of the outer rocker was patched before with fiberglass (you can see it in the photo) that the fender piece has some soft issues and the two pieces (outer rocker and rear quarter) are not in their original alignment positions. That is to say that the rear of the outer rocker was pushed slightly down, allowing the rear quarter to move forward like a plate shift and then they locked them into this into position when they patched it previously. To fix it, I'd need to separate these two so I can raise the rocker without raising the whole rear quarter and keeping the side door gap the same as the bottom gap?
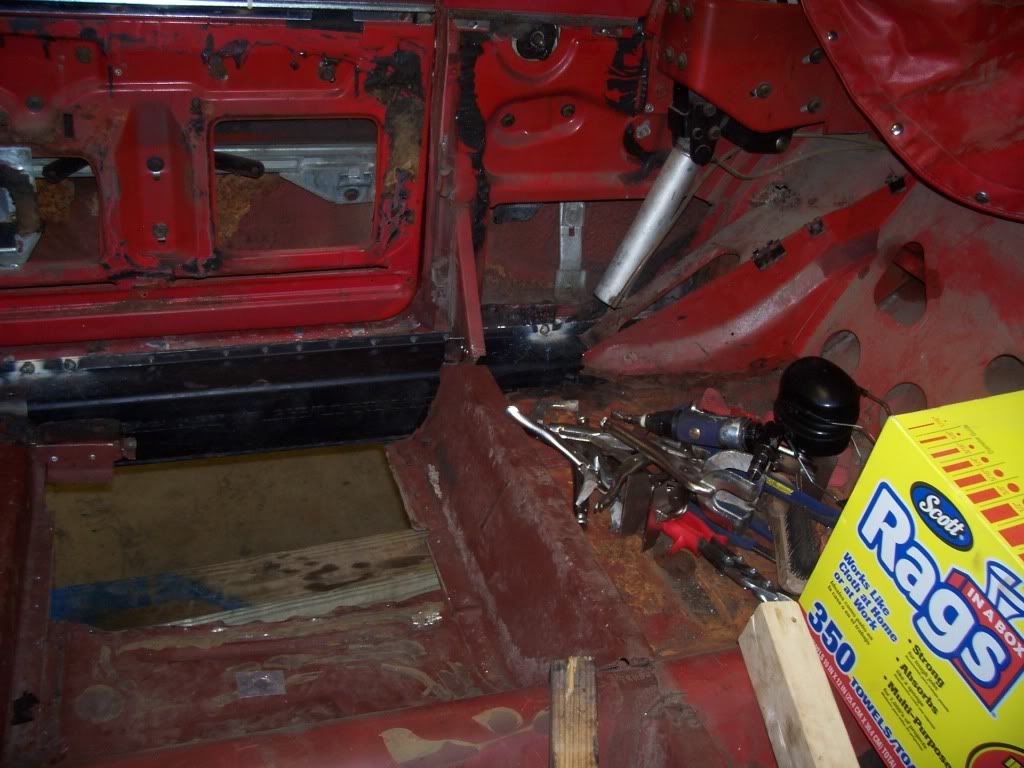
At any rate, we'll get back on it tonight to finish up the inner rocker welds, put in the inside of the front torque box, grind off any not already ground off welds. Then we need to get the wheels back on, at least some of the breaks to work, get it off the jacks and get it moved this weekend. Then we need to make the outer front torque box and... start on the other side
Would even be this far if it weren't for my son with his "anything is possible attitude and you guys on the forum who gave good advice and encouragement. And if anybody else is facing rusty inside rockers all I gotta say is, if two rubes like us can do it than anybody can, so grab a chisel and get on it.
1. We originally thought we were going to patch the front torque box, but in the end, we just cut it all out. This has been a bit of a time suck, as it's not our best skill set to create those pieces shaping 16 gauge steel by hand. We've finally got a nice inner piece, but it's going to take a little more time to get the outer piece right.
2. Of course before we can weld that piece in, we had to do some patching on both sides. Made a full length patch from the frame rail to the front frame complete with tabs for welding pieces in. On the outside we made similar pieces with tabs to receive the outer torque box piece (eventually, once we finish shaping that).
2a. Stiffener and inner rocker were painted with black implement paint. Nobody locally had POR and we're under the gun to get the car moved (as I noted in a post above) so we went with the best thing we could get. It's not as hard as POR but it is thicker than regular spray primer.
3. After several fitting and checking attempts, we put in the stiffener and spot welded a few holes to see how it would fit.
It turns out the new stiffener was a little taller than the outside rocker (as we were warned by the supplier). Unfortunately, we drilled the holes BEFORE we noticed this (sorry no photos of that, too frustrating). So some of the bottom holes stuck halfway below the outer rocker. We drilled staggered holes in the outer rocker and welded it from the outside. Not as pretty, but it should do. Some of the stiffener holes did line up nicely so we welded those from the inside too.
Had a bit of a time getting the rear part of the outer rocker to line up correctly with the stiffener. The outer rocker got chewed up a bit with the air chisel and the fact that it was kind of rusty, plus it all happens in a tight space under the convertible top support and inside the fender tub. Didn't want to cut out too much metal, so we clamped and twisted and angle grinded and got a pretty good fit. I think the outer rocker has collapsed a bit (i.e. the bottom has sprung upward a bit -- unless the bottom surface is supposed to angle up slightly). We can't seem to do much about that (would need some sort of spreader inside the rocker), but when this is all complete, I believe the inside rocker is doing more of the structural work here and the outer rocker is pretty, ads some strength and ties the front cowl and fender to the back fender (or at least that is what I hope is happening). It's all there, and welded, just that it isn't a mirror image of the inner rocker.
Oh and after we got it in (and after reminding ourselves several times) we noticed we forgot to cut the stiffener for length, so we had to do that while it was already welded into place. Nice working the cutter inside the wheel tub where there is no escape from the sparks.
4. Once the stiffener plate was in and ground smooth, we took a few shots at fitting the inner rocker. Very tight fit (which is good, right) but it took a sledge hammer, a block of wood and about 50 one handed hammer taps from my back holding a block of wood over the tail of the rocker to push it in through the rear wheel tub.
But it's in now and has a dozen welds to hold it in place. We had to use some screw jacks to push it up into place and flex the bottom just a bit to get it to line up with the stiffener. This is kind of a head scratcher as the two pieces were pretty much exactly the same size when they arrived. My guess is that there is some pressure on the side of the inner rocker that was flexing the top and bottom tabs outward. A slight amount of upward pressure below the spots where we are welding takes care of it.
5. We checked the doors constantly and they seem to close better than they did when we started.
About the only thing we've noticed is that the very back of the outer rocker (right below the door handle) now drops ever so slightly away from the door. But the top is straight across from the rear quarter to the door and it works nicely. I think this is a slight sag in the outer rocker (again from is weary state/condition. I don't know what to do about it because if I jack up the back, then the gap at the top closes too much.
I suspect (somebody check me on this theory) that since the area of the rear fender right above the tail end of the outer rocker was patched before with fiberglass (you can see it in the photo) that the fender piece has some soft issues and the two pieces (outer rocker and rear quarter) are not in their original alignment positions. That is to say that the rear of the outer rocker was pushed slightly down, allowing the rear quarter to move forward like a plate shift and then they locked them into this into position when they patched it previously. To fix it, I'd need to separate these two so I can raise the rocker without raising the whole rear quarter and keeping the side door gap the same as the bottom gap?
At any rate, we'll get back on it tonight to finish up the inner rocker welds, put in the inside of the front torque box, grind off any not already ground off welds. Then we need to get the wheels back on, at least some of the breaks to work, get it off the jacks and get it moved this weekend. Then we need to make the outer front torque box and... start on the other side
Would even be this far if it weren't for my son with his "anything is possible attitude and you guys on the forum who gave good advice and encouragement. And if anybody else is facing rusty inside rockers all I gotta say is, if two rubes like us can do it than anybody can, so grab a chisel and get on it.
1964 Comet Caliente Convertible
30,000 miles on our rebuild
All Comets start out as dreams...
Re: Father and Son Comet Project (with photos)
... Oh, and the reason we need the brakes to work is NOT that we're going to drive it soon  It's that we have to roll it down a grade to get it into my garage at home and I'm not comfortable just having several people roll it by hand. Their is a turn at the bottom of the drive, and a rocky cliff beyond that turn (think Ferris Bueller and that scene where Cameron's dad's car goes into the ravine). So NO, we're not planning to drive it, but I'd like stopping power. Otherwise we have to rig a come-a-long or something and this seems easier. Plus the brakes are almost done anyway.
1964 Comet Caliente Convertible
30,000 miles on our rebuild
All Comets start out as dreams...
-
CALIFORNIA CALIENTE
- Posts: 5933
- Joined: Mon Feb 20, 2006 12:57 am
- Location: Camarillo,California
Re: Father and Son Comet Project (with photos)
WOW,great work so far!!! I have never seen the firewall,frame,inner fender rust away like that!! You guys are doing a great job,just keep checking that the body is not twisting or bending.I'm going to have to quit complaining about the rust my wagon had!!! ROY.
Real Racecars have 3 pedals

Re: Father and Son Comet Project (with photos)
i agree with roy, and the door lines look great too. keep on pressing forwardCALIFORNIA CALIENTE wrote:WOW,great work so far!!! I have never seen the firewall,frame,inner fender rust away like that!! You guys are doing a great job,just keep checking that the body is not twisting or bending.I'm going to have to quit complaining about the rust my wagon had!!! ROY.
Re: Father and Son Comet Project (with photos)
I do believe you are doing an excellent job. You are tackling the project one problem at a time and it is turning out very well. I have seen cars repaired by well known Fab Shops that don’t look as good as yours. Keep up the quality work and you will have a car that will still be running when it is your sons turn to pass it down.
Only use the brakes to stop and get gas.
Projects
65 Comet 421Stroker
93 Mark VIII Supercharged w/Fogger
70 Torino GT
Projects
65 Comet 421Stroker
93 Mark VIII Supercharged w/Fogger
70 Torino GT
Re: Father and Son Comet Project (with photos)
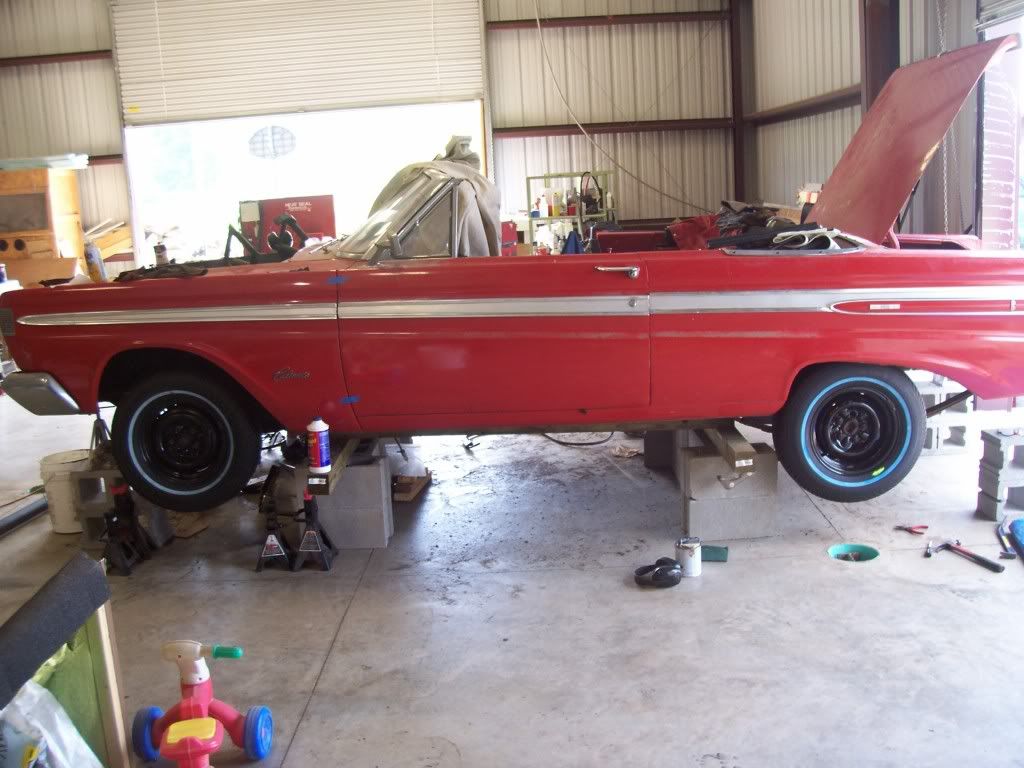
So today we got the wheels and breaks back on, along with tires and lowered it off the blocks for the first time in months in preparation to move the Comet back to our house. It was nice to see what will eventually happen when she's on all fours permanently.
1964 Comet Caliente Convertible
30,000 miles on our rebuild
All Comets start out as dreams...
-
CALIFORNIA CALIENTE
- Posts: 5933
- Joined: Mon Feb 20, 2006 12:57 am
- Location: Camarillo,California
Re: Father and Son Comet Project (with photos)
Sometimes you have to take a step backwards in order to go forward!!! Don't get discouraged,you guys are making good progress,plus learning a lot as you go[like I'm NEVER doing this AGAIN]!!! ROY.
Real Racecars have 3 pedals