Lavron's '64 Build Thread

The Era of The Square Body Racing Comets
lavron
Site Admin
Posts: 4710
Joined: Sat Nov 01, 2003 9:17 am
Location: Missouri, Ozarks
Contact:

Re: Lavron's '64 Build Thread

Post by lavron »

poboyjo65 wrote:
Tue Nov 03, 2020 1:41 am
If you could find 3 identical vacuum gauges to help tune/sync them all together it probably would save some hair. I would ship you these left over from the four cyl cycle days but I dont think they work right any more,,,too many years out in the cold.
I see those still selling on Amazon I think for $60 so I might see about getting one, too bad there are no 3 cylinder sets :P

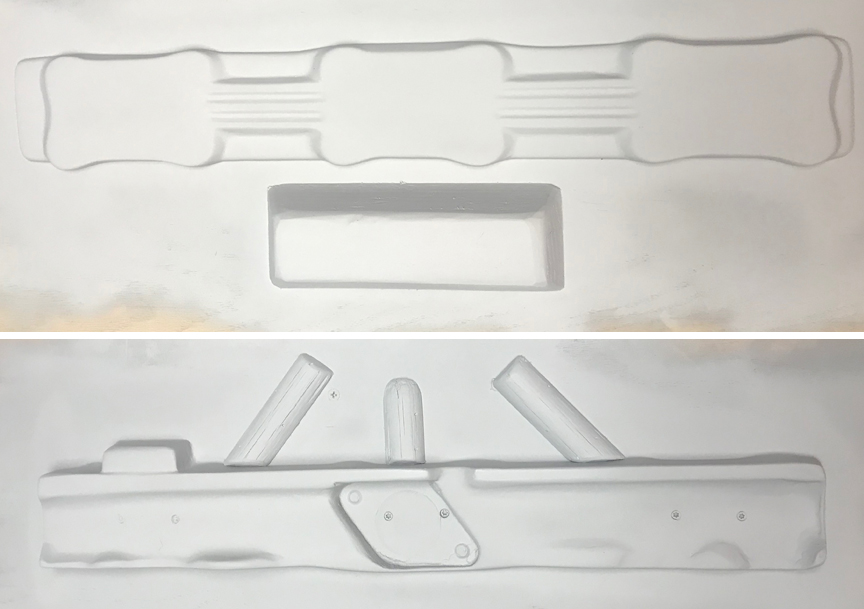
I got the basin and gates added today to the pattern, I still need to do a little filling where the gates meet the pattern and then I will be ready for paint and getting the flasks built.

Image

I went ahead and set it up to pour with the top down.

See Ya,
Mike
Mike's build thread
viewtopic.php?f=9&t=13058
Image

Cobraguy
Posts: 39
Joined: Wed Sep 12, 2018 10:35 am
Location: El Cajon CA

Re: Lavron's '64 Build Thread

Post by Cobraguy »

Hi Mike progress looks good. There are some good Weber carb forums out there for rebuilding and jetting info. If your running a progressive linkage on the carbs you don't really need to synchronize them. If they aren't progressive you can use a 4 dail just hook up three and ignore the fourth. It will only get you close at best running a parallel linkage. The main thing to get right is wide open throttle on all three at the same time.

lavron
Site Admin
Posts: 4710
Joined: Sat Nov 01, 2003 9:17 am
Location: Missouri, Ozarks
Contact:

Re: Lavron's '64 Build Thread

Post by lavron »

Cobraguy wrote:
Tue Nov 10, 2020 9:57 am
There are some good Weber carb forums out there for rebuilding and jetting info.
I am finding there is more info out there than I thought.

I finally made a quick video of the pattern getting close to finished, I shot this video several times over the last couple of weeks but finally decided to do a really short one showing it better.

Custom Cast Intake Pattern

Just a bit over 3 minutes

See Ya,
Mike
Mike's build thread
viewtopic.php?f=9&t=13058
Image

User avatar
SASSY
Moderator
Posts: 5134
Joined: Sat Jan 07, 2006 12:32 am
Location: Wynndel, BC CANADA

Re: Lavron's '64 Build Thread

Post by SASSY »

Cool ! Don't really understand how this is all gonna come together but it sure is interesting.
Fred
I'd rather do it myself if it's done right or not,,,isn't that what hotrodding is all about

Image

lavron
Site Admin
Posts: 4710
Joined: Sat Nov 01, 2003 9:17 am
Location: Missouri, Ozarks
Contact:

Re: Lavron's '64 Build Thread

Post by lavron »

SASSY wrote:
Wed Nov 18, 2020 12:04 pm
! Don't really understand how this is all gonna come together
Me either but I have an idea in my head :roll: :P

So the Comet drove up the highway today to the campground and back, still not enough space to get it up into 5th but really not too interested in pushing it too hard yet with the front end not aligned and I have not had a chance to set my brake bias yet.

I went to show it to the neighbor boys but they were not home, their dad liked it however :P it embarrassed me a little on the way back, one of my other neighbors was out so I stopped to talk to him, and then it wouldn't start, turning the key did nothing, good thing I live on a big hill, he gave me a push and I roll started it. I think I know what is wrong when I changed wiring around on the starter relay I had to extend one wire and I think it has an open, I fiddled around with it and it turned over fine so I will have to repair something there.

I could hear the front tires scrubbing a little so I am out of alignment for sure.

There are some pretty short shifts in there, probably could take off in second-gear. But power when I need it on the low end.

See Ya,
Mike
Mike's build thread
viewtopic.php?f=9&t=13058
Image

User avatar
Joe Travers
Posts: 2434
Joined: Mon Sep 21, 2020 6:23 pm
Location: Louisiana

Re: Lavron's '64 Build Thread

Post by Joe Travers »

lavron wrote:
Thu Nov 19, 2020 4:42 pm
So the Comet drove up the highway today to the campground and back, still not enough space to get it up into 5th but really not too interested in pushing it too hard yet with the front end not aligned and I have not had a chance to set my brake bias yet.
Hey Mike-

What proportioning valve are you using?
Thanks!

JT
Image

1963 1/2 Custom Hardtop
342 stroker, solid roller, T-10, 3.55 posi

lavron
Site Admin
Posts: 4710
Joined: Sat Nov 01, 2003 9:17 am
Location: Missouri, Ozarks
Contact:

Re: Lavron's '64 Build Thread

Post by lavron »

Joe Travers wrote:
Thu Nov 19, 2020 5:01 pm
What proportioning valve are you using?
It is a Wilwood 260-8419 in the back brake line.

Image

That was before I got all the lines hooked up, the rear line exits out the bottom of the proportioning valve.

See Ya,
Mike
Mike's build thread
viewtopic.php?f=9&t=13058
Image

popscomet
Posts: 9689
Joined: Sat Jan 01, 2011 11:19 pm
Location: Jacksonville, Arkansas

Re: Lavron's '64 Build Thread

Post by popscomet »

,,your line bending turned out pretty dang good,,,,GRASSHOPPER !! pop
Image
pop/glenda

User avatar
Joe Travers
Posts: 2434
Joined: Mon Sep 21, 2020 6:23 pm
Location: Louisiana

Re: Lavron's '64 Build Thread

Post by Joe Travers »

lavron wrote:
Thu Nov 19, 2020 5:54 pm
It is a Wilwood 260-8419 in the back brake line.
I'm with, Pop. Nice clean look, there! :D
I just replaced the control knob on my SSBC today. Broke it when a wrench slipped adjusting clutch linkage from the top.
It's tucked under the shock tower brace, Mitsubishi on that side under the hood. :?

JT
Image

1963 1/2 Custom Hardtop
342 stroker, solid roller, T-10, 3.55 posi

lavron
Site Admin
Posts: 4710
Joined: Sat Nov 01, 2003 9:17 am
Location: Missouri, Ozarks
Contact:

Re: Lavron's '64 Build Thread

Post by lavron »

popscomet wrote:
Thu Nov 19, 2020 6:17 pm
,,your line bending turned out pretty dang good,,,,GRASSHOPPER !! pop
Thanks for that guys, you know I can be a bit OCD at times :roll: :P

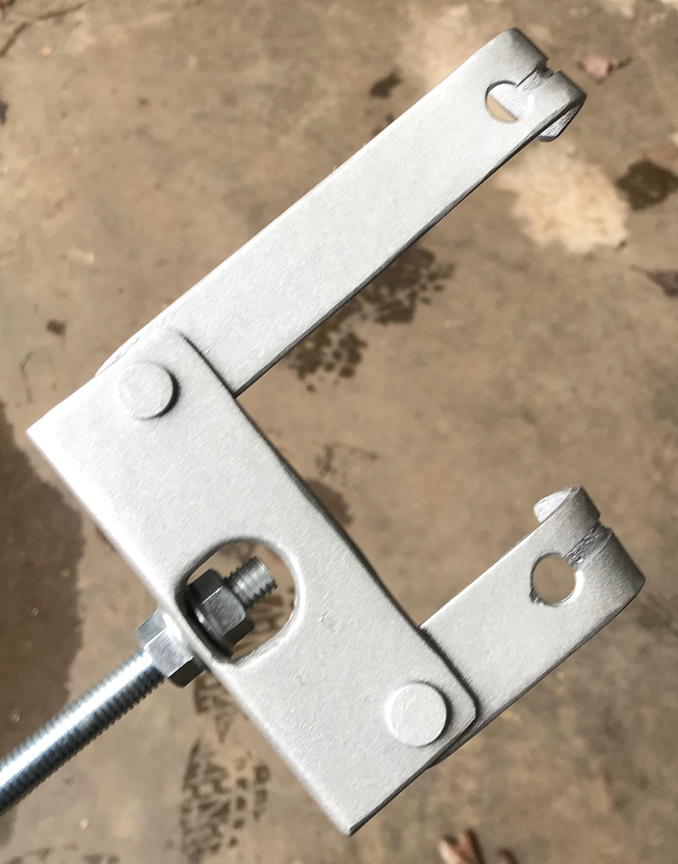
I had a component failure yesterday, I guess it did not pass the stress tests :shock: of course it was the front e-brake cable, I think it pulled the ball off the end of the cable where it attaches to the lever inside, the other end of the cable under the car had bolt-on ends you would have thought one of those would slip first but they are still intact.

I had backed the Comet out of the shed so I could get the lawnmower out and I was using the e-brake to stop the car as I went backward to hopefully help adjust the brake shoes and cable (there is an auto adjuster on the handle as well) all that was fine, actually has gotten to where it will hold some when you go to start the car and keep it from rolling backward, when I pulled the car back in (just getting dark out) I went to set the brake and gave it a good tug and something snapped :? looked under the car and the adjuster was dangling, unhooked it from the rear cables and pulled it out of the sleeve going up to the lever, no ball on the end and the cable itself does not appear to have broken, I think when I go out today I will find the ball in the lever with no cable.

The cable was new but was a universal "HELP" product, cheap, maybe $11 but really couldn't find anything else at the time. I used the original Comet cable jacket and cut it shorter and then just threaded the new cable inside of it, not sure why (can't remember) I did not use the original cable, I think I was concerned about the little ball on the end was too small to stay in the lever (I think the lever is a mid-'90s Mustang part) however I may look at it today, I think it is a thicker cable than the replacement one but maybe I could fit the clamps (that did not fail) on to it and just shorten it to the proper length.

I can't use the factory Mustang cable because it is really short, I think 8" long and couldn't tell from pictures how it attached to the car, the original Comet cable slips right in the hole in the handle and clips with the original spring clip from 1964 just like on stock handles. The late-model Mustang cable also has the equalizer made on one end but need to use my homemade equalizer that compensates for the unequal length of the Explorer rear cables.

Image

I guess this is one reason I don't feel confident of the e-brake system I have built on the Comet :roll: but you have to test this stuff out, I am sure in an emergency situation you would be pulling that lever with all your might :P

See Ya,
Mike
Mike's build thread
viewtopic.php?f=9&t=13058
Image

lavron
Site Admin
Posts: 4710
Joined: Sat Nov 01, 2003 9:17 am
Location: Missouri, Ozarks
Contact:

Re: Lavron's '64 Build Thread

Post by lavron »

I have an e-brake again, I found the old cable from the comet, which really was not that used I had put it on the car just before I quit driving it, I had already cut the outer jacket down and it is on the car, the cable is heavier than the one that pulled the end off so I had to drill the holes out a bit on the barrel clamp (or whatever they are called) which works fine but you just have to watch the little ball bearing inside because it can fall out the new larger holes, once the cable is in there it doesn't matter. it actually works a bit better now, while I was under the car I pulled the cable coming from the lever tight (until all the spring was pulled tight) and clipped it with some vice-grips so it would not retract back, adjusted my equalizer all the way out and pushed the clamp on retainer up the cable until everything was semi-snug and tightened it, then I tightened the adjuster and took the rest of the slack out.

I was a little nervous to pull the lever too hard but was able to stop the car from rolling backward, I did not try forwards but usually, if they hold going backward they work better forward, I will continue to stress test it :P

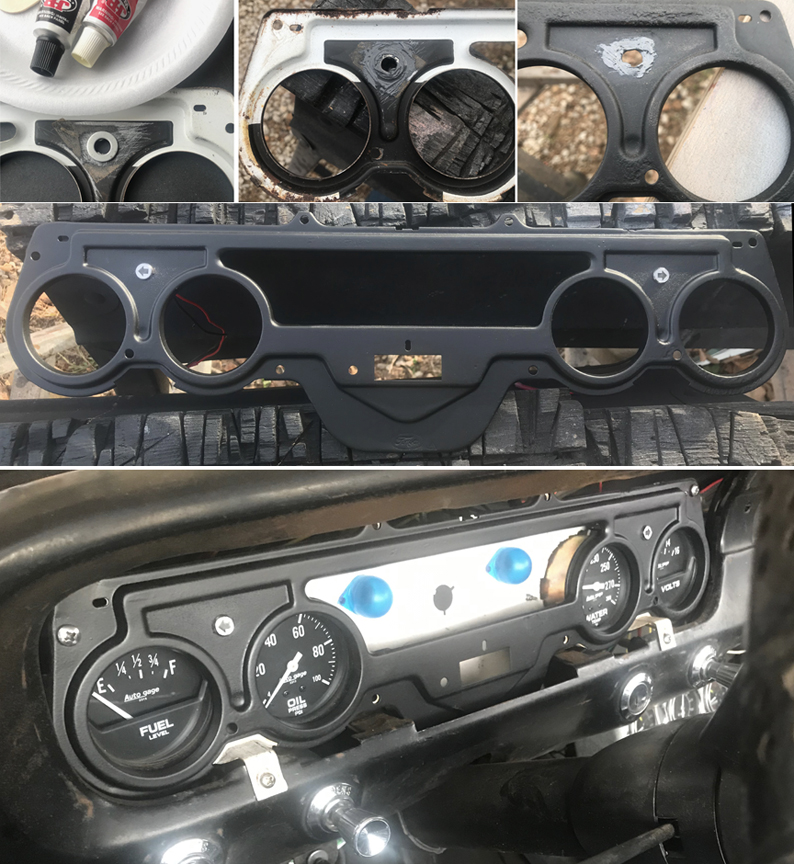
Not sure I showed these pictures (I did this almost a month ago) so I combined them into one because it is still a work in progress, I had a short bit of time one day so I made my turn signal holes round in the gauge cluster, I used epoxy and some washers.

Image

The washer was the right size for the LED indicator to fit in so I scuffed both the washer and the back of the plate and glued it on, I used some more epoxy to fill the edges of the rectangle holes on the front. You can see from the top row of pictures this was not a pristine cluster I am modifying it had a little rust on it, I cleaned the rust up and repaired it, and then shot some bed liner around the indicator holes to give it some texture and finally sprayed the whole thing with some flat black, I then reassembled it and put it back in.

I still need to make better brackets to hold the gauges in the back and get the speedometer put in there. I will probably hook all the electricals up to one plug so I can remove it by just disconnecting one thing, except the oil pressure and water temp, it could be easily removed.

See Ya,
Mike
Mike's build thread
viewtopic.php?f=9&t=13058
Image

lavron
Site Admin
Posts: 4710
Joined: Sat Nov 01, 2003 9:17 am
Location: Missouri, Ozarks
Contact:

Re: Lavron's '64 Build Thread

Post by lavron »

Some days I should stay in the house :roll: It was a cold, damp, dreary day so I just went out looking for little jobs to do, I think I mentioned during the drive up the highway and back I stopped to talk to the neighbor and had to roll start the Comet because it wouldn't turn over, I suspected the wire was not put together very well going to ignition post on the relay and it wasn't, I decided to make a new wire and when I went to take the old wire off I found out an open-end wrench, as it is turning the nut will act like a lever when it contacts the body of the relay, yep, I cracked another relay.

Image

It just cracked so I super glued the crack and wrapped a little tape on it to hold it until the glue sets up.

Look like I will be ordering another one or two or maybe 12 to replace it with :oops: it does still work but it is only a matter of time it will probably break off.

At least it is easy to get too :P

See Ya,
Mike
Mike's build thread
viewtopic.php?f=9&t=13058
Image

lavron
Site Admin
Posts: 4710
Joined: Sat Nov 01, 2003 9:17 am
Location: Missouri, Ozarks
Contact:

Re: Lavron's '64 Build Thread

Post by lavron »

The Comet stranded me! OK only sort of, I was still at home, I am going to be looking for a starter now but not the bargain type :roll:

Kinda Stranded :roll:

Thinking about a Motorcraft starter even though I don't know if they will be any better.

Hopefully, I am slowly working all the issues out on the Comet :P I know just down to the mailbox and back a few times a week doesn't seem like much but I guess I am finding issues.

Now I am wondering if the starter is not a contributing factor to the slow start etc. I have experienced?

See Ya,
Mike
Mike's build thread
viewtopic.php?f=9&t=13058
Image

lavron
Site Admin
Posts: 4710
Joined: Sat Nov 01, 2003 9:17 am
Location: Missouri, Ozarks
Contact:

Re: Lavron's '64 Build Thread

Post by lavron »

I am kinda happy this starter broke, it has been a chore and a half getting the old one off, things bolt-on easy when there is things like the header not installed :roll: it has taken me two days to get it off, I will admit that those two days I only worked about an hour or two but still that is too long and I had to lift the front of the car up and use 7,000 extensions with 10 u-joints and the cordless impact driver to be able to turn the stud out (no way the nut was coming off without doing some dismantling :roll: ) not a job you would want to do in a parking lot someplace.

The new starter came in today, that stamp on the side better mean something as well as the higher price.

Image

There is little hope that Ford made that and it was not made in China :roll:

Hopefully, I can get it installed tomorrow I found some stainless bolts I overlooked or I wasn't thinking, because if the exhaust studs fit the holes an exhaust manifold bolt should fit as well, and it does, I may leave the lower stud in there to make the starter a little easier to install by sliding it up on the stud and then only having to feel around to get the top bolt in there which should be aligned because of the stud, the bottom nut/stud is easy to get too.

I guess if the install happens easy enough I will know :P

One difference with this new starter is the solenoid wire uses a spade plug instead of a ring so I will just clip the ring off and add the spade socket.

I can't stand the car sitting there and not being able to start it (well technically I could with a good hill, I think I have that covered :P ) While I am messing with it I may go ahead and drain the gas out and fix the float to read properly, I would guess it needs bent down some so it will float sooner? I had at least 5 gallons of gas in there a 22-gallon tank should give me around a 1/4 on the gauge and it barely lifted so it did not take long to show empty when it wasn't.

The other thing I have been putting off is switching that rear tire out, I guess I need to see if the rear tires will come off now after all the modifications I did to the rear wheel wells.

See Ya,
Mike
Mike's build thread
viewtopic.php?f=9&t=13058
Image

popscomet
Posts: 9689
Joined: Sat Jan 01, 2011 11:19 pm
Location: Jacksonville, Arkansas

Re: Lavron's '64 Build Thread

Post by popscomet »

you may have to do what pop does to remove rear tires from my 66 f100...they are 8.5 wide x15 whls,,sitting in here can't recall tire size,,,,,I have to put a floor jack under rear end and just barely lift tire off grd,just barely,,,then I take a old regular bumper jack on the rear bumper and barely lift the body ,,just a couple of clicks...just kinda stretch the spring just a tad,,,but not near enough weight to be dangerous on the bumper jack,,,,,,sorta just tightening up slack
Image
pop/glenda

Post Reply