Lavron's '64 Build Thread

The Era of The Square Body Racing Comets
lavron
Site Admin
Posts: 4710
Joined: Sat Nov 01, 2003 9:17 am
Location: Missouri, Ozarks
Contact:

Re: Lavron's '64 Build Thread

Post by lavron »

More wiring, but not a lot :roll: I got a couple of things from UPS today, the bulkhead fitting and the weather pack crimpers.

I drilled out the hole in the firewall below the right fender and installed the bulkhead and put the outside cable on.

Image

I think I will spray it with some kind of sealer once I am satisfied I won't be removing it again, I had to repair a main feed into the house once after I nicked it with a shovel (power on standing in a puddle of water :roll: ) I used some spray rubber for repairing insulation and I may see if I can find some of that, it would probably be fine as is but with it being in the wheelhouse I would like to be extra protected.

Because I got the weather pack crimpers I wanted to test them out, they are not the real deal that cost around $100 but a pair made by WIss that were $12, you have to crimp in two steps instead of one like the originals, they worked pretty slick. I added the three-port connector to the distributor after cutting off the Dura-Spark connector.

Image

So now the ignition system is all wired up just need to build the mount for the ICM/coil but haven't gotten around too it.

I need to settle on my battery cables and get them ordered, I am thinking of running #2 welding cable from the battery to the firewall which is around 13' give or take and running 6 gauge across the inside firewall and up into the fuse boxes. I think all of that will be large enough because the only accessory I am running is the A/C, I am going to install a relay box in the trunk to handle the fuel pump and compressor.

See Ya,
Mike
Mike's build thread
viewtopic.php?f=9&t=13058
Image

lavron
Site Admin
Posts: 4710
Joined: Sat Nov 01, 2003 9:17 am
Location: Missouri, Ozarks
Contact:

Re: Lavron's '64 Build Thread

Post by lavron »

Not been a good week to work on the Comet, someone kicked in the door of the church Sunday night/Monday morning and carted off all the electronics (piano, digital projector, sound system, computer, dehumidifier, etc) been dealing with the sheriff's office and trying to get a list for the insurance company for replacements (so far $2,800.00) maybe the thieves can get high a couple of times off of all our stuff :(

Also, the A/C went out in the doublewide and I had to deal with getting it repaired (no big deal the capacitor went out) lastly (I hope) I have to run up to church in a few minutes and meet some guys to repair our well pump :roll:

In between all of this I got a little done on the Comet, I finally got the ignition system built, it is all hooked up except I need some thermal grease to go under the flux capacitor (also known as an Ignition Control Module, ICM) I spent a couple of days building the mount and revisioning it, this morning I got it bolted in under the dash/console.

Here it is all hooked up and ready to install under the dash, the one wire under my thumb is the ground wire, I just screwed it to the floor, the white wire is for the tach.

Image

I made it so it would slide out so the flux capacitor was easy to switch out considering where it originated from it will probably stop working all the time and try to strand me :roll:

Image

Finally tucked in place, it is a little hard to see it was kinda dark and cloudy today. To slide it out you just remove the black knob and it slides smoothly out until it hits the stop.

Image

I built it all from scrap, of course, the nylon track was leftover from my seat track repair, the large aluminum plate is another piece of the Mac base and the track itself was made from an old awning support that was on our camper when we bought it (no awning just the support hanging down) it fell off a few years ago and has been laying out there beside the camper so I retrieved it and cut it up, the knob was part of it.

Yesterday the break-in carburetor came in.

Image

I still need to find a spacer plate to go under it that turns the bolts the proper way, I have one someplace if it is not too crusty and broken, otherwise, I will have to find a different one.

Getting closer to the first start, I need to find some odds and ends and get my oil ordered, I have been putting it off because I need to add another $30 to the Summit cart to get free shipping and need to see what they have I want/need :P .

See Ya,
Mike
Mike's build thread
viewtopic.php?f=9&t=13058
Image

lavron
Site Admin
Posts: 4710
Joined: Sat Nov 01, 2003 9:17 am
Location: Missouri, Ozarks
Contact:

Re: Lavron's '64 Build Thread

Post by lavron »

More exciting wiring today :roll:

I think my build has morphed into; "I think I can make that myself out of old junk, build" or "how many mismatched parts can I put together to make a car, build" the only problem with that second one is I think Fred beat me to it.

As of today the ICM/coil is completely installed, I even routed the wires, which is the least fun thing trying to reach up under the dash and screw mounting loops, etc in place, everything is just out of a convenient reach.

I got all the wires except the starter wire hooked up to the ignition switch plug. I ordered a new ignition switch today and a new set of ignition and door locks with matching keys, at some point I had changed the ignition switch out, it said "Made in Taiwan" on it and it won't hardly turn to start or return to run, and the back was falling off, I know the new one will probably be even junkier :roll:

When I get time I am going to have a few questions on wiring but I will post them up in the wiring thread.

See Ya,
Mike
Mike's build thread
viewtopic.php?f=9&t=13058
Image

User avatar
SASSY
Moderator
Posts: 5134
Joined: Sat Jan 07, 2006 12:32 am
Location: Wynndel, BC CANADA

Re: Lavron's '64 Build Thread

Post by SASSY »

lavron wrote:
Fri Jul 03, 2020 8:36 am
More exciting wiring today :roll:

"how many mismatched parts can I put together to make a car, build" the only problem with that second one is I think Fred beat me to it.


Mike
:shock:
I'd rather do it myself if it's done right or not,,,isn't that what hotrodding is all about

Image

lavron
Site Admin
Posts: 4710
Joined: Sat Nov 01, 2003 9:17 am
Location: Missouri, Ozarks
Contact:

Re: Lavron's '64 Build Thread

Post by lavron »

Welcome to the exciting world of wiring my Comet, I decided to just do an update once this week because nobody probably wants to see how I wire stuff up :P .

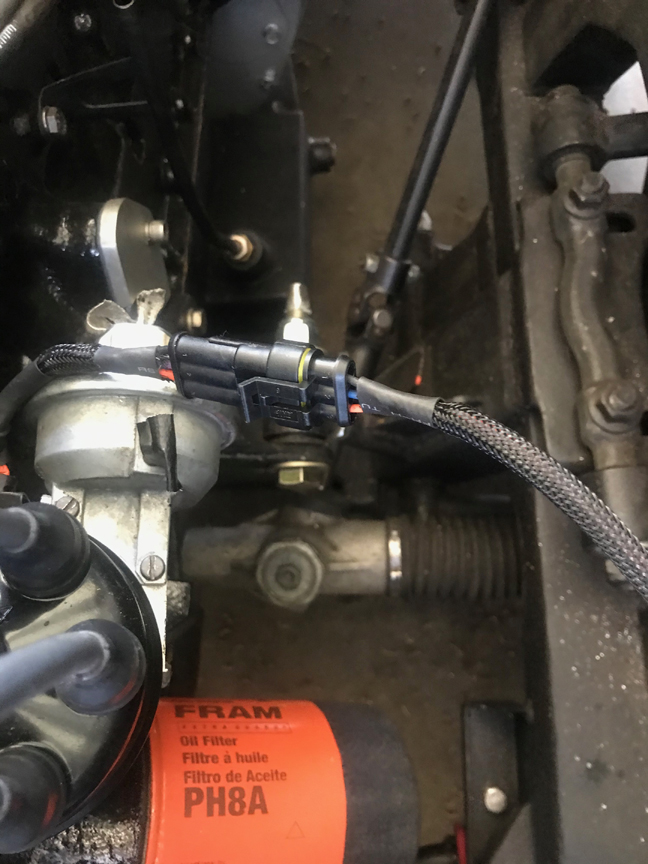
I almost have the engine run wiring/harness done, I am waiting on a few more little parts to get here like some relays, etc. but I will give you a quick review of what I have done since the last time I posted on it.

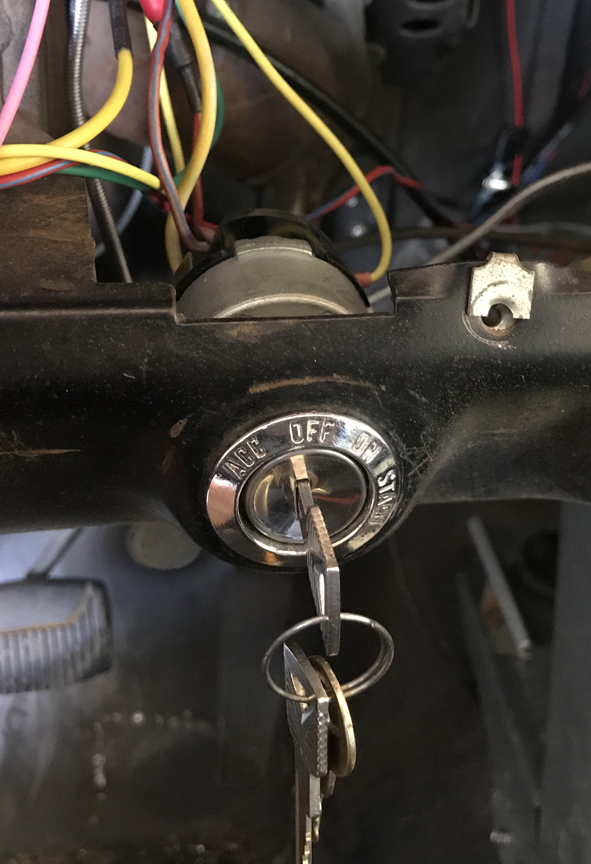
I got my new ignition switch and key set wired up and installed. Now I need to get my new Mercury keys cut to match.

Image

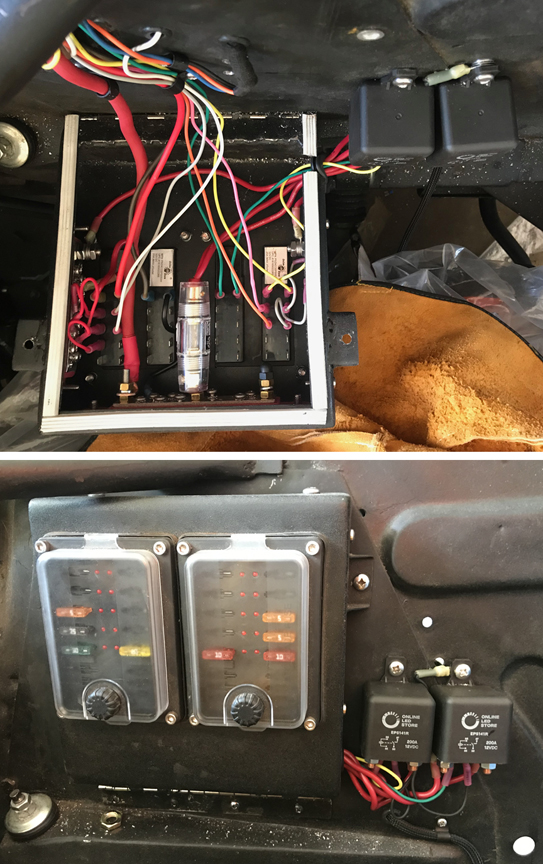
I have 8 circuits wired up, the two 10 amp fuses on the lower right are for the two constant contact relays inside the box, I am not sure I needed them but put them in any way, they protect the triggers on the relays.

Image

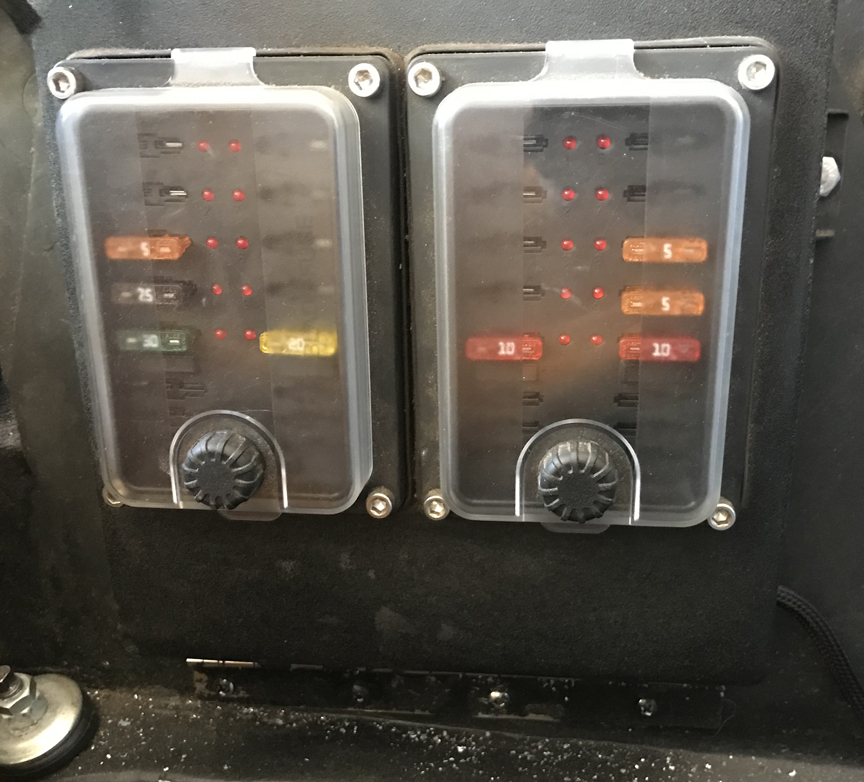
As you look at the boxes above the far left column is the IGN. ON, the next one to the right of that is ALWAYS HOT, and the other box is all ACCESSORY ON except the aforementioned bottom 2.

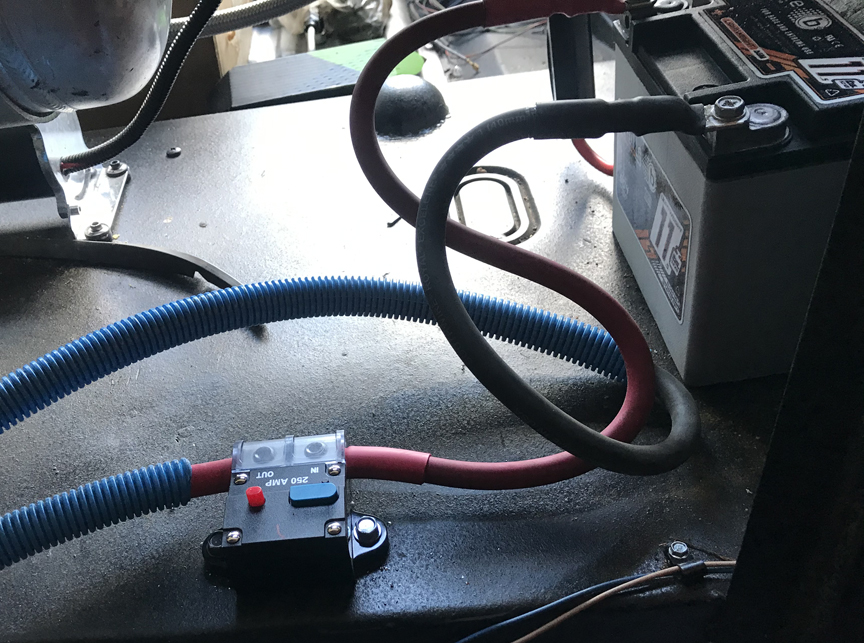
Here is a look inside the box, it has three bus bars that are the same as the above (IGN, HOT, ACC) The big 6 gauge wire runs to the battery and is attached to the top bus bar. I haven't wired them yet (waiting on parts) but two other large posts on the top bus bar will each have a wire running to the two relays, they will have some inline 60 AMP fuses in them, then the relays will attach to each of the bus bars on the side.

Image

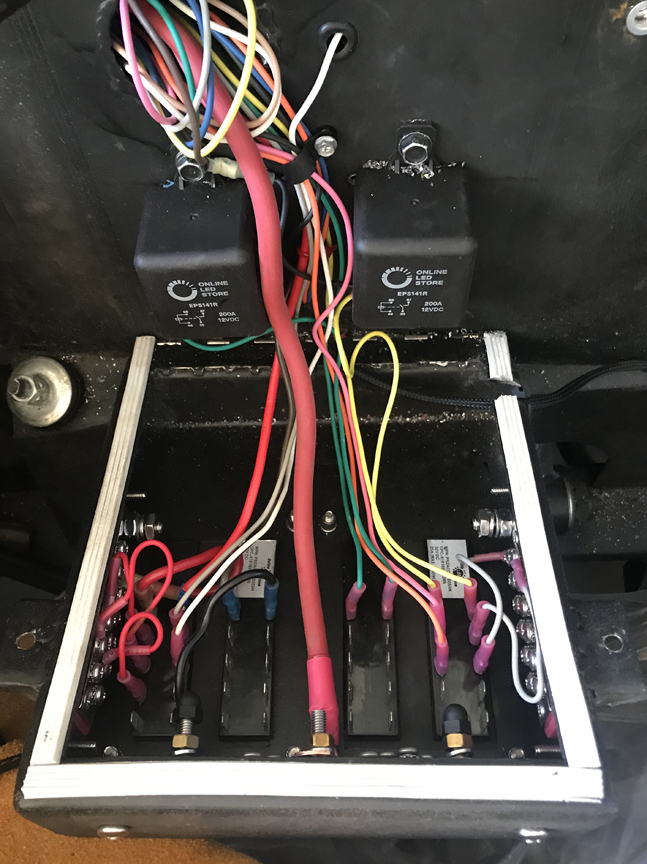
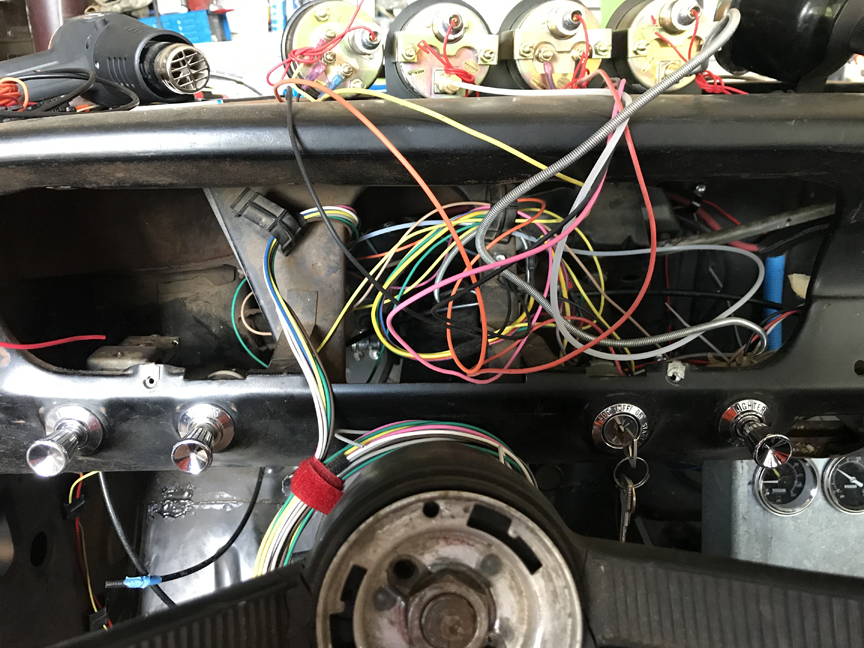
I know it looks like a rats nest of wires coming out of the dash but a lot of the wires are for future harnesses, the gauges are all hooked up (you can see them facing the other way up on the cowl)

Image

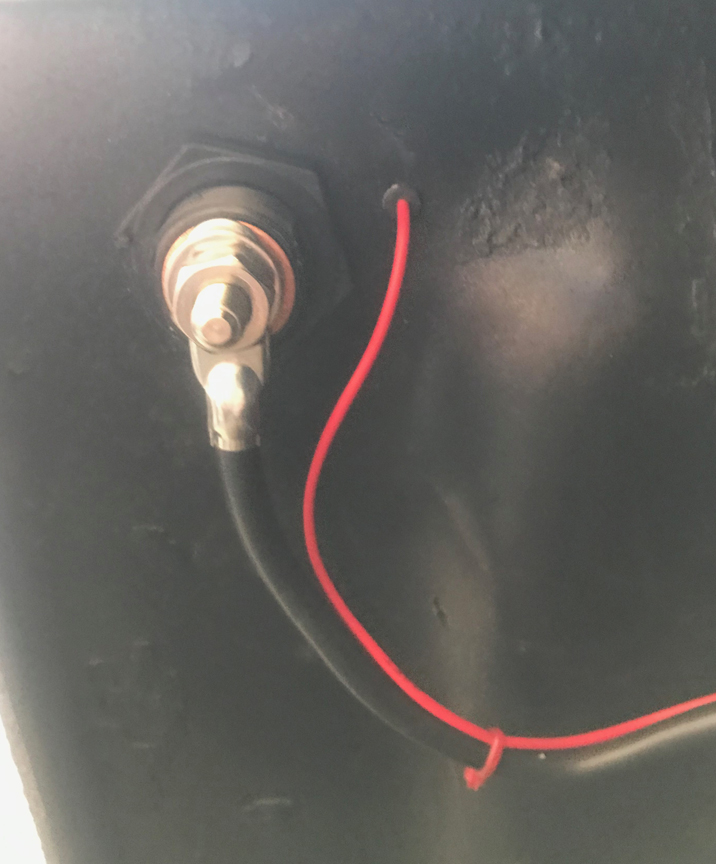
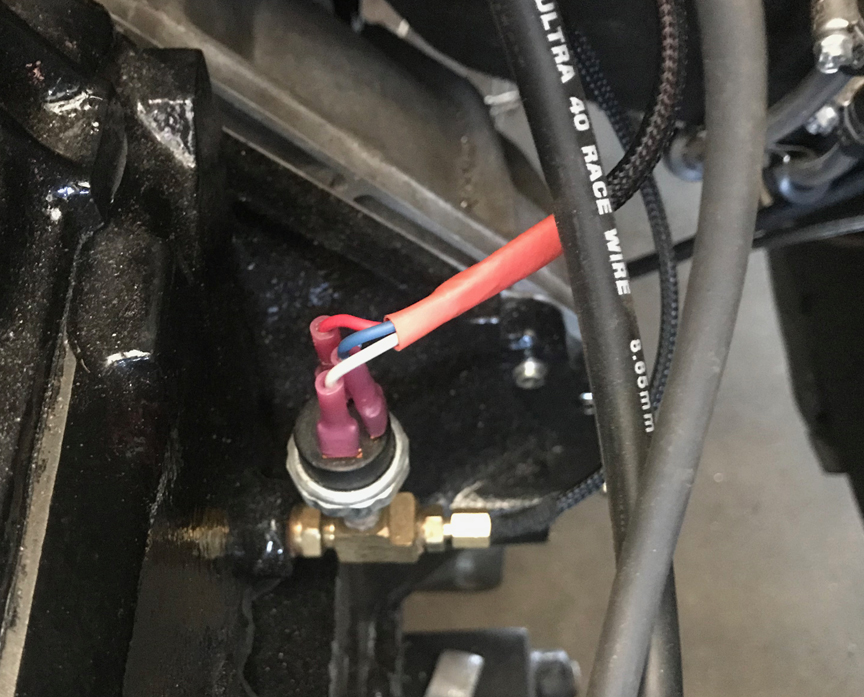
The fuel pump low oil pressure switch is all installed, the grey wire (looks white in picture) supplies IGN. on power to the switch which will supply 12V to the red wire as long as there oil pressure present, the blue wire supplies 12V to the red wire when the ignition switch is in the start position allowing the pump to run while starting the car, before there is any oil pressure.

Image

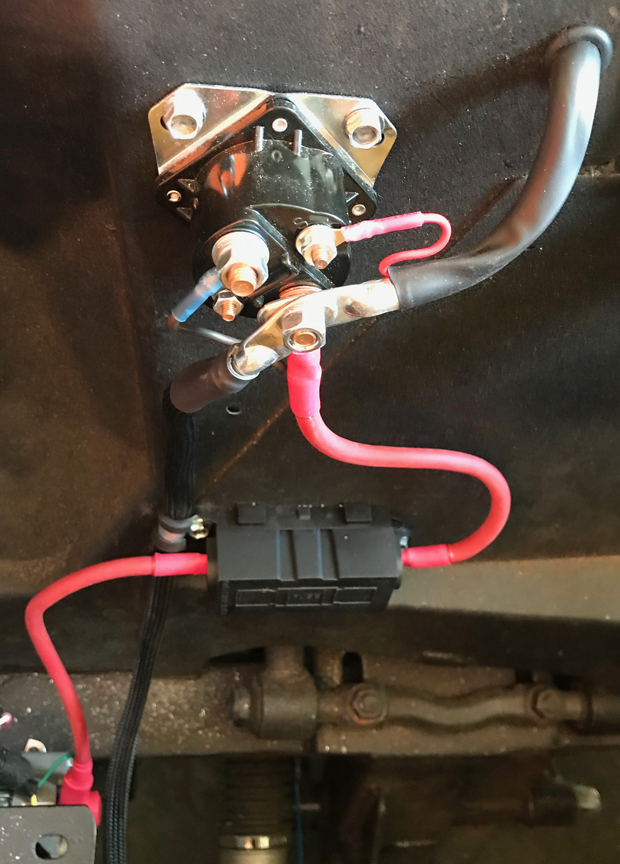
The red wire from the oil pressure switch runs all the way back to the trunk of the car where it is attached to a relay in this box (or will be when I get relays) which will activate the relay supplying power to the fuel pump.

Image

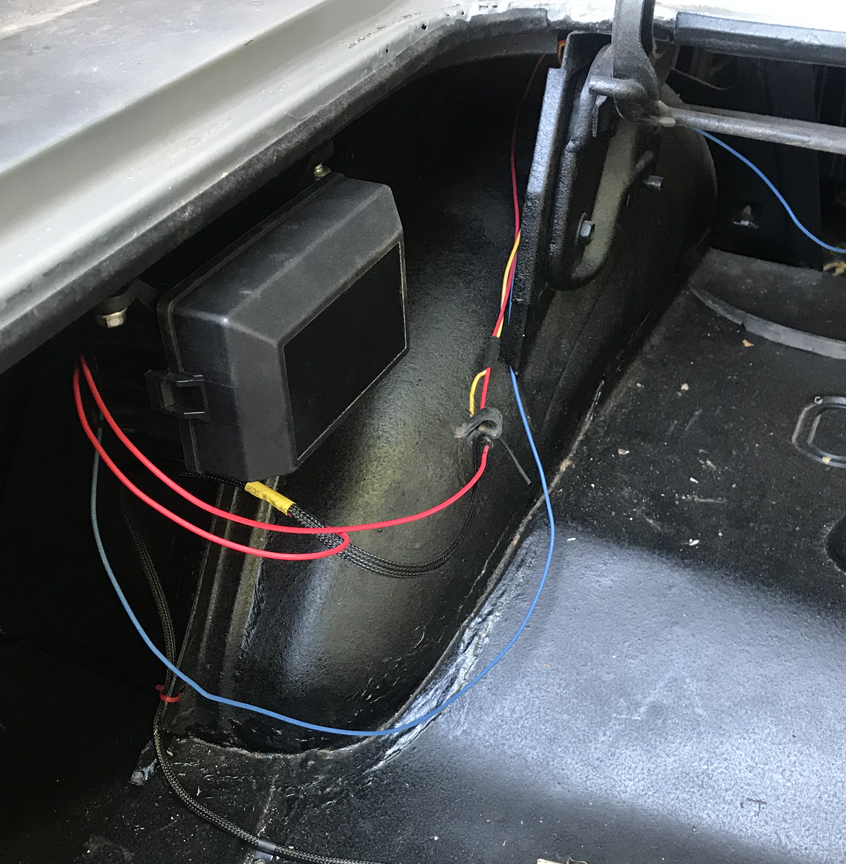
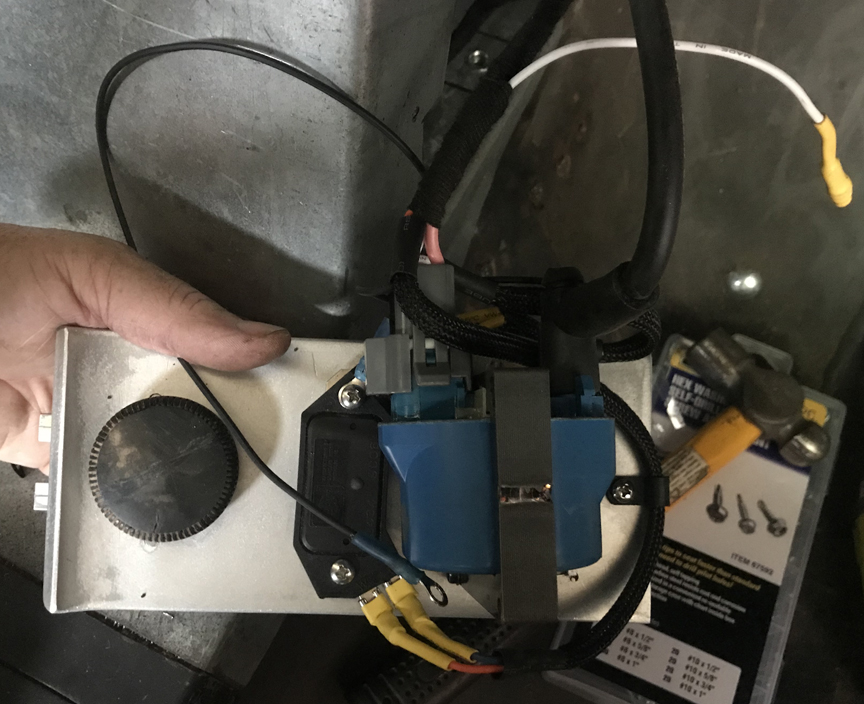
The box will also house the compressor relay and any others I might need in the rear of the car. The blue wire coming from the relay box is attached to the trigger ground wire on the fuel pump relay and runs back forward in the car to between the seat where it is attached to the inertia switch.

Image

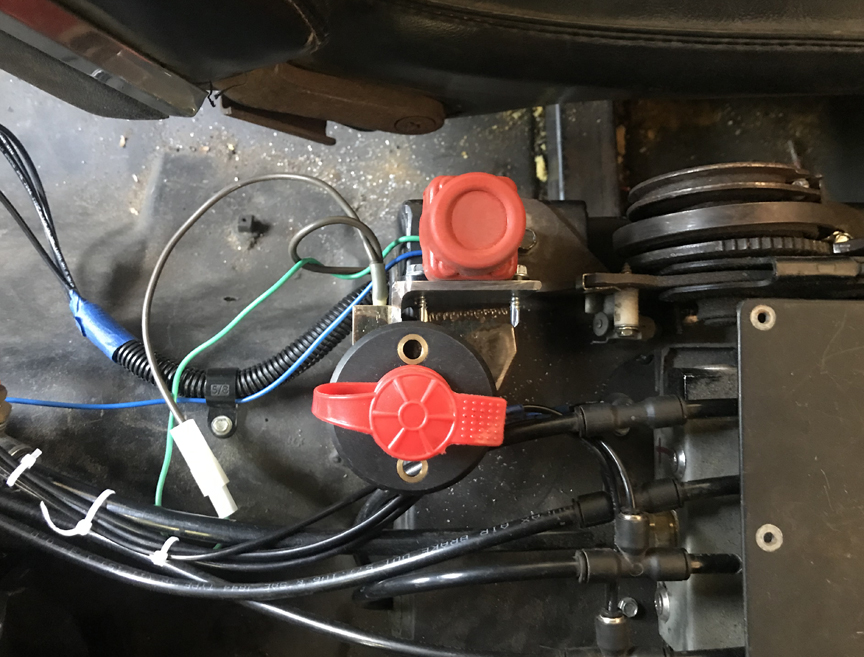
The other side of the inertia switch goes to ground. Just to explain how the switch works, for anyone interested; When the inertia switch is in its normal state which is a closed circuit, it supplies ground to the fuel pump relay, which means if the relay is energized it will supply power to the pump, if the inertia switch gets triggered it will break the ground and shut off the relay turning off the pump.

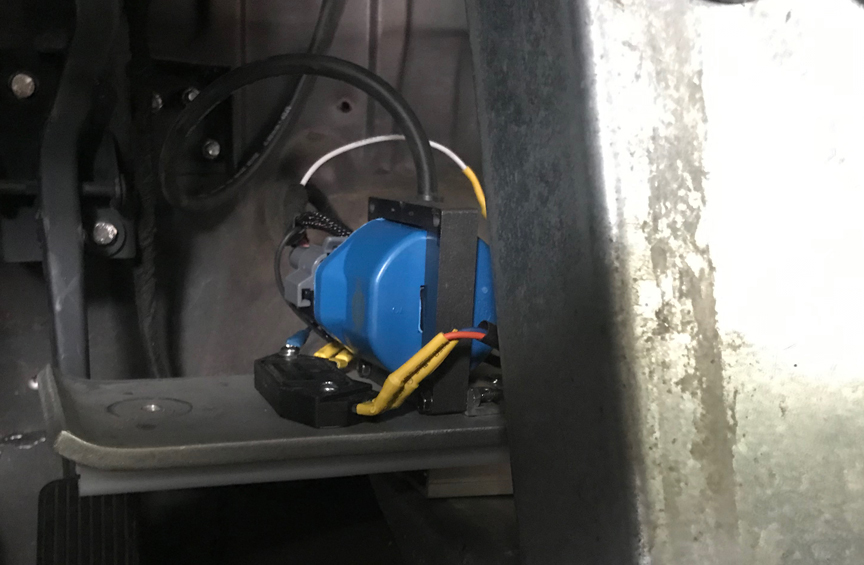
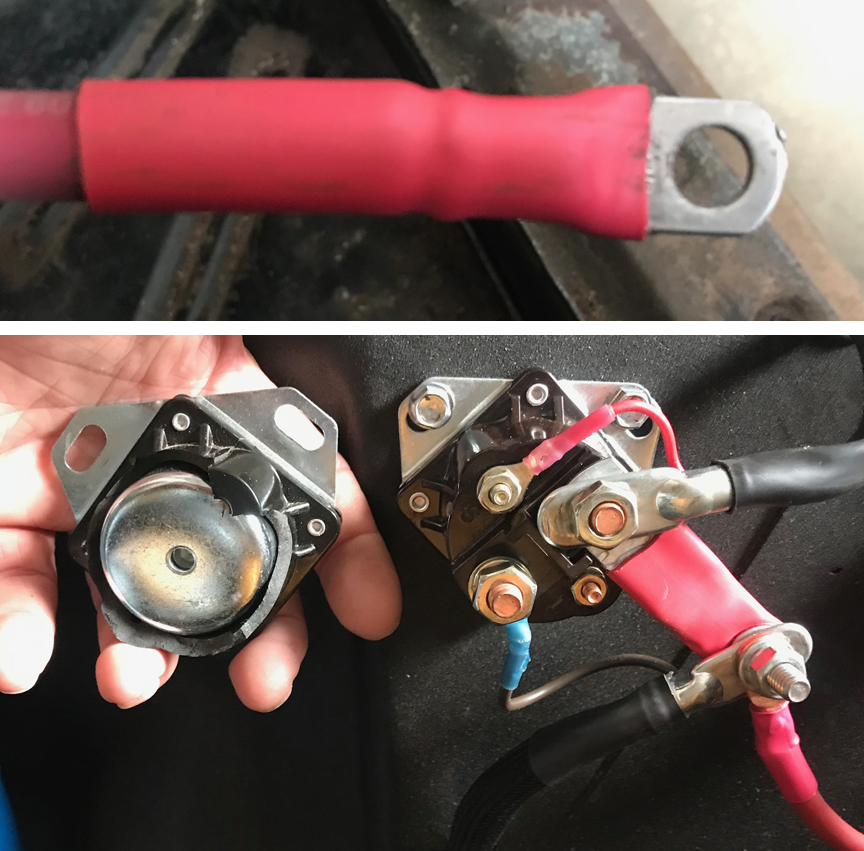
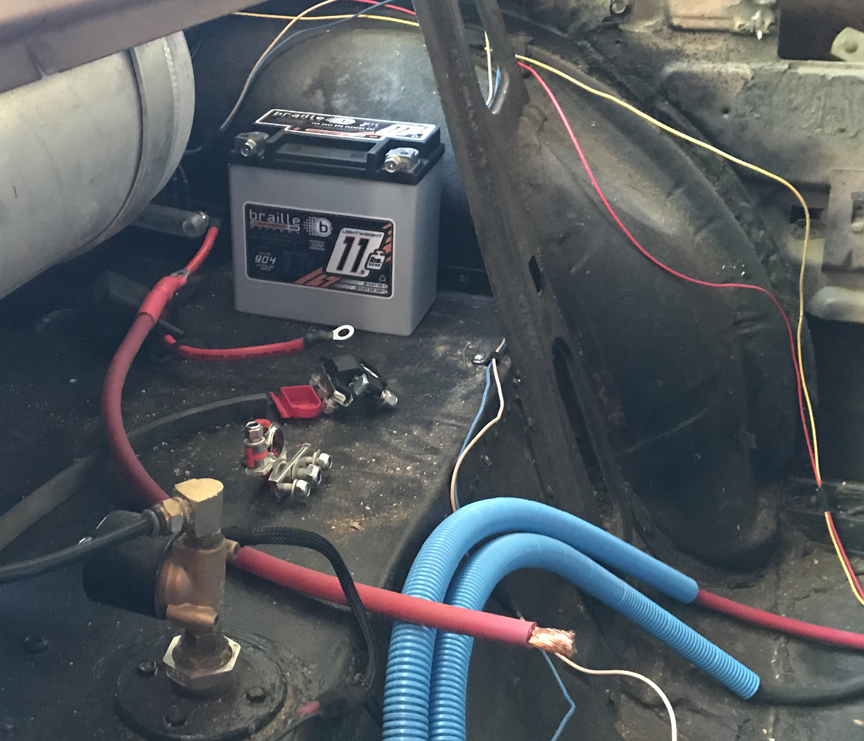
I decided to put the inertia switch between the seats inside the console (that will be there) because they say sometimes you can hit a pothole, etc. and it will activate the switch shutting off the pump and stranding you in the middle of the road, I thought I would like to be able to reset the switch (that is a button on top) without fumbling under the dash or getting out to access it under the hood or in the trunk. The inertia switch is the top reddish device in the picture, the other red thing is the battery cutoff switch that cuts off the ground wire from the car.

That is enough on that, for now, I guess, getting close to being done wiring stage 1, the engine run harness.

See Ya,
Mike
Mike's build thread
viewtopic.php?f=9&t=13058
Image

lavron
Site Admin
Posts: 4710
Joined: Sat Nov 01, 2003 9:17 am
Location: Missouri, Ozarks
Contact:

Re: Lavron's '64 Build Thread

Post by lavron »

As I got more supplies in I had to make a few modifications to my layout on the wiring.

I got the mega fuse and holder for the alternator charge wire and it was a lot bigger than I thought it would be so I moved it to the inner fender.

Image

That is all hooked up now, finished.

I also had to move the big relays out of the box to the inner fender, everything was just getting too crowded and the box was getting hard to shut and I was afraid it would cause some wires to be pinched eventually, I added a 60amp glass fuse holder and then split the wires going to each of the main relays, one to IGN-on and one to ACC-on with 10 gauge wires and then back to the respective buses.

Image

I don't like them cluttering up my engine bay but I guess I will survive :roll: I wish I could find a big rubber cover for them to make them a little more water-proof.

Anyway, I think that is all wired up now as well, the only thing left to do is run the big battery cables from the trunk (I have them) and place an electric hot bus-bar in the trunk that UPS just delivered a few minutes ago. I am getting ready to order my battery and I am thinking about getting a lithium battery that doesn't have to vent and is super small and lightweight (Braille Battery BRL-B14115).

Getting closer to start (break-in oil came this week).

See Ya,
Mike
Mike's build thread
viewtopic.php?f=9&t=13058
Image

lavron
Site Admin
Posts: 4710
Joined: Sat Nov 01, 2003 9:17 am
Location: Missouri, Ozarks
Contact:

Re: Lavron's '64 Build Thread

Post by lavron »

If I don't post that probably means I am still wiring and doing nothing exciting :roll: slow and steady wins the race.

See Ya,
Mike
Mike's build thread
viewtopic.php?f=9&t=13058
Image

User avatar
SASSY
Moderator
Posts: 5134
Joined: Sat Jan 07, 2006 12:32 am
Location: Wynndel, BC CANADA

Re: Lavron's '64 Build Thread

Post by SASSY »

Looks great Mike!
lavron wrote:
Fri Jul 17, 2020 1:46 am
If I don't post that probably means I am still wiring and doing nothing exciting

See Ya,
Mike
I
Or in my my case I'm draggin the 5th wheel rv around enjoying the wife and weather. :mrgreen:
Fred
I'd rather do it myself if it's done right or not,,,isn't that what hotrodding is all about

Image

lavron
Site Admin
Posts: 4710
Joined: Sat Nov 01, 2003 9:17 am
Location: Missouri, Ozarks
Contact:

Re: Lavron's '64 Build Thread

Post by lavron »

SASSY wrote:
Fri Jul 17, 2020 4:17 pm
Looks great Mike!
Thanks Fred I don't mind doing the wiring I just do one or two things a day so it won't be too much of a chore.

I need to start writing down what each wire is coming out of the fuse boxes because I am already finding myself stopping to try and remember what each one is and that is just the engine run wires.

I finally ran the big wire from the firewall to the trunk today and routed it inside a flex conduit, I still need to put the lug on the trunk end but got the one soldered on the front and hooked up, so the positive side is wired from starter/alternator all the way to the trunk. Next I will get the negative wire run to the disconnect and it will be done as well.

Fuel pump, ignition system, starter, alternator, air compressor, and gauges are all hooked up, I need to get the battery ordered and hooked up and start doing some testing and look for escaping smoke - In other words, the engine run harness is almost done :roll:

See Ya,
Mike
Mike's build thread
viewtopic.php?f=9&t=13058
Image

lavron
Site Admin
Posts: 4710
Joined: Sat Nov 01, 2003 9:17 am
Location: Missouri, Ozarks
Contact:

Re: Lavron's '64 Build Thread

Post by lavron »

I guess first a picture because I haven't taken or posted many in the last week or so.

I got the battery cables all made, I soldered the lugs on the cables and used some glue type heat shrink tube to seal it all up, both the red and black ones are all done.

Image

The bottom picture is what happens when you decide to give the bolt on the starter relay just one more little snug down and break the whole thing to pieces, as you can see I had to buy a new one to replace the new one I broke :roll:

All the engine run harness is done except hooking the battery up, which should be here today or tomorrow, I also got the compressor hooked up which wasn't a necessity but my shop compressor is not putting out but about 75# of pressure so I need to either get a new one or see about fixing that one, it is old, I inherited it from my dad, the compressor in the car is capable of 175# so I would be able to get the front raised higher than ride height again if I need too.

I am ready now to go back over all the wiring I have done and check all my connections. After that is done I will pull the head and switch the valve springs out and get the head bolted on and torqued down.

I forgot I went to the parts store yesterday (to get the replacement relay) and took my lower radiator hose in to see if they something that would fit better, they sent me in the back and let me look through all their hoses, I finally found one that I cut in half and pieced it together with my original that I had cut in half as well, I push a 1.75" piece of exhaust pipe up into the smaller hose and then shoved the bigger hose over the smaller one, hopefully it won't blow apart after I clamp it, I think the lower hose is the one the water pump sucks on so it shouldn't have that much pressure pushing out.

Will keep chipping away at it.

See Ya,
Mike
Mike's build thread
viewtopic.php?f=9&t=13058
Image

User avatar
SASSY
Moderator
Posts: 5134
Joined: Sat Jan 07, 2006 12:32 am
Location: Wynndel, BC CANADA

Re: Lavron's '64 Build Thread

Post by SASSY »

"I push a 1.75" piece of exhaust pipe up into the smaller hose and then shoved the bigger hose over the smaller one, hopefully it won't blow apart after I clamp it, "
Shouldn't be aproblem, thats been there since '06 or so.
Image
After rereading your post I see the difference with your hose on hose,,, maybe two clamps? :roll:
I'd rather do it myself if it's done right or not,,,isn't that what hotrodding is all about

Image

lavron
Site Admin
Posts: 4710
Joined: Sat Nov 01, 2003 9:17 am
Location: Missouri, Ozarks
Contact:

Re: Lavron's '64 Build Thread

Post by lavron »

SASSY wrote:
Tue Jul 21, 2020 3:19 pm
After rereading your post I see the difference with your hose on hose,,, maybe two clamps?
I think it will probably be temporary and I will do something like you did and have a metal pipe bent to fit and just put rubber ends on it. When I put the 302 in my '62 F100 we (me and dad) had the muffler shop bend us a pipe to go under across the front of the engine so we could use the original '62 radiator, I had that truck a lot of years after that and it never leaked or rusted out.

I will most likely try to get something in stainless this time.

I had thought about getting a V8 hose and see how different it is.

See Ya,
Mike
Mike's build thread
viewtopic.php?f=9&t=13058
Image

lavron
Site Admin
Posts: 4710
Joined: Sat Nov 01, 2003 9:17 am
Location: Missouri, Ozarks
Contact:

Re: Lavron's '64 Build Thread

Post by lavron »

Here is the hose in hose, there is a small piece of 1.75" exhaust pipe inside the inner hose.
Image

I think if I got a 90-degree hose elbow that matches the upper hose I could just put a short piece of stainless pipe between them, I think this will work for now.

Just a picture of the engine bay showing all the engine run wiring complete, actually almost all the wire that will be under there except the A/C wiring.

Image

I got my tiny little battery this afternoon so I didn't have time to hook it up, it is a lithium battery for those wondering, maybe doesn't fit in with my off the shelf parts but I have enough cable to put a full-sized battery in there in an emergency

Image

I know it looks like a lawnmower battery but it isn't, it is about that size and weighs 11.5 pounds, from what I read they are supposed to last a long time.

Image

It should be big enough to crank over my 250 I read some people using this same battery to start small-block V8s.

See Ya,
Mike
Mike's build thread
viewtopic.php?f=9&t=13058
Image

lavron
Site Admin
Posts: 4710
Joined: Sat Nov 01, 2003 9:17 am
Location: Missouri, Ozarks
Contact:

Re: Lavron's '64 Build Thread

Post by lavron »

As I was out testing (and repairing) my wiring job UPS delivered the last couple of parts to hook it all up permanently, I was waiting on the 250AMP main breaker and a couple of switches.

I got the breaker in and screwed to the floor with the cables added.

Image

I still need to get a couple of conduit clamps to attach the blue conduits to the floor but basically, that is done.

Not too many issues with my wiring, the main thing was every time I turned the compressor on it would immediately blow the fuse (I bought a big box of fuses figuring something like this might happen) initially I thought it was my switches in the console because I was not happy with them (the switches that came today were replacements) so I bypassed it and it still blew the fuse, checked my relays in the trunk and stared at them a little while and then realized I had totally wired them up wrong, can't even tell what I did they were so backward, I think part of it is wiring the box up from behind, luckily the terminals unclip and slide out the back so I rearranged both the compressor and the fuel pump, worked right when it was wired up properly :roll:

I could not get the fuel pump to come on either and found out the inertia switch was wired up wrong from the factory, it has a weather tech style plug on it so I popped those terminals out and put them in the proper positions, fuel pump now works properly, I also disconnected the starter wires and tested if it worked in start mode through the oil pressure switch and it did.

The starter also engages but I had the main cable off so it would not spin the motor, voltmeter and fuel gauge both operate (fuel is on "E" but lifts a little off the peg) I wired up the tach as well, and finally I went ahead and replaced those two switches in the console with the new ones (tank drain and compressor both operate correctly, the compressor is a bit loud).

Engine start harness is ready!

Failing to find my carb adapter plate I found one on eBay and ordered it, I hated paying $30 for something I will throw in a box and never see again :roll: I did find the little vacuum manifold that screws into the intake while digging for the adapter so at least there is that :P

I can't make any more excuses for not pulling the head and changing the valve springs now, the list is growing really short for the first start 8)

See Ya,
Mike
Mike's build thread
viewtopic.php?f=9&t=13058
Image

lavron
Site Admin
Posts: 4710
Joined: Sat Nov 01, 2003 9:17 am
Location: Missouri, Ozarks
Contact:

Re: Lavron's '64 Build Thread

Post by lavron »

Some days are like you get zero accomplished it seems like. I had posted earlier about the headlight switch wiring and some might be wondering what prompted that, I have other things to do :roll:

It all started yesterday, my wife is working at home and has decided she needs a second DSL line so she asked me to contact the phone company and make it happen if you have had to deal with the phone company before you know what I am talking about :roll: so this morning I called them and instead of sitting on hold I punched the button to have them call me back and went out to the shed to work on the car, I was sitting in the driver's seat routing wire when they called me back, so while I was sitting there on the phone I started cleaning the bezels and knobs with a piece of steel wool, they had overspray on them from when I painted the bottom of the car (don't ask me how it got all the way from the bottom of the car to inside because I don't know) they put me on hold so I decided to take the headlight switch out, I took the knob out a long time ago (more on that later) it was a chore to get out but inbetween talking to them I got it out. That is where it got worse :x

I cleaned it up and tried to determine what wire connection went where, then I decided to go ahead and clean up the switch knob except I can't find it, in fact, I spent the rest of the day looking for it and along the way started looking for the turn signal lever, can't find it either but I just saw it not too long ago, I think they are together just don't where :?

I have determined to quit looking for them because then I will find them and I am not buying replacements to help the search along (trust me I know they are someplace in the shed, I lost the Sawzall for a month in there) my solution, for now, was to straighten the shaft from the parts car that I had bent like a pretzel trying to remove it and pulled the knob off in the process, I used the knob from the parts car wiper switch so now I have all my knobs and switches.

Image

That killed any work today. I hate hunting for stuff :evil: I think I did get the DSL line ordered someplace along the way :P

See Ya,
Mike
Mike's build thread
viewtopic.php?f=9&t=13058
Image

Post Reply