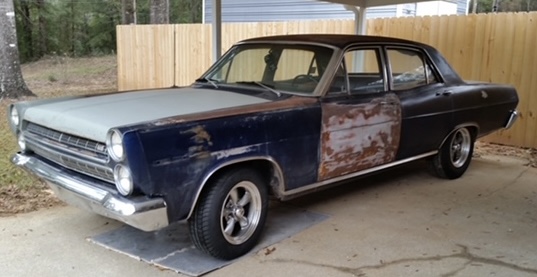
Lou's 65 Comet Build
Re: Lou's 65 Comet Build
Joe, I use my standard grease gun for them. With my highly calibrated HF measuring tool, I get .126in (3.20mm) on the grease gun nipple, and .137in (3.48mm) on the wrench portion. Hope this helps, if you need pics let me know.
Motor Safe,
Lee

Re: Lou's 65 Comet Build
Glad it was a little rut roh now rather than a bad one later. because with the holes it could have been assembled, with my slightly off dents I dont think I could have went another 1/10'' like you had it & made it fit. I had to get those fittings like in your link but I only bought a pair from scott drake @ one of the stang vendors for 11-12 bucks,but would have got the 4 pack to have spares if I'd seen it,because you wont need them or holes in front,just a regular 90° is fine for front. the little tool gives you a better idea of how to make one that worksLou's Comet wrote: ↑Mon Oct 24, 2022 11:37 amThanks John for the info!!
Read this and thought Ruh-Roh....mine were offset like .2 I readjusted them to get close to .1.
I did the same as you and pressed out the bolts, turned the shaft and put the bolts back in.
As far as the holes for the rear grease fittings I was thinking 1.5". Really would like to do more of a oval than a circle but will look thru my draw of rubber plugs and see what I got. Not going to put holes for the front fittings. They would be visible under the hood and don't want that.
Going to get these and see if they work for the front.
https://opentrackerracing.com/shop/grea ... 3-mustang/
When I took the car apart I kept all the alignment shims in order. Left control arm front bolt shims in its own bag. Left control arm rear bolt shims in its own bag. Same for right side. Figured this may give me a starting point when it came time for reassembly.
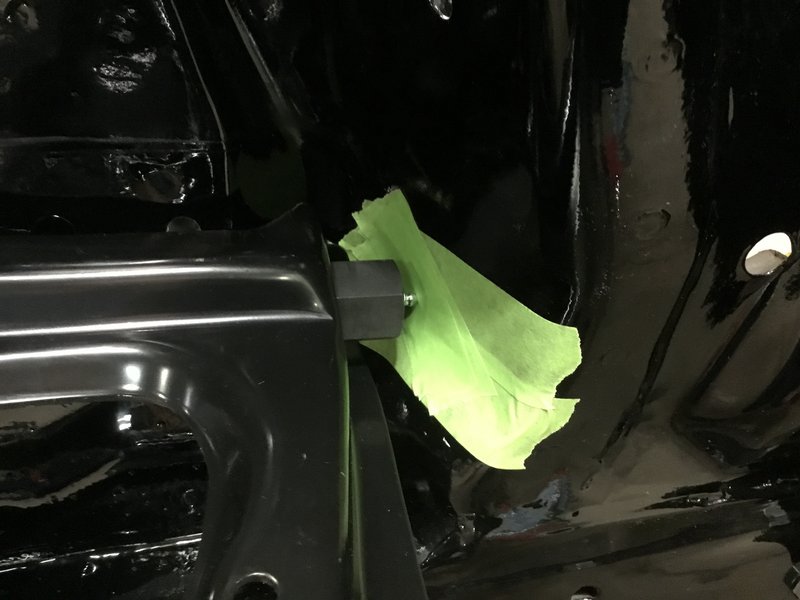
To give me a starting point on where to drill the holes for the rear fitting access, I put couple layers of tape on the inner shock tower. Put the rear grease fitting in and mounted the control arm with the original shims in the original locations.
I then unscrewed the grease fitting till it left a mark on the tape.
This should give me a decent idea on where to drill the hole. Changing the alignment should only move the fitting horizontally. So the fitting should fall into the widest part of the drilled hole. I don't see anything that would move the fitting vertically unless I mounted the control arm up in the original holes instead of the Shelby drop holes. At least it is a starting point.
And maybe just use the extended grease fittings in the rear holes. See what happens at least it is progress!
Thanks again for the info!!!
Lou

Oh Lou the caps would have to go on from exterior I think, steering box is near touching the shock tower,think it IS touching on mine ,w/ my dents [that I wish were holes like you're doing] w/borg box. I dont remember all I did but somehow I remember most of what I wished I'd have done
& if anyone misunderstands the holes are just give you more room to get to & service the zerks from the wheel well,[ after shelby drop, & UCA shaft move],not to try to grease it from engine bay side.

Johno
-
Joe Travers

- Posts: 2437
- Joined: Mon Sep 21, 2020 6:23 pm
- Location: Louisiana
Re: Lou's 65 Comet Build
Nah, no pics needed. I was lubing the front end last week and had one heckuva time getting to them w/ my big gun. Looked for my small one after I posted and it's missing. Guess I'll grab a 'highly-calibrated HF' one later this week.
Heck, I'd surely grease straight ones from the engine bay side. Used to drill holes in the towers on the old Mustangs to install zerks in the original caps to keep the squeaking from driving you nuts. Young & tacky, didn't install plugs but it's a great idea for a clean look and ease of maintenance. None of us are getting any younger.
Joe

1963 1/2 Custom Hardtop
342 stroker, solid roller, T-10, 3.55 posi
-
Lou's Comet
- Posts: 1540
- Joined: Sat Nov 26, 2011 8:56 pm
- Location: Jeannette, Pa.
Re: Lou's 65 Comet Build
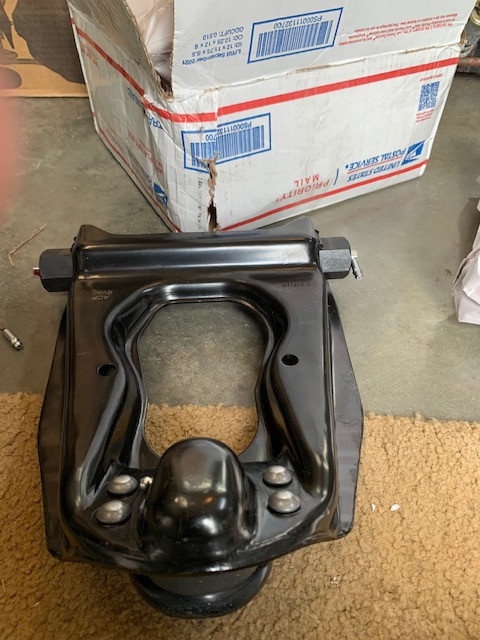
Caveman49 wrote: ↑Mon Oct 24, 2022 12:05 pmHey Lou, as so many others have said, fantastic work on your Comet. I ordered UCAs from John at OT, and they had those zerk fittings on them, one was broke during shipment and John had me another one sent within a week. The fittings are pretty close, they might work for you. Here’s a pic, box was beat up during shipping. Keep the build pics coming, very informative and helpful.
Thanks Lee..
I bought some stuff off them (OT) a couple weeks ago, ordered on a Thursday....had it the next Monday. Very pleased with them.talked to Them on phone they also also very helpful.
Lou
-
Lou's Comet
- Posts: 1540
- Joined: Sat Nov 26, 2011 8:56 pm
- Location: Jeannette, Pa.
Re: Lou's 65 Comet Build
Yea that's what I am hoping for!
Yea little Rut-Roh better than Big. Glad you posted that cause I had not read that before.
So then I only need two of the extended fittings for the rear. Are yours two piece or one?
Thanks again!
Lou
Re: Lou's 65 Comet Build
lou I think 2 pc
look just like yours. 2 or 3 piece
Couldn't get on if it was one piece with uca's mounted & they want to sell them to lazy guys too ,lol, or guys like me who thought they didnt need em or didnt know about them. & pita to get on with mounted UCA's anyway with s drop & uca shaft moved back because it gets crammed in there to the back so tight.
Johno
Re: Lou's 65 Comet Build
Yeah Johno, the zerks sure wouldn’t go on with the UCAs installed, or could be a real PITA. Mine zerks are one piece on the UCAs I’ve yet to install, hoping I don’t have to use the Big Hammer too much to make these fit.
Motor Safe,
Lee
Re: Lou's 65 Comet Build
Oh you just have the regular 90° zerks? dont think I've seen the one piece long ones like in Lous link .
Johno
Re: Lou's 65 Comet Build
Yes, they came with the UCAs from OpenTracker (OT). You can see in the pic I posted that one was broke, the piece sticking out looks like threads is the spring inside the tube. I mentioned to John at OT that he might consider shipping them in a separate package to prevent possible breakage. Guess I’ll see how they hold up after installed, I’ve not seen em like this before either.
Motor Safe,
Lee
Re: Lou's 65 Comet Build
I had seen the pic but thought they were 2 piece like mine & Lous link. are you sure the long piece doesn't screw out of the base? like these mine has? it looks like the hex for a wrench near the end where grease goes in,(but cant see that part good), but even if they are one piece I'd bet if someone was looking for a set & wanted the 2 pcs set,get the set with the wrench in there. the wrench/tool is for 2 piece,& for UCA's that are mounted so you can screw the base in ,get it clocked right then screw the long skinny end on.Caveman49 wrote: ↑Tue Oct 25, 2022 12:42 amYes, they came with the UCAs from OpenTracker (OT). You can see in the pic I posted that one was broke, the piece sticking out looks like threads is the spring inside the tube. I mentioned to John at OT that he might consider shipping them in a separate package to prevent possible breakage. Guess I’ll see how they hold up after installed, I’ve not seen em like this before either.
Johno
Re: Lou's 65 Comet Build
I’ve got to look closer at these things, they could be two pieces, will dig em out tomorrow and see. I know that would help with installing them with the UCAs already installed. Makes more sense to have at least a two piece zerk for that application.
Motor Safe,
Lee
Re: Lou's 65 Comet Build
yea cause other wise it'll have to come back off or at least loosened, do you have the coils back in? that is the pain. if the spindles are on might still could loosen them enough but the coils would need to be removed If that 66 is as tight as a 65.
but if it has a hex near the input end it wont be for looks,lol & I really dont see how they could make a one piece,how would they get the ball spring in there?
Johno
Re: Lou's 65 Comet Build
Yep, you’re right Johno, two piece. I just looked at them when received to make sure they were ok, thus finding the broken zerk. I pulled the box out and looked closer at them and here’s what they look like.

I’ll get around to installing them soon I hope
I’ll get around to installing them soon I hope

Motor Safe,
Lee
-
Joe Travers
- Posts: 2437
- Joined: Mon Sep 21, 2020 6:23 pm
- Location: Louisiana
Re: Lou's 65 Comet Build
Thanks for bringing all this up
Joe
1963 1/2 Custom Hardtop
342 stroker, solid roller, T-10, 3.55 posi
Re: Lou's 65 Comet Build
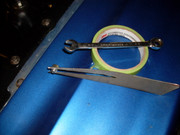
here is the thing I made to hold the base while turning with a wrench ,didnt have room for the tool that came with it. It was like building a little ship in a bottle,not strenuous, but tedious & time consuming. I bet I had a milk crate print on my butt when I got done.  first side wasn't so bad & maybe that's why the other side had me so frazzled.
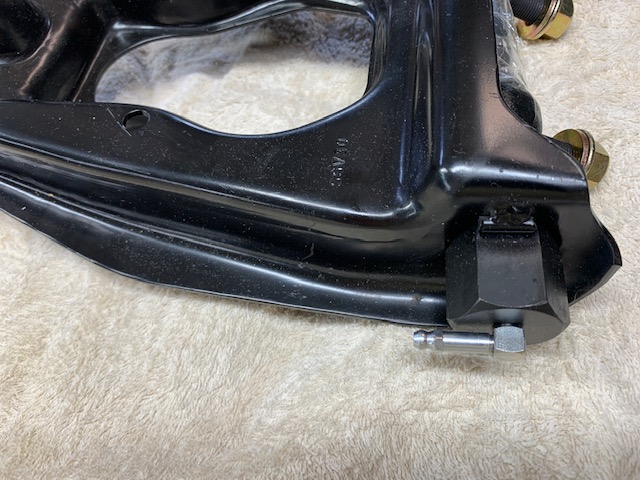
Lou here is a close up of my poorly placed dent , & the reason I remember wishing I'd had went with my first idea of a hole , but the idea of dirt getting in there made me do it like dazecar said with the dent. then after I figured out it was slightly off I thought of the holes again & rubber/plastic caps my mistake was concentrating on where the zerk would be,I didnt think about where the grease gun tip would need room to get on it. so your oval idea sounds good to me! also I put the new zerk in this pic & it is right where it would be to show how much room it saves vs a regular 90° zerk.

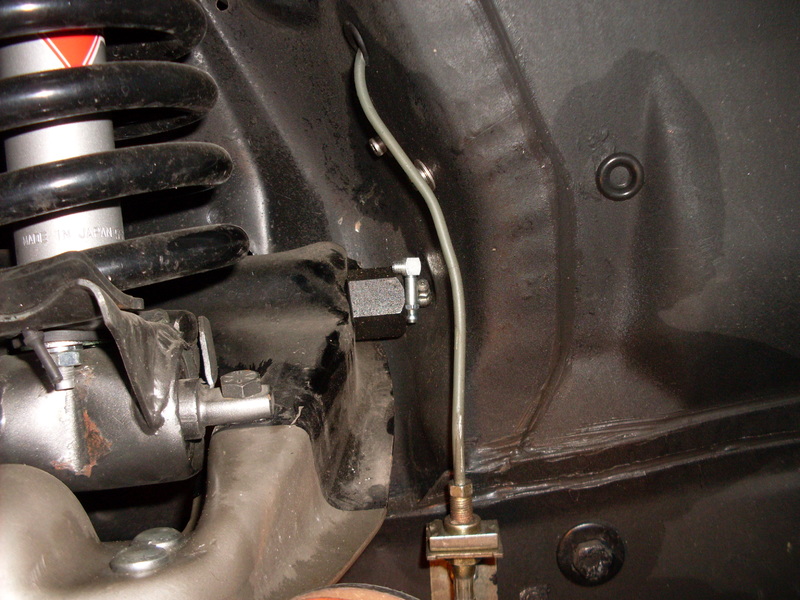
& here's a couple more showing no need for the long skinny ones on the front, plenty of room with regular zerks.so save the other 2 for spares ,,,,after thinking about it I may have gotten 4 of them, I may have a couple spares in my little fomoco gold drawer for little stuff better than gold if/when you need it .


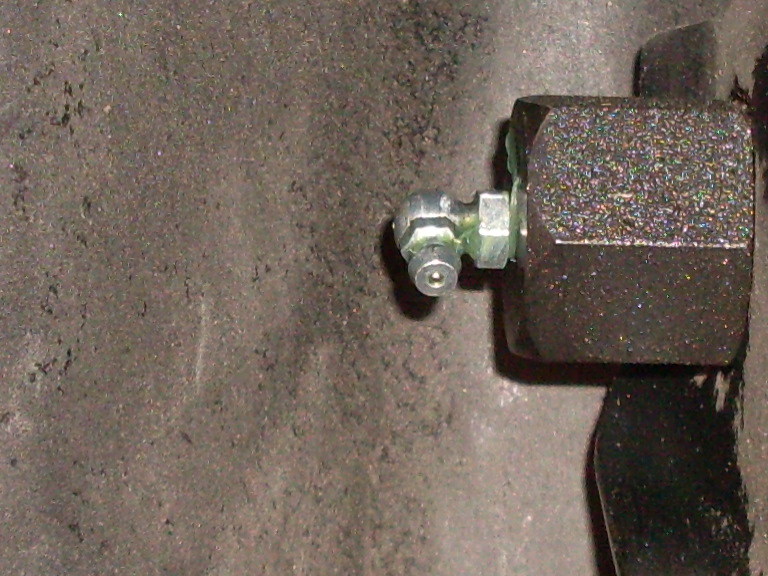
shelby drop moves the UCA down 1'' & back a little ,1/8 I think & moving shaft back 1/10'' is what creates the problem, notice how the shock tower angles back in on the lower part, adds to the snowball.
Lou here is a close up of my poorly placed dent , & the reason I remember wishing I'd had went with my first idea of a hole , but the idea of dirt getting in there made me do it like dazecar said with the dent. then after I figured out it was slightly off I thought of the holes again & rubber/plastic caps
& here's a couple more showing no need for the long skinny ones on the front, plenty of room with regular zerks.so save the other 2 for spares ,,,,after thinking about it I may have gotten 4 of them, I may have a couple spares in my little fomoco gold drawer for little stuff better than gold if/when you need it .
shelby drop moves the UCA down 1'' & back a little ,1/8 I think & moving shaft back 1/10'' is what creates the problem, notice how the shock tower angles back in on the lower part, adds to the snowball.
Johno