ALRIGHT!!! That will beat the heck out of working on it from underneath. Did it take much effort from the engine hoist to start the roll?
Jim
Lavron's '64 Build Thread
-
Jims65cyclone

- Posts: 2764
- Joined: Sun Nov 23, 2014 10:29 pm
- Location: Lexington, SC
Re: Lavron's '64 Build Thread
Great job Mike. Looks awesome. Will certainly be easy to work on.
tom
tom
tomb's 65
Re: Lavron's '64 Build Thread
Thanks for the encouragement guys!
Super stable with the sandbags on the legs, no fear of it tipping back on me.
It is really nice to see all the stuff I need to fix (and the stuff I don't) I will probably go out tomorrow and at least try to get the grease scraped off, may be too cold to do any pressure wash (or just hose washing) and knowing me I will have the grinder and welder out working on something or getting the wheel wells started.
I hear we are going to hit near the 60s this weekend because we like going from 13 degrees to 60 degrees in two days, of course I am not complaining about it warming up.
See Ya,
Mike
No, you all saw it on the dollies, we just jacked up the right side and removed the dollies on that side so the car was already crooked, and don't forget the 240 lbs. of sand on the right side of the car, like I said the cherry picker was pulled out to the one ton notch (second hole out from all the way in) the hook/rocker panel was probably about knee high to start, I pumped the jack maybe four times and I would guess the rocker was about thigh high, we both gave the car a little push and looked at each other because it already felt easy to push and the cherry picker was actually pulling back on it, I asked him if he thought we should just take the cherry picker loose, he said he thought it was balanced enough, so he he held the car by himself while I disconnected the hook (he actually lifted it enough by himself that I could unhook it) we rolled it not much further and hit the car ramps, I pulled it back and he went around and pulled both of them out, and then we lowered it until the sandbag incident.Jims65cyclone wrote:ALRIGHT!!! That will beat the heck out of working on it from underneath. Did it take much effort from the engine hoist to start the roll?
Super stable with the sandbags on the legs, no fear of it tipping back on me.
It is really nice to see all the stuff I need to fix (and the stuff I don't) I will probably go out tomorrow and at least try to get the grease scraped off, may be too cold to do any pressure wash (or just hose washing) and knowing me I will have the grinder and welder out working on something or getting the wheel wells started.
I hear we are going to hit near the 60s this weekend because we like going from 13 degrees to 60 degrees in two days, of course I am not complaining about it warming up.
See Ya,
Mike

Re: Lavron's '64 Build Thread
If you all are nice to me and want to see it, I can try and take a movie when we flip it over the other way.
See Ya,
Mike
See Ya,
Mike
Re: Lavron's '64 Build Thread
Id like to see it happen 
I'd rather do it myself if it's done right or not,,,isn't that what hotrodding is all about

Re: Lavron's '64 Build Thread
It looks good on its side.
Only use the brakes to stop and get gas.
Projects
65 Comet 421Stroker
93 Mark VIII Supercharged w/Fogger
70 Torino GT
Projects
65 Comet 421Stroker
93 Mark VIII Supercharged w/Fogger
70 Torino GT
-
Jims65cyclone
- Posts: 2764
- Joined: Sun Nov 23, 2014 10:29 pm
- Location: Lexington, SC
Re: Lavron's '64 Build Thread
Heck yeah!lavron wrote:If you all are nice to me and want to see it, I can try and take a movie when we flip it over the other way.
Jim

Re: Lavron's '64 Build Thread
I was really motivated to get out and get some stuff done today, but not motivated enough to go out while it was 7-9 degrees so I waited until it was 16 degrees. 
I got the right side (down part) of the rear stuff cleaned up and touched up some welds and added a few little patches and gussets that I didn't get too good when I was laying on the floor. I even added a patch where I had cut the "C" notch in the frame plate before I welded it on and then figured out I did not need them, it is mostly cosmetic stuff no one will see

I was great sitting in a chair doing this, I have done about all I need to on this side until it flips the other way, I also got the top/outside of the left side done and will do the same as I did on the right side when I flip it. Now going to move forward and get all that done and maybe a few "extra" things I might not do otherwise but since it is flipped up I just might. Or I might get to work on those inner wheel wells.
Hoping for warmer weather!
See Ya,
Mike
I got the right side (down part) of the rear stuff cleaned up and touched up some welds and added a few little patches and gussets that I didn't get too good when I was laying on the floor. I even added a patch where I had cut the "C" notch in the frame plate before I welded it on and then figured out I did not need them, it is mostly cosmetic stuff no one will see
I was great sitting in a chair doing this, I have done about all I need to on this side until it flips the other way, I also got the top/outside of the left side done and will do the same as I did on the right side when I flip it. Now going to move forward and get all that done and maybe a few "extra" things I might not do otherwise but since it is flipped up I just might. Or I might get to work on those inner wheel wells.
Hoping for warmer weather!
See Ya,
Mike
Re: Lavron's '64 Build Thread
Did a few things today, first I dug out the gas tank (no small feat, but I grabbed the header at the same time) I found a place for the fuel pump to live, there just isn't much choice back there because there is not a lot of space to avoid stuff like the exhaust.
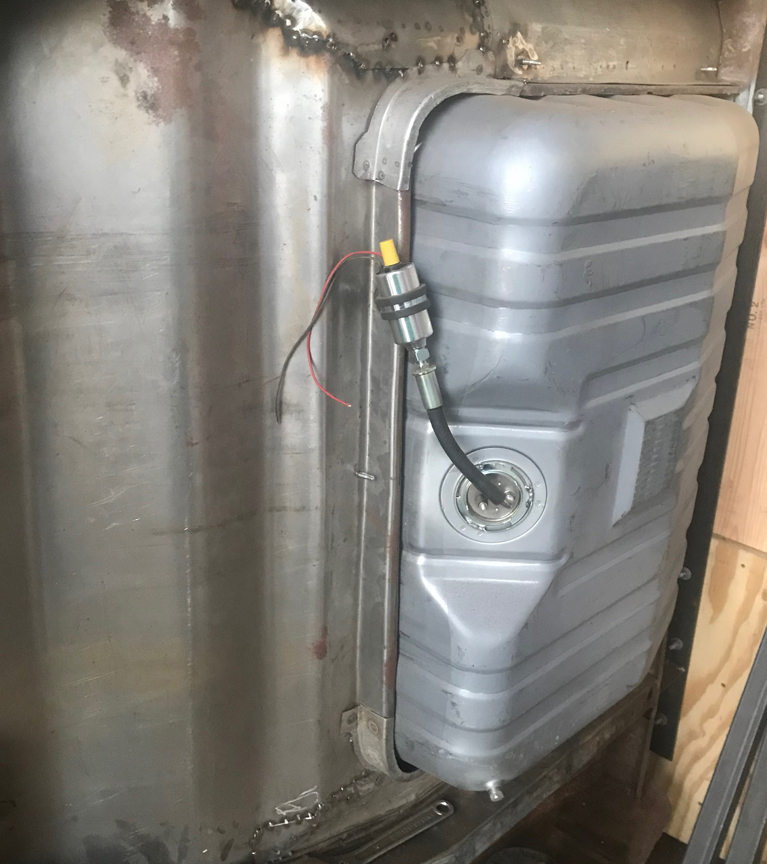
I drilled the hole for the mounting bolt and welded it in place because the head is between the tank and body (no the head does not touch the tank, there is probably 1/2" between them) and if I need to change the fuel pump I don't want to have to remove the tank first.
I also was cleaning the bottom of the car mostly with a knotted wire wheel in the angle grinder, not a terrible job just dirty.
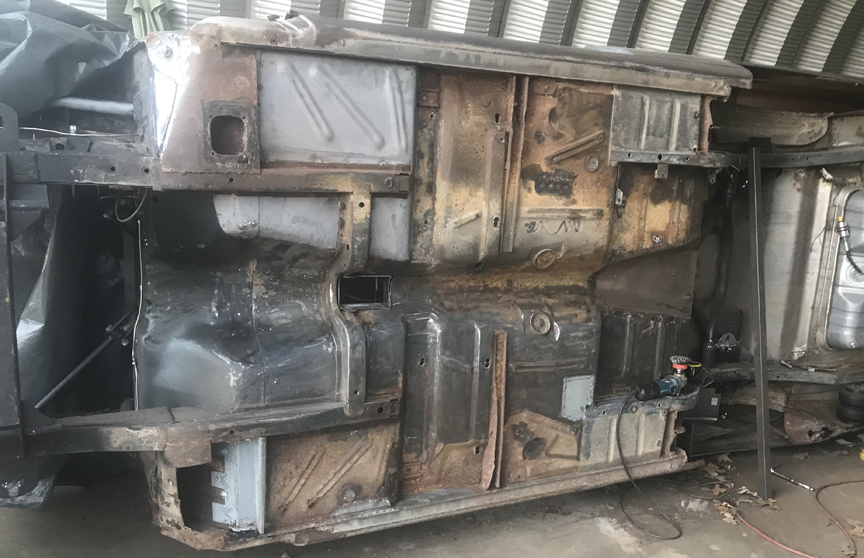
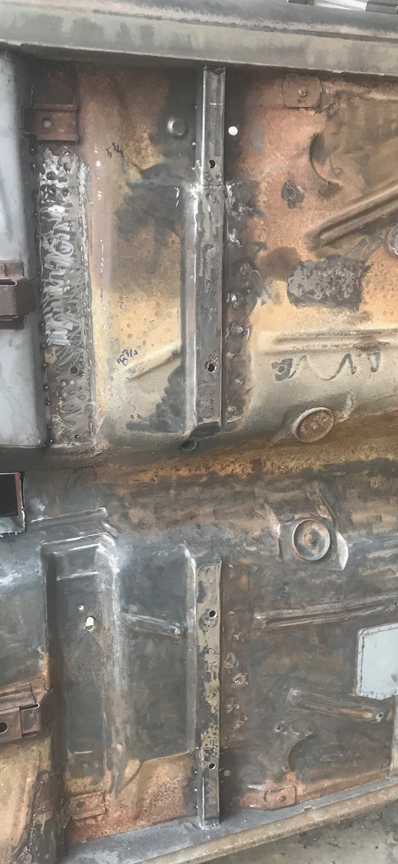
Hopefully you can see what I got done, I was mostly cleaning the car's self applied undercoating (grease and oil). The bottom of the car looks pretty good actually just where the rusted out spots were that I replaced already were bad everything else is surface rust and grease.
One thing I cleaned a little on was the left torque box, and there is a little rust on it so I think I will just cut the corner off where the access hole is and replace it and not worry about having the hatch any more (my park brake is between the seats now).
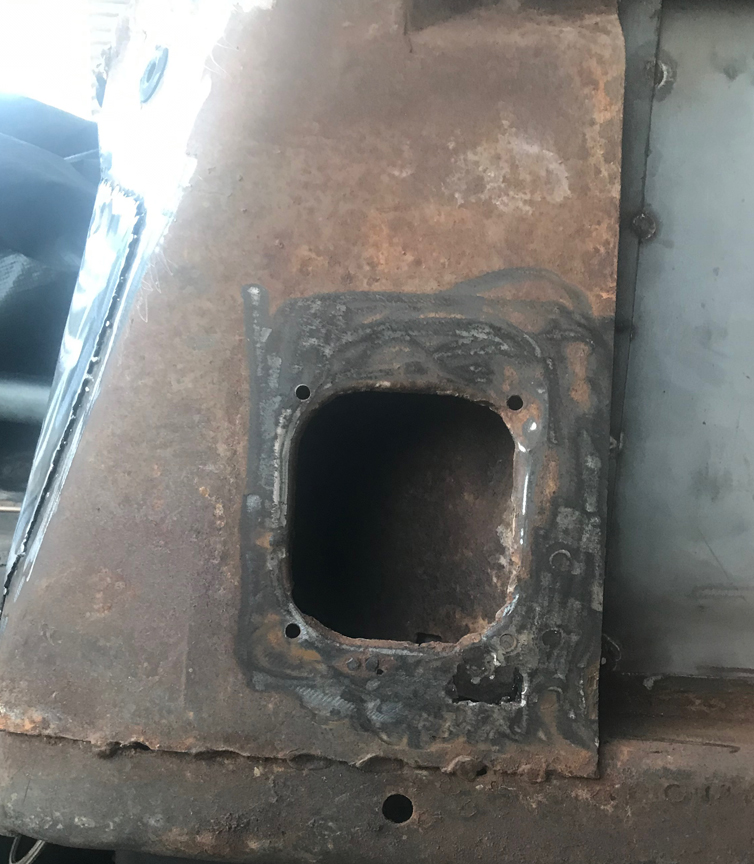
Also notice how crappy a job they did welding the torque box to the frame, makes me feel better about my welds
I will keep plugging away, still is nice to have the car like this, makes work way more enjoyable and I am doing this for fun anyway
See Ya,
Mike
I drilled the hole for the mounting bolt and welded it in place because the head is between the tank and body (no the head does not touch the tank, there is probably 1/2" between them) and if I need to change the fuel pump I don't want to have to remove the tank first.
I also was cleaning the bottom of the car mostly with a knotted wire wheel in the angle grinder, not a terrible job just dirty.
Hopefully you can see what I got done, I was mostly cleaning the car's self applied undercoating (grease and oil). The bottom of the car looks pretty good actually just where the rusted out spots were that I replaced already were bad everything else is surface rust and grease.
One thing I cleaned a little on was the left torque box, and there is a little rust on it so I think I will just cut the corner off where the access hole is and replace it and not worry about having the hatch any more (my park brake is between the seats now).
Also notice how crappy a job they did welding the torque box to the frame, makes me feel better about my welds
I will keep plugging away, still is nice to have the car like this, makes work way more enjoyable and I am doing this for fun anyway
See Ya,
Mike
Re: Lavron's '64 Build Thread
Did quite a bit today but really can't see much I did, There was some thinking and pondering time involved
I got this idea the other day that I did not like my seat mounts, or the way the seats are mounted, the T-Bird seats have the lap belts attached, and even though I have never had seat belts in the Comet I thought I might like to have at least the lap belts. I also decided that to keep the mounting bolts from ripping through the floor I might want something stronger in place, I also thought about adding some bracing just to stiffen the car a little.
I have some scrap 1 1/2 " square tubing (I think 1/8" thick) left over from a different project so decided to cut a couple of holes through the floor and mount the tubing in place to hold the rear seat bolts. I also decided that the light weight, beat up "brace" that the original bench seat mounted to could go, basically I knocked it off with the seam buster.
Also I am going to add some tubing under the floor where the front mount bolts come through but just run it the width of the seat mounts.
What do you do when you still have some more left over square tube? I don't know what you might do but I decided to make some subframe connectors.

This one may end up being just a pattern because there are a couple of spots I am not happy with but I have enough to discard it and I learned a lot from making it I will weld it to both the front and rear subframes, the crossmember I just added and a couple of other spots through the rear floor pan.
Don't know if it will help anything but I figure it can't hurt either
See Ya,
Mike
I got this idea the other day that I did not like my seat mounts, or the way the seats are mounted, the T-Bird seats have the lap belts attached, and even though I have never had seat belts in the Comet I thought I might like to have at least the lap belts. I also decided that to keep the mounting bolts from ripping through the floor I might want something stronger in place, I also thought about adding some bracing just to stiffen the car a little.
I have some scrap 1 1/2 " square tubing (I think 1/8" thick) left over from a different project so decided to cut a couple of holes through the floor and mount the tubing in place to hold the rear seat bolts. I also decided that the light weight, beat up "brace" that the original bench seat mounted to could go, basically I knocked it off with the seam buster.
Also I am going to add some tubing under the floor where the front mount bolts come through but just run it the width of the seat mounts.
What do you do when you still have some more left over square tube? I don't know what you might do but I decided to make some subframe connectors.
This one may end up being just a pattern because there are a couple of spots I am not happy with but I have enough to discard it and I learned a lot from making it
Don't know if it will help anything but I figure it can't hurt either
See Ya,
Mike
Re: Lavron's '64 Build Thread
Subframe connectors pie cut, bent, welded and ground a little more prep work and I will be ready to weld them on.

I got out early today just about 1/2" of snow on the ground this morning but not bitter cold, didn't get to work all day on the subframe connectors because I got the stuff to fix the 4X4 on the truck so I did that this afternoon.
Going to try tomorrow to get the two front seat mounts cut out and mounted and then weld everything together.
See Ya,
Mike
Re: Lavron's '64 Build Thread
it's neat not to have to crawl and lay on that back,huh ??? ol POP can get down,,but DWAYNE dang near has to help me onto my feet !!! had I known I would live to be as old as I am....I would have taken better care of myself when I was a puppy !!! climbing all over those locomotives over 36 yrs didn't help......POP

pop/glenda
Re: Lavron's '64 Build Thread
VERY! It was more of an ordeal thinking about doing this than the process was, I am so glad I went ahead and did it.popscomet wrote:it's neat not to have to crawl and lay on that back,huh ???
I think I can do a better job this way, I know my welding is better because I suck at overhead welding and really don't care to perfect any skills to improve it
I am sure within a month I will have this thing back upright bolting the parts on for the final time, I will still have to crawl underneath but everything should be cleaner, this roll is getting close to being done, just the wheel wells and torque boxes, a little more cleanup and it can roll the opposite direction, will take longer on the other side because that will be when I am seam sealing, painting and running fuel and brake lines etc.
See Ya,
Mike
Re: Lavron's '64 Build Thread
Got out late today but I have most of the floor wire brushed now, saving the stuff at the very bottom until the car is up the other way so I don't have to bend over
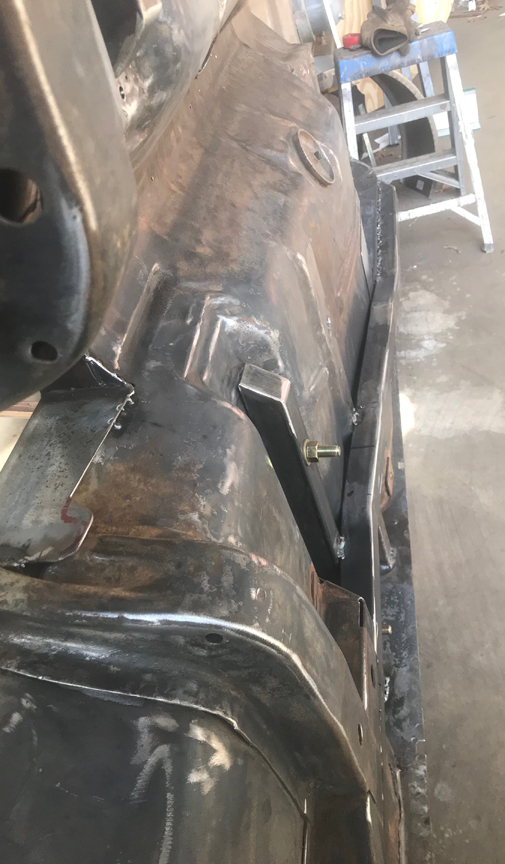
Decided to add two more bends in the subframe connectors to get them to tuck a bit closer up to the floorpan.
I also began welding the left one in (up) I bought one spray can of Eastwood Rust Encapsulator (and three quarts) so if I needed to do a quick shot on something I didn't have to get a spray gun out, I sprayed where the subframe connectors would cover and the top of them as well because when I finally paint the bottom they won't get much in there.
I also cut out the front seat supports and angled one end they are just sitting in there in the picture, I need to drill the seat bolt holes out and some holes through the floor for some plug welds and then get them welded in and welded to the subframe connectors.
I will weld the convenient side on everything and then the other side when it flips the other way.
Almost done with this little side project and will do the torque box repairs next, again just welding them on the easy side.
See Ya,
Mike
Re: Lavron's '64 Build Thread
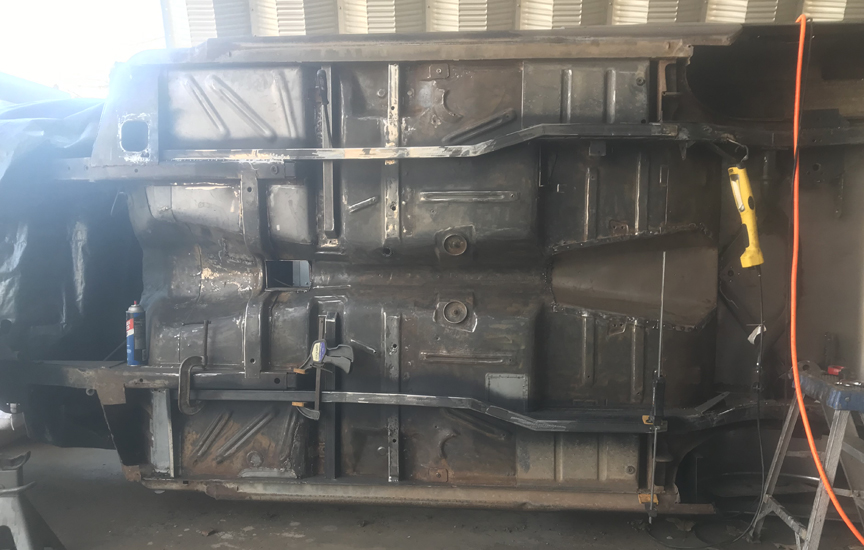
To keep from making this any more boring than it already is I decided not to post another picture that was super similar, I did get the subframe connectors all welded in on the top side, here is the right side looking from front to back so you can see how they follow the floor kinda.
And then because I am a glutton for punishment I thought I would show some of my welds, if I get too proud of my welding ability I just have to weld to a little on galvanized frame on the car (I did flap wheel the galvanizing off first)
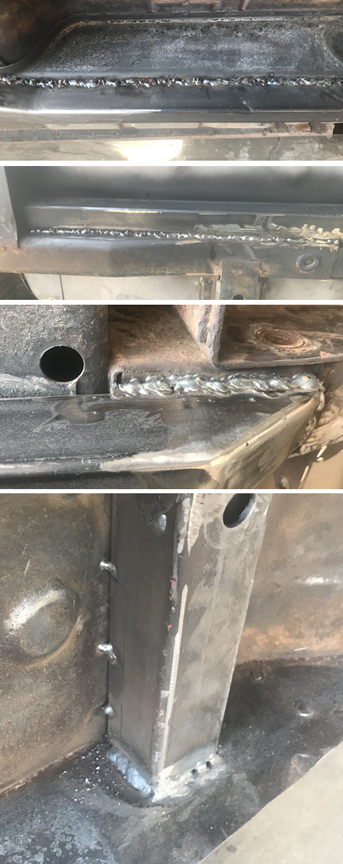
I hate showing my welds before I get to dress them up with my superior grinding skills If you were wondering where each of those welds are, from top to bottom; Inside the rear subframe rail - The front subframe rail - Outside the rear subframe rail next to the spring mount (under) and finally one or the seat mounts where it meets the rocker panel.
Continuing on trying to get a little every day. Rainy week coming up this next week but I should be able to get out in the shed and fix and patch more stuff.
See Ya,
Mike
And then because I am a glutton for punishment I thought I would show some of my welds, if I get too proud of my welding ability I just have to weld to a little on galvanized frame on the car
I hate showing my welds before I get to dress them up with my superior grinding skills
Continuing on trying to get a little every day. Rainy week coming up this next week but I should be able to get out in the shed and fix and patch more stuff.
See Ya,
Mike