Let me start!!!!!!!!
Re: Let me start!!!!!!!!
Last edited by SASSY on Thu Jan 30, 2020 3:20 pm, edited 1 time in total.
Re: Let me start!!!!!!!!
You have a really beautiful carSASSY wrote:Link to steering mods on Sassy
http://www.cometcentral.com/forum/viewt ... 13&t=15437
Re: Let me start!!!!!!!!
The cheque is in the mail!! LOLSolange79 wrote: You have a really beautiful car
Serious, thank you much!
Had it a long time, never seem to finish it, but enjoy continually mucking with it.
Welcome to the forum, I see this is your first post.
How 'bout a post in the introduction with a little about you and what you have or want in a Comet.
Fred
Re: Let me start!!!!!!!!
Another 5 years has past since this post!!!!!INSANESASSY wrote:Well it's official ,, owned Sassy for 40 years.
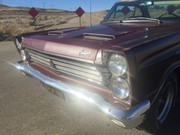
Actually bought the car the wednesday before this weekend which in Canada is Thanksgiving .
Drove it to Calgary AB. about (7hrs one way) to celebrate the weekend and spend time with family.
All I remember about the weekend is when we got to Calgary went through an automatic carwash for the
first and last time,,,,GOT SOAKED!! LOL,, and complained about the motel room that cost me 20 bucks!!
To celebrate we took the car for a drive and lunch today (driven it about 4 times since I touched up the paint on the drivers door in june).
Went down to Sandpoint ID. to a small eatery we enjoy. Been hearing some weird noises from the rear end
but after this run think it's a spring or something in the drivers side rear brake cause the noise changes with brake appication.
Crawlled under when I got home, about 60F outside , drove betwen 60-80 couldn't keep my hand on the center section,,opinions
Still gotta pull the wheels to check brakes.
Fred
Re: Let me start!!!!!!!!
Nothing like long term ownershipSASSY wrote:Another 5 years has past since this post!!!!!
See Ya,
Mike
Re: Let me start!!!!!!!!
Well started on the interior over the last few days.
I mentioned in another thread about attempting the sewing myself,, although I think I would enjoy the experience, I'm not prepared to invest the TIME and money into it so I have retained the services of a local pro. She does mostly boats but I've seen some of her auto work and am fine with the quality.
A little background, when I bought The car in 1974 it already had a custom interior which has stayed The same other than I had the shag carpet replaced in the early 80s. Then when I got The 1989 Cougar XR7 V6 I decided to use The buckets from it, so they replaced the highback mopar buckets with Caliente stitched into the headrest.
The headliner I had done in California when we were down there in 2014 for a holiday with the car.
My plan is to redo the rug eliminate the stock rear seat and use the top of the Cougar back seat, have the front seats and door panels redone in vinyl. I don't know if it will stay but also going to wrap the metal on the door above and below the interior panel with Vvivid Leather look vinyl wrap. On a side note Vvivid also has chrome vinyl wrap, gonna get a small piece and try it on the gauge cluster.
So here I go!
Have pulled some of the interior to take to the upholster and started on the rear seat change.
Some pics are old and have been shown before.
Re: Let me start!!!!!!!!
Cam really surprised at how well the seat back fits in there.
I am not doing a back seat but have been thinking lately of making faux back bucket seats, basically just padded vinyl stitched to look like seats with maybe snaps to hold them in, my original idea was to make some trays to hold stuff like ice chests and suitcases, which I could still do but snap the fake seats in when those were not in there.
Anyway I love watching your Comet evolve over time, always a big inspiration to me.
See Ya,
Mike
Re: Let me start!!!!!!!!
Rug is pretty much done to the front of the back seat.
I got a little distracted ended up moving the battery a bit.
The trunk will be rugged in the end and I want side panels hiding the battery, tool box, gas can etc so the battery had to go out about 4 inches then it went down about 3,, just because.
Out with the old, and in with the new.
In the first pic scraped off some tar and this aqua paint showed up,,,, no clue where that came from,,?
Weld, paint, next!
Re: Let me start!!!!!!!!
The interior is slowing coming together.
I got the material back from the upholster for the door panels with the stitching done.
Now I'm in the process of reworking them. A few mistakes here and there nothing
noticeable really and happy the way they're coming out.
I'm using a 1/8 inch thick vinyl panel called puckboard for the door backers as the stuff in the car was done.
The 4 rows of stitching with the chrome trim above and below it will blend into the seats.
Back a post or 2 you can see the back seat upper and what I'm talking about.
The buckets are being redone in stock stitch to match the back seat upper that I'm just going to paint for now.
Most of the trunk carpet is done pics coming there.
The upholsterer said she would be finishing work that is in the shop then going on leave during the stay home stuff.
hope she does.
old
new
Re: Let me start!!!!!!!!
Is that the stuff that looks kinda like a cutting board? I was thinking about using the 1/8" - 1/4" plastic stuff like that, it is solid and I was not sure if I could just cut a design with a router into it and paint it, I still have my original door panels and last time I saw them they were ok but who knows when I goto pull them out how they will look.
Anyway the new panels look great.
See Ya,
Mike
- Jims65cyclone
- Posts: 2774
- Joined: Sun Nov 23, 2014 10:29 pm
- Location: Lexington, SC
Re: Let me start!!!!!!!!
Lookin good Fred !!
Re: Let me start!!!!!!!!
Thanks for the comments guys!
Fred
I would have liked to have gotten it lower like yours but one of the supports for the tray is already notched for the exhaust.
Dont think it will hold paint well. A router would probably melt through it, I used a jigsaw for curves and just score it good then bent it. Snaps apart with a nice straight linelavron wrote: ↑Wed Apr 01, 2020 9:46 pmIs that the stuff that looks kinda like a cutting board? I was thinking about using the 1/8" - 1/4" plastic stuff like that, it is solid and I was not sure if I could just cut a design with a router into it and paint it, I still have my original door panels and last time I saw them they were ok but who knows when I goto pull them out how they will look.
Anyway the new panels look great.
See Ya,
Mike
Fred
Re: Let me start!!!!!!!!
First off, kudos to people who do auto upholstery for a living!
Crawling around in the trunk using contact cement, I'll do it on mine but to make a couple bucks .
The side panels are done but the floor still needs some work. The drivers side hides a tool box and a 1 gal gas can, battery and other stuff on the opposite side.
Heres a pic of the trunk. Tough to get a pic in a black trunk. Add light to see it camera darkens.